27.09.2019
Abstract on the fine arts "Application. Let's decorate the hat" (senior group). Application "Hats of Indians". Master class Lesson on the application of hats
In childhood, many folded, it is in their likeness that a simple hat is folded for repair. But the art of paper folding does not tolerate monotony or flatness. There are a lot of methods for folding paper hats, you should also not forget about the imagery of thinking: you can fold a military cap for children, fold a pirate cocked hat for a boy, make an original hat with brims or a paper cap with a visor for walking - there are many variations for both play and everyday life. Choose any hats folding pattern below and get down to business soon!
Necessary materials
Origami hats are made from any paper at hand. They can be folded from a newspaper or used unnecessary trimming of wallpaper - so unassuming is the origami hat in the material of execution. Take yesterday's Izvestia or plain office paper - it doesn't matter. The decor is much more significant, thanks to which the paper hat will acquire a thematic affiliation (pirate, gentleman's, cowboy). To decorate the headdress, use feathers, any appliqués, drawings and inscriptions, buttons and any other handy details. So a simple paper cap can easily become a pioneer, an army, and even a navy.
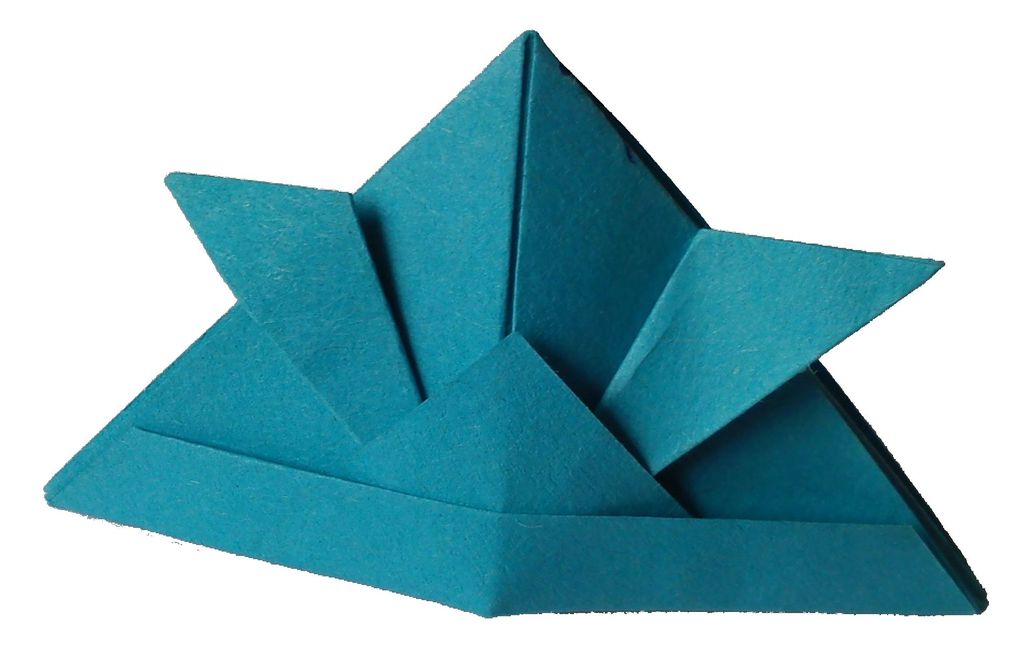
Let's first decide on the purpose of our future paper cap, and then we will immediately start making it. For children, a samurai helmet is perfect for playing the game. It develops surprisingly simple. Our step-by-step instructions will help you make your child happy with a new play attribute in 2 minutes. Let's get started?

- Prepare a sheet of paper in the shape of a regular square (see Fig. 1). Fold the piece of paper diagonally, and turn the resulting triangle into a square, bending the sharp corners to the top;
- Bend the lower corners of the "front" side to the opposite corner, and then again bend the upper corners outward, forming "ears" protruding beyond the boundaries of the workpiece;
- The Japanese paper hat is almost ready. Bend the lower corner of the upper plane up, slightly overlap it on the bends of the workpiece, tuck the bottom again, fixing the shape;
- Turn the hat over to fold up the "extra" corner on the back side, unfold the product - you have learned how to make a hat out of paper with your own hands for your fidget shogun.
By the way, you can also make a complete set.
Homemade garrison cap
Origami cap is a universal thing. Its role binding depends solely on how it will be decorated by you (painted, painted). Let's figure out how to make a paper cap. Look at the picture below - a detailed breakdown of the circuit will tell you about the process in detail. In fig. 2 specially shows how to make a garrison cap from newspaper, since its standard spread sets a sufficient size for a headdress for a middle head. So:

- An origami garrison cap is folded from a rectangular sheet. Fold it in half, and then fold the upper "closed" corners of the convolution inward, bringing them together corner to corner, edge to edge (see fig.);
- Tuck the top "side" up twice, then turn the workpiece over. On both sides, bend the planes towards you, setting the desired size (we make a cap for yourself, a teenager, a small child);
- Tuck the lower edge of the workpiece towards you without overlap on the protruding folds, unfold the edge and bend its corners along the marked line of the new fold;
- Fold the bottom plane up twice, covering all previously made folds. In fact, the paper cap is ready;
- Turning the workpiece over, fold the top of the bundle downward, aligning it with the base of the workpiece. Then tuck this fold over the side of the bundle, straighten the product - you have a pioneer cap in your hands. I managed to make a paper cap with my own hands in just a couple of minutes.
Hat with brim
If you can make a garrison cap in no time, see how to make a paper hat with your own hands (Fig. 3). The task is very simple:

- Make a regular square out of the newspaper, fold it diagonally, then in half and again in half - we outline the bends;
- The future origami hat returns to the stage of the folded square. "Closed" corners are folded inward without joining the folds along the edges (see figure);
- Fresh folds must be opened from the inside and squeezed along the plane of the workpiece. Unfold the product face down and bend the edges towards you along the previously marked fold lines. Bend the "bumpers" on each side towards you.
The spectacular homemade hat is folded at its best! All that remains is to straighten it, push the dome a little and, of course, show the children how to make a paper hat for the upcoming walk in the park.
Paper cap
Figure: 4 shows how to make a hat with a visor out of paper, or, as the people say, an ordinary baseball cap. We'll be making a paper cap with a visor using a standard newspaper spread.

- We bend the "closed" corners inward, bringing the corners and edges together. We turn the lower side out twice (see also how to make a cap-type cap out of paper - a similar scheme);
- On the reverse side, we bend the locking corners, then bend the planes towards us on both sides, focusing on the size of the cap required (universally - orientation to the center);
- We continue to figure out how to make a hat with a visor out of paper. Bend the bottom plane towards you along the edges. From it we bend the double corners inward, they will need to be wrapped inside the workpiece (see Fig.);
- Turning the bundle upside down "face", bend a larger angle to the lower edge and tuck it over the "side". Straighten the hat by tucking the side corners over the sides. Now it's no secret for you how to make a cap out of the spread of yesterday's newspaper.
Do you know how to make a paper hat out of paper for long, of course, game voyages? It will not be a paper hat with a visor, not a cap and not a samurai helmet at all. In fig. 5 shows how a headdress made of paper in the image
Compiled by: Educator - Vakulenko A.N.
Summary of a lesson on applications for the middle group of kindergarten, the topic of the lesson is "Decorate a hat"
Software content:
To systematize the elementary knowledge of preschoolers about hats (berets, caps, hats, caps).
To form the ability to independently choose a color scheme that matches a joyful mood.
Develop color perception, improve fine motor skills of fingers and hands.
Cause a positive response to the results of your creativity.
Material:
Colored cardboard, oilcloths, tassels, scissors, glue, buttons, beads, beads.
Preliminary work:
Observing people "What kind of hats do people wear?"
Conversations on the topics: "Hats", "What do people wear?"
Reading fairy tales "Puss in Boots", "Cinderella", "Little Red Riding Hood".
Consideration of illustrations for fairy tales.
Consideration of fashion magazines, newspapers.
Course of the lesson:
Children go into the playroom and greet (sit on the chairs).
The child holds a letter with a seal in his hands: Listen! Listen! And don't say you haven't heard! Hurry everyone to the ball! Ball! Ball! Ball! And everyone to take a hat!
Educator:
Do you guys want to go to the fabulous hat ball? (Yes, we want) To do this, you need to prepare, pick up what you need for the ball.
Guys, where can we get things for the ball and a hat? (in the store, sew it yourself)
What do people usually wear when they go to a ball? (dresses, suits, shoes, crown, hats)
Let's remember what hats do you know? (cap, hat, bezel, cap, panama, beret cylinder). Let's repeat once again what types of hats we know (cap, hat, beret, panama hat, bezel cap, cap, top hat).
Well done! Guys, tell me and show me how you can wear a hat? (can be worn on the left - no, on the right side - no, on the forehead - no, on the back of the head - no, completely on the head - yes).
You guys are great. And in order for us to go to the ball we need to get into a fabulous workshop. Sit down in your seats.
Educator:
Today we will make a top hat for boys and hats for girls. Let's turn into designers and decorate our hats. Look, guys on your tables are materials for your new hat (beads, beads, buttons).
Hats and top hats are prepared for you, which you must carefully cut and decorate them. Also, different samples have been prepared for you to decorate your hats. In order for us to prepare beautiful hats, we cut out our hats and cylinders from cardboard, then open the glue and fill the glue bowls with glue. Then we take a brush and gently dip it into the glue, then coat the button or beads and glue it. And if you want to start working with beads, then we dip the brush in glue, and then dip this brush into the beads, then carefully glue it with our fingers.
Educator:
Now I see you have done everything and are probably tired. Let's play with you a little.
Physical minute "Let's start to relax!"
One, two, three, four, five,
Let's start resting!
(reach out)
The back was cheerfully straightened,
The handles are pulled up!
One and two, sit down and get up
To rest again.
Bend forward once and twice,
Bend back once and twice.
(we perform the indicated movements)
So we became stronger
(show "strength")
Healthier and more fun!
(smile at each other)
Educator:
Well done, have a seat. (Music sounds, the king enters).
King:
Hello guys!
Children:
Hello!
Educator:
Hello! Please come in, your majesty.
King:
Rumor has reached me that you are going to the ball.
Children:
Yes.
Educator:
Your Majesty, and now our guys will show you what work they have done. (Children are carried to the table next to the king).
King:
You guys are great, your hats are the most original and wonderful, at the ball you will be the most beautiful of all. You dress for the ball, and we will all meet there, I will look forward to waiting for you. But to get to the ball, here's a fabulous stick and it is with it that you will open fabulous doors. Goodbye, guys.
Children:
Bye.
Educator:
Goodbye king.
Summarizing:
Guys, tell me, what did we do in class today?
How did we decorate our hats?
Whose work did you like the most?
Did you like our lesson?
Educator:
Guys, you did a great job creating such original headdresses! And it's time for us to get ready for our ball, let's go to our dressing room to change. (Children get up and say goodbye.) Thank you all!
Galina Farnina
Application
« Indian Hats»
Galina Farnina
Tasks "Arouse interest in creating game attributes. To acquaint-with clothes and indian headdresses... Show how to create headdress of headbands and paper feathers. Improve tape technique applications... Build communication skills of cooperation. Foster curiosity, interest and respect for different cultures.
Preliminary work: Acquaintance with America, a conversation about the indigenous people of America. Consideration headdresses of Indians in children's educational books and encyclopedias.


Kids choose strips of sturdy headband paper, feather paper.

Manufacturing technology:
Let's prepare a strip of strong paper so long that the bezel is held on head.

We cut out a lot of feathers, it is convenient to do this using the symmetrical or ribbon technique applicationsby folding the paper rectangle twice - three times in half or with an accordion.

We cut the feathers with a fringe so that they are fluffy, draw the rods with colored pencils or felt-tip pens.
We spread the feathers on the rim strip and glue them.

Follow-up work: Action and role-playing games in indians using homemade hats.
Related publications:
Didactic lotto "Clothes, hats, shoes" for children from 2 to 7 years old The game consists of 8 large cards and 48 small cards. Play.
Abstract of the GCD for the outside world in the middle group. Cognitive development "Clothes, footwear, hats" Types of children's activities: play, communication, cognitive research. Objectives: to introduce the names of outerwear items.
Abstract of the open lesson "Clothes, shoes and hats" Program content: vocabulary: continue to teach to correctly name the main types of clothing, footwear, hats and their purpose; use.
Memo for educators "Speech games" (on the example of the lexical topic "Clothes, shoes, hats") 1. Game "Name" (or "We walk in the group and call pictures", or "Look and name" (naming items of clothing, shoes, hats.

