09.10.2020
Didactic game "Pyramid" made of felt. DIY children's pyramids and DIY fabric pyramid
If you look into any basket for toys of a baby under one year old, then you will surely come across at least one pyramid. These developmental toys are able to teach a baby a lot - they will develop fine motor skills, give a whole range of tactile sensations, and teach colors.
That's why all mummies wonder how to make a pyramid do it yourself. And note that making this educational toy for toddlers is a snap.
So, how to make a pyramid made of fabric that recognizes colors. First, you need to redraw on a paper sheet the patterns for open rings of various diameters, and then transfer them to the wrong side of the selected natural fabric.

To cut out one ring of the pyramid, it is necessary to take two fabric rectangles, fold them inward "face", and then transfer the contours of the segment to the fabric. For convenience, first connect the parts with a basting stitch. Then, along the contour of the figure, you can lay a machine line, not forgetting to leave a small hole.
After the details have been sewn, the open ring can be cut out. Using a stick with a blunt end, turn the ring out onto the front side. Now fill the ring with cotton wool, synthetic winterizer or synthetic fluff, and then carefully sew the hole through which you stuffed the ring.
In the same way, make four more rings of different colors and diameters.

Make the base for the pyramid from waste materials - handles without a core and corrugated cardboard, cover the finished base with the same natural fabric. So a wonderful educational toy for your child is ready!
Fleece caterpillarI saw a photograph of a caterpillar toy in a Japanese craft magazine. She looked so bright and positive that I could not resist and went to the store for fleece. I really wanted to sew such a caterpillar for the son of my close friend!
If you like this cute, benevolent creature, I will tell you in detail about all the stages of its creation.
First of all, I cut out a pattern of the caterpillar head (the final segment of the body is sewn according to the same pattern) and stitched the darts.

Then I decided on the height of the horns, cut them out of the fabric, twisted and stuffed with padding polyester.

With pins she fixed the horns on the front side of the head fabric and sewed two segments of the back of the head along the contour of the pattern.

As an eyelet to which the torso will be fastened, I used a rep tape. Subsequently, a fastener will be attached to the loop, so it is very important that the material chosen for it is strong and does not stretch. He will be exposed to heavy loads. The loop should be sewn into the center of the turning hole. The size of the loop is arbitrary, it is chosen empirically.
This is what the track head looks like.

And this is the final segment of the trunk.

I decided that it would be more convenient if the segments of the body of the caterpillar would be worn on a wide elastic band. The elastic stretches well and shrinks. The squeeze effect will do a good job of keeping the track body rings together. The fleece fleece surface will prevent the rings from sliding, and the elastic will firmly press the segments together and prevent them from falling apart in different directions. The body will look one and complete.
To make it pleasant for the kid to hold the elastic in his hands, I sheathed it with fleece. As an attachment, it was decided to stop at the buttons. They are quite durable and reliable. In addition, it is more convenient and faster for a child to fasten buttons than buttons or hooks.

To keep the caterpillar's facial expression constantly changing, I decided to opt for plastic eyes with shifting pupils. The eyes are glued, and the blush and mouth are securely sewn on.

In the process of sewing ring segments, I encountered unexpected difficulties that I had to overcome empirically. The challenge was to keep the segment round even after padding, despite the fleece's ability to stretch in different directions. And also avoid unnecessary seams, which also tighten the fleece. Having tried several options, I settled on the following.
Prepare in advance the legs of the caterpillar in the same color as the ring to which they will be sewn. Decide in which direction the fleece is stretching. It is very important to make all the patterns of the rings in such a way as to keep the direction of pulling the material the same, otherwise the finished rings will skew in different directions.
Cut one ring out of the fabric with a hole in the center (just like on the pattern). Place the feet on the right side of the fabric. After trying several different options, I determined that the best leg spacing was 12 cm and kept it on all rings. Secure the pins to the fabric with pins. Cut out the second ring, but without the center hole. Place the pattern face down on the first circle with the paws. Sew both circles completely along the outside outside contour.

Turn the workpiece out through the center hole.

Using a fabric marker, trace the outline of the center hole on the second circle and cut it out.

Mark with pins the section through which you will fill the workpiece and sew the outline of the inner circle with a blind seam.

Fill the workpiece tightly with filler and sew up the remaining hole.


Prepare several rings of different colors.

It seemed to me that for a given track size (given the slight compression of the rings with the rubber band), 8 rings would be most suitable.

It remains to assemble the caterpillar. One end of the elastic is attached to the end segment. All subsequent rings are put on it in no particular order.

There are no bells in the paws. I think padding made of padding polyester would drown out their chimes. But thinking about the bells, I suddenly thought that I could fill the paws with something like granules, buckwheat or other cereals. Kids love to feel everything. Let's fasten the head and you can start the game!

Thanks to the loose segments, the body of the caterpillar can wriggle.

This cute creature will become not just a kind and soft toy for your kid. With a caterpillar, it's fun to recognize colors, determine their sequence, change the order of multi-colored rings. You can try to count them, learn the body parts of the caterpillar, and come up with many other fun games.


If you like the caterpillar as much as I do, I suggest you a pattern that I borrowed from a Japanese magazine and modified a little to get smoother and more round rings.

The caterpillar recently met its new owner. His name is Syoma, he is a year and a half. Syoma gave the caterpillar a real test of strength and showed us how you can still use a new stuffed toy to play.
It's very cool to pull the horns in different directions! (Thoroughly sew the attachment points of the legs and horns, children love to pull on everything they can).

It's great to crawl in company with a caterpillar!

It also makes a very soft pillow! You can lie on the floor, sing songs or dream!

Did you know that track rings are a lot of fun to put on your wrists? They are so soft, warm! The most real colored bracelets!

What if you try to put them on your feet? It's so great to swing your legs and pull on the little legs!

And running with bracelets on your feet is even more fun!

But what if you put one segment on the floor, lie down on it with your head and roll on the floor, pushing off with your feet? They did not expect? Fun!!!

That's how much pleasure one caterpillar can give a child! And they just met! What will happen when Syoma and the caterpillar become friends for real?
I hope they will still delight each other with new discoveries and achievements!
If the mother has a desire on maternity leave, then there is usually little time to sew educational toys.
We all want it to be quick and easy, but at the same time bright and interesting, and even preferably from scrap materials.
These criteria are met by a soft pyramid, which will not be difficult to sew with your own hands.
At the same time, its own pyramid compares favorably with the purchased one - it is more interesting and useful for a child.
First, it is soft and pleasant to the touch. Each piece can be made from materials of different textures to develop tactile perception. And you can fill it with different fillers for the same purpose.
Secondly, it will be bright, safe, and you can also add developing elements to it. The Velcro felt pyramid is used in the early childhood development system of Maria Montessori. And of course, such a thing is much more sincere, children feel it subtly.
If it seems to you that it turns out imperfect, ugly, crooked, then this does not mean anything to the child. This will not make the toy less interesting and useful for him. And the most "ugly" toys made by your hands, he can love more than anyone else.
We suggest you make two versions of the pyramid with your own hands - a soft felt pyramid with Velcro and a pyramid of soft rings. Let's start with felt, as it is easier to manufacture, while it is very useful for the development of the baby.
Velcro pyramid
Traditionally, it is made of felt of different colors, but you can take fleece and other dense material, just different flaps of different textures. You will also need Velcro - a tape 2 cm wide and about 10 cm long. Filling - synthetic winterizer, holofiber or polystyrene balls (“antistress”).
Cut the fabric into equal squares with a width of 4, 5, 6, 7, 8 and 9 cm. Cut the Velcro tape into pieces 2 cm long.A piece of Velcro should be sewn to each square so that the parts are then fastened together. That is, for example, so that at the bottom of each part there is a soft part of the Velcro, and at the top - a hard sticky one.
Now sew two squares into the part, leaving a hole for stuffing, fill with filler and sew the hole. The lower part can be stuffed with buckwheat so that our pyramid stands well.
Here's what you get:
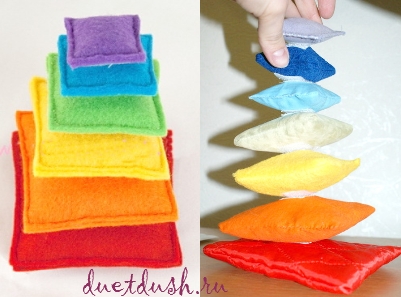 The squares can be alternated in this order, then it will be easier for the child to collect, focusing on the color:
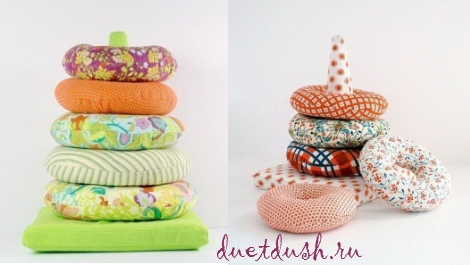
 Pyramid with rings
Here you can show your imagination, and make the rod straight (which is much easier, since the size of the hole for the rings will be the same for everyone), and in the form of a cone. For the manufacture of the rod, you can use materials at hand and cardboard, and then sheathe it with a cloth or paste over it with colored paper.
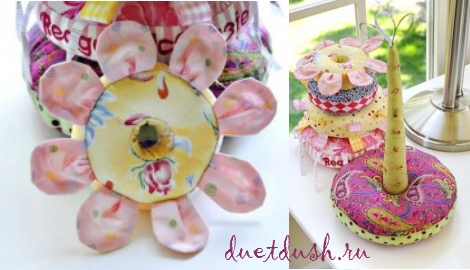
Cut two pieces from each ring material. Sew them together, leaving a hole for stuffing, turn out and fill with filler, then sew the hole with a blind seam. If you wish, then add developmental elements - ribbons, buttons, petals (see photo below).
The base can also be filled with buckwheat. Or, as in the photo, make a square base, covering it with fabric.
This is how you can get a pyramid with your own hands:
 This is how you can make ribbon-loops on the rings:

And even such beautiful petals:
 We hope we managed to inspire you to sew a soft pyramid with your own hands for your kid! May this bring him a lot of joy and benefit!
OPTION # 1
Such a toy will help in studying the colors of the spectrum, large - small, counting, promotes the development of fine motor skills. To make a pyramid, you will need: sheets of felt 2-3 mm thick or fleece flaps of different colors; Velcro tape 2 cm wide - 10 cm segment; synthetic winterizer or holofiber for stuffing; threads in color; ruler; scissors; chalk or fabric marker; pins.
Open the pyramids:
From each color of felt, you need to cut 2 identical squares with a side length of 4, 5, 6.7, 8, 9 cm.Cut the Velcro tape into 2x2 cm squares.
Sew a piece of Velcro with hooks in the center of the red square, sew the other half of the Velcro with loops into the center of the purple square. Sew pieces of Velcro on all other parts in pairs. It is advisable to sew the soft part of the Velcro on all the upper parts of the squares, and the hard part of the Velcro on all the lower parts of the squares.
Fold squares of felt of the same color with Velcro outside and sew with a straight stitch, 2 mm back from the edge, leaving an unsewn area for stuffing with padding polyester.
Fill the blank with padding polyester through the open area in the seam and sew up the hole in the resulting pad.
The largest pillow can be filled (in the photo it is red) with peas or cereals - for greater stability of the finished toy.
Sew all 6 pads in the same way and connect them with Velcro.
The pyramid is ready, you can play!
These are 9 figures - 3 circles, 3 squares and 3 triangles, sewn from fabrics of 3 basic colors of the spectrum. All parts can be sorted and assembled into 3 pyramids according to different criteria:
- In shape - square, triangular and round (and each pyramid contains all 3 colors),
- By color - yellow, blue and red (each pyramid contains all 3 forms of geometric shapes),
- By size - large, medium, small (in each pyramid there are 3 shapes of geometric shapes of different colors).


1square - there is a zippered pocket for storing removable figurines, and a pocket in which a ladybug is hiding.
2 square - removable felt parts, fastened with buttons of different colors. It is necessary to choose a button for each figure by color.
3 square - a rattle.
4 square - filler (rustles)
5 square - a flower on a button
This multi-colored pyramid will be a good helper in the study of colors. The pyramid pads rustle, are connected to each other by buttons.
OPTION # 2


Made of fleece, stuffed with padding polyester, the bottom ring rustles, inside there is a parallon for shape, the bottom ring is stuck to the stick. In the stick is a synthetic winterizer and 2 plastic sticks from the flag for the form. In the upper cap there is a synthetic winterizer and a bag with beads, a bell is sewn, sewn with decorative stitching. The cap is attached to the pyramid with a magnet. Height 35 cm
The pyramid consists of a base and 6 rings made of materials of different textures. The head of a chicken is worn on top. The height is 26 cm, the diameter of the lower ring is 16 cm. The rings can be used as teethers, each has either beads or ribbons.
author Xenia
If the mother has a desire on maternity leave, then there is usually little time to sew educational toys.
We all want it to be quick and easy, but at the same time bright and interesting, and even preferably from scrap materials.
These criteria are met by a soft pyramid, which will not be difficult to sew with your own hands.
At the same time, its own pyramid compares favorably with the purchased one - it is more interesting and useful for a child.
First, it is soft and pleasant to the touch. Each piece can be made from materials of different textures to develop tactile perception. And you can fill it with different fillers for the same purpose.
Secondly, it will be bright, safe, and you can also add developing elements to it. The Velcro felt pyramid is used in the early childhood development system of Maria Montessori. And of course, such a thing is much more sincere, children feel it subtly.
If it seems to you that it turns out imperfect, ugly, crooked, then this does not mean anything to the child. This will not make the toy less interesting and useful for him. And the most "ugly" toys made by your hands, he can love more than anyone else.
We suggest you make two versions of the pyramid with your own hands - a soft felt pyramid with Velcro and a pyramid made of soft rings. Let's start with felt, as it is easier to manufacture, while it is very useful for the development of the baby.
Velcro pyramid
Traditionally, it is made of felt of different colors, but you can take fleece and other dense material, just different flaps of different textures. You will also need Velcro - a tape 2 cm wide and about 10 cm long. Filling - synthetic winterizer, holofiber, or polystyrene balls ("antistress").
Cut the fabric into equal squares with a width of 4, 5, 6, 7, 8 and 9 cm. Cut the Velcro tape into pieces 2 cm long.A piece of Velcro should be sewn to each square so that the parts are then fastened together. That is, for example, P so that at the bottom of each part there is a soft part of the Velcro, and at the top - a hard sticky part.
Now sew P two squares into the part, leaving a hole for stuffing, fill with filler and sew the hole. The lower part can be stuffed with buckwheat so that our pyramid stands well.
Here's what you get:
The squares can be alternated in this order, then it will be easier for the child to collect, focusing on the color:

Pyramid with rings
Here you can show your imagination, and make the rod straight (which is much easier, since the size of the hole for the rings will be the same for everyone), and in the form of a cone. For the manufacture of the rod, you can use materials at hand and cardboard, and then sheathe it with a cloth or paste over it with colored paper.
Cut two pieces from each ring material. Sew them together, leaving a hole for stuffing, turn out and fill with filler, then sew the hole with a blind stitch. If you wish, then add developmental elements - ribbons, buttons, petals (see photo below).
The base can also be filled with buckwheat. Or, as in the photo, make a square base, covering it with fabric.
This is how you can get a pyramid with your own hands:
 This is how you can make ribbon-loops on the rings:
And even such beautiful petals:
 We hope we managed to inspire you to sew a soft pyramid with your own hands for your baby! May this bring him a lot of joy and benefit!

