28.11.2020
How to crochet a crown for a girl at a matinee: diagram and description. Types of crocheted crowns for a snowflake costume: photo. Crochet crown. Crochet hook and threads for the crown Knitting kokoshnik Russian crochet scheme
They ordered me a kokoshnik for a New Year's party.
(by photo from the Internet)
I knit ... In principle, I don't bother anyone ... But, should I try it on for someone? It is necessary! The lesser beloved is jumping next to you! We measured it! The young ones fooled that they say that mom knits for someone, but what about her beloved daughter without a kokoshnik? Not a princess, or what? -Mommy! Beloved! My princess !! ... Well, if my mother is a queen, my daughter is a princess in any way ... And the matinee is already in the morning of the next day !!! I grabbed the yarn and ran to knit and decorate ...

And you also need to starch them ... I decided to try PVA glue (because starch will not hold such a structure ... It's too heavy, and the starch is not the same now)
Here are handsome men on the "stretch" !! And here is the photo on the happy owners: Blue-order, white-my star!

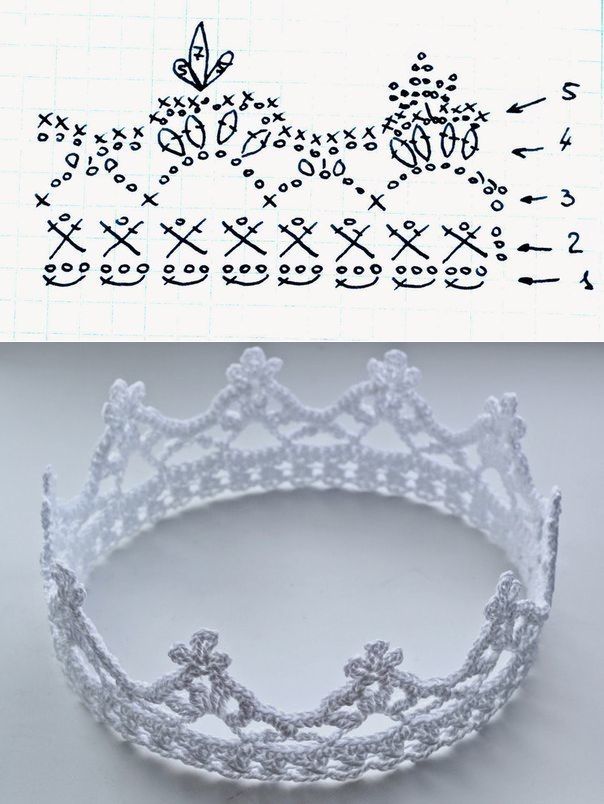
Well, if someone needs it, here is the source from the Internet: headrest diagram:

Diagram of the kokoshnik itself:

Description: we knit a comb of a kokoshnik, typing a chain of 97 air loops. (6 rapports)
Next, according to the scheme, along the lower edge of the ridge, we knit a head mesh.
The kokoshnik is ready, it remains to shape and decorate.
To do this, it is necessary to moisten the workpiece and give the shape of a kokoshnik,
fix on a waterproof surface with tailor's needles.
leave the forehead mesh without glue),
decorate with sequins and leave to dry completely.
Sew a satin ribbon to the finished kokoshnik along the rim line.
In order to better fix it on the head, I took the headbands and tied it with threads to match, and then crocheted it to the base of the kokoshnik. And finally, I congratulate everyone on the upcoming New 2018!

And let your hands do not know boredom and your hearts do not get tired of love! I wish you great, immeasurable happiness ... And, of course, health !!!
The peculiarity of the cap shown in the photographs is that, having started to knit it from the bows at the crown and ending with ribbons, you will not have to break the thread anywhere.

According to our description, you can knit exactly the same hat.If you fantasize a bit, then the top of the hat can be designed in the form of "leaves".
The hat is knitted from thick yarn on two needles, the seam is at the back.
Crochet on a needle 40 stitches, leaving the beginning of the thread about 15 centimeters long. Or simply tie a chain of air loops and put on a knitting needle: a loop from a hook, backs of air loops and a knot (Fig. 1). Close these loops with a "pigtail": insert the hook into the last loop, then into the penultimate one, grab the thread and pull the loop (Fig. 2). In the same way, knit the remaining loops from the knitting needles and the eyelet of the knot (Fig. 3). A similar cord can be knitted without a knitting needle by crocheting a chain of air loops and knitting half-columns along it.


Put 6 loops on the knitting needle, evenly picking them up from the cord (Fig. 4). You will get zigzags, which will become an ornament on the top of the hat. Without removing the loops from the needles, pull the beginning of the thread through them using a crochet or needle. When the hat is tied, you will use the same thread to pull off the initial loops.


1st row: front loops (do not let the loops run far, overcome the resistance of the cord). Remove the first edge loop hereinafter, as usual. Make sure the edge loops form neat "pigtails".
2nd row: 1 hem, * 1 purl from the thread broach, 1 front from the loop *, from * to * repeat, the tenth (penultimate) loop will be the purl of the broach, the eleventh - the hem. Try not to pierce the starting thread with a knitting needle, it is necessary that it moves freely and can tighten the loops.
3rd row: 1 edge, * from the front knit 3 loops (front, yarn, front), 1 purl *, from * to * repeat, 1 edge. There are 21 loops on the needle.
4th row: 1 hem, * remove the purl loop without knitting (thread in front of the loop), 1 front *, from * to * repeat, 1 hem.
5th and other facial rows: elastic 1 x 1 (alternation of 1 knit and 1 purl). In five places at regular intervals, knit 3 loops from one front: front, yarn, front. Do additions, for example, in the 2nd, 6th, 10th, 14th, 18th loops. There will be 31 stitches at the end of the row. Thus, in each front row, 10 loops are added, while each time the gap between the increments increases by 2 loops (in the 7th row, the increases fall on the 2, 8, 14, 20, 26th loops, in the 9th row - on the 2nd, 10th, 18th, 26th, 34th loops, etc.).
6th and other purl rows: elastic band 1x1, while remove the purl loops without knitting (thread in front of the loop), knit the front loops.
 When there are 111 stitches on the needle, continue to knit without adding 8 centimeters. Then transfer all loops to the ring needles and connect both edges with a vertical seam loop into loop (see "Science and Life" No. 8, 2000, p. 108), starting from the crown. At the end, swap the edge loops. Turn the zigzags on the right side of the cord. Pull the loops at the crown of the head with the beginning of the thread, secure it and mask it, stretching it along the wrong side through several rows.
Divide all stitches into three parts (111: 3 \u003d 37). Knit the right eyelet on the first 37 loops from the seam in the same pattern, decreasing along the edges 2 loops in each front row. To do this, remove the first knitting stitch after the hem on the right knitting needle, swap the following purl and knitting stitches, put the first knit stitch on the left knitting needle again and knit 2 knit stitches together with the knit stitch, 2 knit stitches together with the wrong knitting needle. Decrease the loops on the left side accordingly. (Decreasing 2 loops from each edge is quite sharp, try not to pull the edges of the ear.)
When 9 stitches remain on the knitting needle, move 2 middle front loops behind the purl in the front row and knit: 1 hem, 2 front loops together, 3 purl stitches together, purl 2 together, 1 hem. In the purl row, knit the front ones, remove the purls without knitting (thread in front of the loop). Knit the remaining 5 loops as follows: 1 hem, 3 knit loops together, 1 hem. Now crochet one out of 3 loops. Without removing the hook from the loop, cast on 40-50 loops on the needle (Fig. 1), close them with a "pigtail" using the hook (Fig. 2, 3). You will get a ribbon for tying a hat. When you have closed the last stitch from the knitting needle, insert the crochet under the nearest eyelet stitch towards the visor, grab the thread and pull the buttonhole. Continue crocheting half-stitches along the edge loops to the open loops of the visor (fig. 5), being careful not to pull the edge together. Pass the first loop of the visor through the loop on the hook.
Put 37 loops of the visor on the knitting needle and knit 31 loops in the same pattern, without tying 6 loops (37 - 6 \u003d 31). Work 25 stitches back (31 - 6 \u003d 25). In the next row - 19 (25 - 6 \u003d 19), in the opposite direction - 13 loops. Twist the knit again and knit all the loops to the end. Close 37 stitches of pigtail visor. It is better to crochet it (fig. 2, 3). At the same time, insert the hook into the front loop - from the face, and into the purl - from the wrong side, moving the thread forward. Turn the knitting and knit along this "pigtail" half-columns, grabbing the loops of the previous row for both walls. Place the loop from the hook on the first loop of the left ear.
On the remaining 37 sts, knit the second eyelet in the same way as the first.
When you finish the ribbon, knit half-columns along the edge to the visor, break off the thread, fasten it and hide it.
You can complement the New Year's image of your child with a do-it-yourself crown. For this, crochet patterns and photos of finished products will come in handy.
The crown is one of the important snowflake image elements for a child on a New Year's holiday. She is not only decorates the girl, but also adds elegance to her... Every needlewoman can make such a crown using simple crochet.
Usually snowflakes knit from white yarn, then starch to "keep their shape." After that, a small amount of snowflakes (from three to five) should be glued on hoop - the basis of the crown... In some cases, you can decorate the resulting crown with others decorative elements: beads, sequins, ribbons, sequins.
IMPORTANT: Crochet a beautiful snowflake with a diagram detailing the number and type of loops.
Patterns for knitting snowflakes:
Beautiful crochet snowflake, description and detailed diagram 
 Lace snowflake
  Round snowflake
  Three types of snowflakes
  Fancy snowflakes, snowflakes hexagons
  Small thin snowflake
 Beautiful snowflake
IMPORTANT: The base for the crown, that is, the hoop, can be bought in any craft store. Everyone to buy by preference can choose a hoop on a plastic or metal base. If you want to make it yourself, then you should use thick wire and tape with which you wrap it.
Crochet snowflake crown for girls: scheme, pattern, description
A snowflake crown can be created not only with small snowflakes, but also as one-piece product... For this one should combine several patterns and to get motif... It is also advisable to starch the finished product or sprinkle generously with hairspray so that it keeps its shape.
INTERESTING: You can use glitter hairspray, this will add elegance to the crown.
 Knitting patterns for lace crown "snowflakes"
 Each carnival costume is individual, has a variety of decor elements, designs, colors and decorations. That is why some suits may suit huge lace kokoshnikwhile others modest diadem... You need to go through each crochet crown pattern and choose the right one.
IMPORTANT: If the finished product does not hold well on the head, it can be secured with invisibility and hairpins.
Crochet crown patterns:

 Beautiful crown diadem crochet
 Classic crown
  High crown
 Beautiful crochet crown for a suit, a description and a detailed scheme of work
  Scheme for creating a large crown
 Beautiful lace crown for snowflake
 Types of crochet knitted crowns for a snowflake costume: photo
Ideas of creation christmas snowflake costume - many and each is somewhat different from the previous one. To get a "portion of inspiration" to create the most beautiful outfit and jewelry will help your child photo of finished products.
With rubber glue, sequins and rhinestones can be attached to the knitted crown, which will make your piece shimmer and sparkle. If you wish, you can embroider the crown with beads or make pendants out of beads.
Snowflake crown:

 Crochet snowflake crown decorated with pearl beads
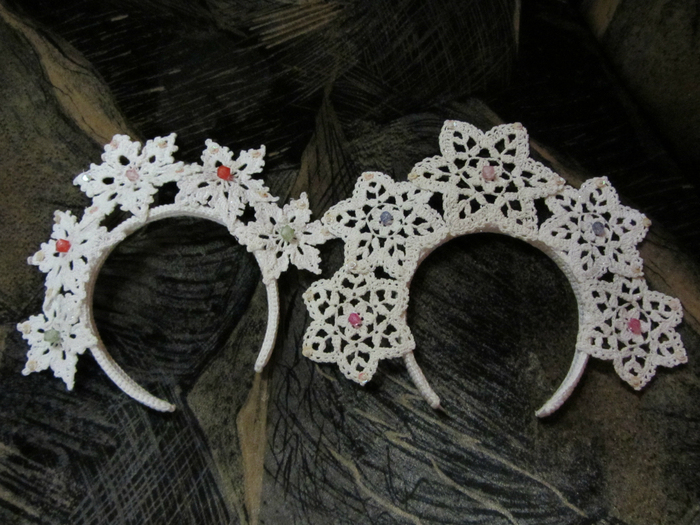
 Crown made of a plastic hoop and five knitted snowflakes
  Crown made of plastic hoop, large and small snowflakes
 Snowflake crown, kokoshnik
 Snowflake crown embroidered with sequins
 Classic crown in snowflake costume
 Crown embroidered with beads and beads
 Crown of silver thread
 Crochet crown of five snowflakes
 Snowflake crowns embroidered with bright beads
 Video: "Crochet crown"

