10.07.2019
How to make a big paper snowflake with your own hands. A shiny volumetric snowflake is ready! Puff snowflakes made of cardboard
The way to create a snowflake, given below, will appeal to the smallest children, because they love to fold paper with an accordion. There is nothing difficult in such work, but in a fairly short time it is possible to get a whole snowfall of voluminous multi-colored snowflakes. Check out an example we made, then vary the size, colors, and decoration of the snowflakes to keep both you and the kids entertained. Good luck!
1. Do not be afraid to choose bright colors to create snowflakes, because you can get real fabulous crafts with your own hands. Snowflakes do not have to be white or blue. We suggest using a juicy yellow color. You will also need scissors and a stapler or glue for work.
2. Cut out two exactly the same squares from the selected paper.

3. Begin to fold the accordion along one side of the square, each strip should be completely identical to the previous one.

4. Collect a thin harmonica from one square.

5. Then make exactly the same detail from the second square.

6. The ends of the two parts can be cut with a house or corner to make the finished product look more impressive.

7. Find the middle in each strip and fix it with a stapler.

8. Fasten both fan blanks in the center with a stapler or glue.

9. Fluff the four ends of the accordion and fasten them together one by one to get a round snowflake.

10. Sew a bead or button into the middle. And on the other hand, you can also attach a button, then the voluminous snowflake will turn out to be two-sided.

The final look of the craft.
This is how you can get a great winter decoration. On the basis of such a snowflake, you can even make garlands by fastening many similar products with threads or a stapler to each other.
Perfectly convey the winter fairy-tale atmosphere of snowflakes. To make them look spectacular, make them voluminous. In this article we will look at: how to make voluminous paper snowflakes with your own hands.
You will need: shiny cardboard in blue and purple, stationery knife, glue gun, ruler, pencil, toothpick.

Master Class

A shiny volumetric snowflake is ready!
exquisite snowflake

You will need: 6 blue square sheets, 6 white square sheets, blue paper circle, pva glue, rhinestone.
Master Class

Exquisite voluminous paper snowflake is ready! I recommend watching this video!
beautiful snowflake

You will need: 2 square sheets of blue paper, scissors, glue stick, pencil, rhinestone.
Master Class

A beautiful voluminous paper snowflake is ready! I recommend watching this video!
3D snowflake with Christmas trees

You will need: 6 green sheets 8x8 cm in size, scissors, a simple pencil, glue stick, rhinestone.
Master Class

original snowflake

You will need: 2 sheets of yellow A4 paper, scissors, a simple pencil, white thread, glue stick.
Master Class

The original voluminous paper snowflake is ready! I recommend watching this video!
Volumetric snowflake

You will need: white and blue paper, scissors, ruler, glue stick, decoration elements - sequins, beads, flowers ...
Master Class


You will need: 2 sheets of colored paper, scissors, glue stick.
Master Class

Volumetric snowflake from components
You will need: 6 square sheets of paper, scissors, glue.
Master Class
- Take a piece of paper and fold it diagonally, then in half.
- Make 3 cuts and unfold the workpiece.
- Glue the ends of the smallest strips, then glue the others through one strip on each side.
- Connect the remaining strips on the other side in the same way.
- Repeat this process with the rest of the sheets, then assemble the snowflake by gluing 6 blanks together.

You will need: paper. scissors, ruler, glue.
Master Class

The paper strip snowflake is ready!I recommend watching this video!

You will need: sheets of paper, circle template, glue, pencil, thread, needle, ruler.
Master Class
- Cut out 8 identical circles from paper.
- Divide the circle into 8 equal parts and make cuts.
- Twist each part of the circle into a cone using a pencil, fixing with glue.
- Repeat this process with the rest of the blanks.
- String the blanks on a thread with a needle, fasten and form a ball.

Modular origami is considered more difficult than ordinary origami. Fold the first module according to the photo scheme, make a huge number of them and start assembling according to the photo master class. Creating such a masterpiece requires a lot of time and patience. There are also huge advantages - you develop fine motor skills of your hands and will be able to surprise others with such a chic snowflake.

Master Class
- Start assembly from the middle by forming the center of 12 modules.
- Insert the edges of the module into the pocket of the other modules.
- Attach the modules in a checkerboard pattern from one edge, a chain of two fastened rows should form - the outer row of 6 modules, and the outer 5.
- Unscrew the remaining module and connect the ends of the chain with it, forming a ring.
- Increase the length of the beams by attaching modules.
- Add a module of a different color to each beam and continue building with the main one.
- Add modules until the snowflake is the desired size.


Snowflake in the technique of modular origami is ready! I recommend watching this video!
Snowflakes are always pleasing to the eye and uplifting. Make the best, original volumetric snowflakes and present them as a gift. Then your loved ones will feel a fairy tale at home, remembering you.
Master class with step by step photos.
Master class "3D snowflakes".
Material Description: This material is designed for children of preschool, school age, teachers and parents.
Purpose: making decor with your own hands to decorate a group, class, apartment.
Target: creating a 3D paper accordion snowflake
Tasks:
- Learn how to fold paper. Make an accordion, consolidate the ability to use scissors.
- develop children's creative abilities, attention, imagination and fantasy;
- develop fine motor skills of hands, eye;
- cultivate perseverance, accuracy, interest in working with paper.
We are snowflakes, we are fluffs,
We are not averse to spinning.
We are snowflakes - ballerinas,
We dance day and night.
Let's stand together in a circle -
It turns out snow.
We whitewashed the trees
Roofs covered with fluff.
The earth was covered with velvet
And saved from the cold.
Lesna-Raunio M.
The beauty of winter is in its purity, so I like to use white paper for winter crafts. This gives a feeling of snowy expanses, frosty air, a winter fairy tale. These are the snowflakes - I offer ballerinas to decorate the interior. They are made in the technique of paper "accordion" or corrugated paper.
Corrugation is a very simple, familiar and accessible to everyone since childhood way of folding paper, fraught with great opportunities. Making crafts using corrugated paper is available even to preschoolers. Corrugation of paper consists in bending the sheet alternately back and forth. The result is an "accordion" from which you can make various crafts.
We will need the following materials and tools:
Sheets of white paper
Scissors
simple pencil
Glue
Ruler
White threads
Let's get to work.
Prepared everything necessary.

We take a sheet of paper. We mark on the long sides segments 2 centimeters long.

We fold the "accordion". Bending the sheet alternately back and forth.

We take the second sheet and do the same. For one snowflake, you need two identical blanks.

Fold the workpiece in half, outlining the middle.

We fix the part in the center with a thread.

We outline the pattern with a pencil. Experienced craftsmen will make cutouts without basting.

Cut out.


We glue each part in the form of a fan.


Then we glue both blanks together.

We connect in a circle.

The snowflake is ready.


There are many pattern options. It all depends on your imagination.


Everyone carved snowflakes as children. Do-it-yourself voluminous paper snowflakes are not much more difficult to make, but they look much more spectacular. Volumetric snowflakes are not only glued to windows. They are hung like New Year's garlands around the room. These unusual snowflakes look original and harmonious on the Christmas tree among other toys. You can also give them to friends as Christmas gifts.
Everyone knows about that, from paper. A three-dimensional snowflake is cut out according to the same principle, but then, as a result of some manipulations, real miracles happen with an ordinary sheet of paper.
Snowflake #1
For a bulk snowflake you will need:
- white or colored paper;
- glue;
- scissors;
- stapler.
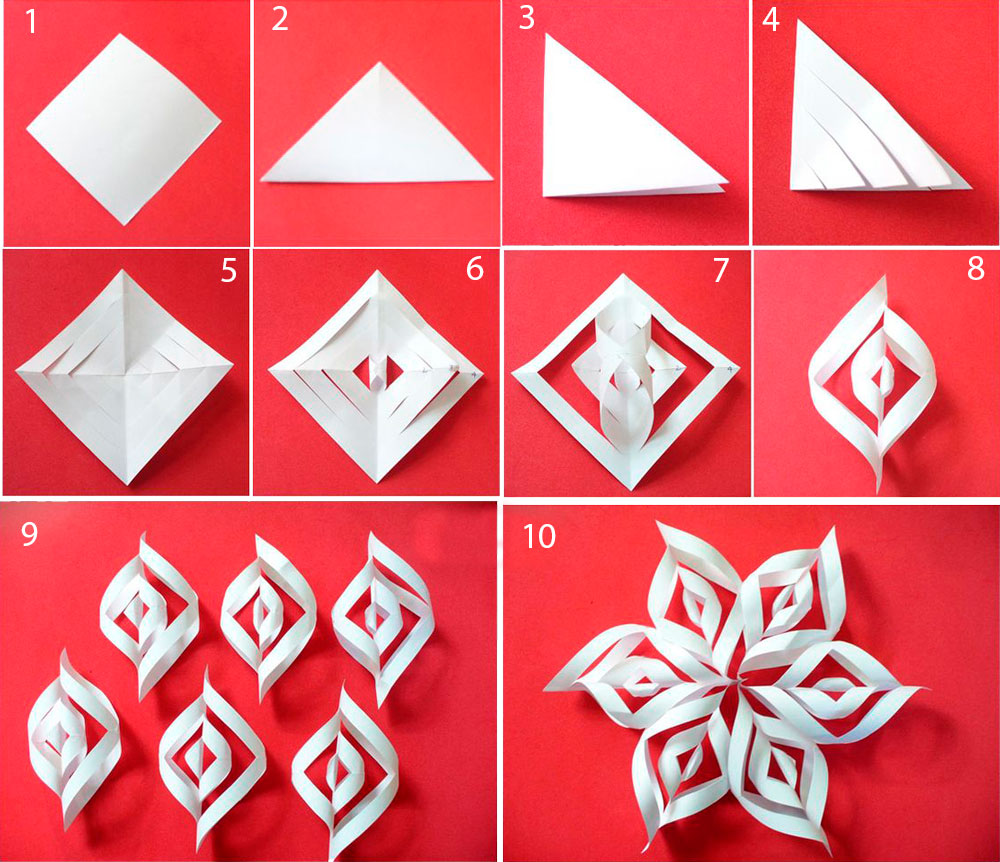
1. Prepare 6 square sheets of paper. Fold them into triangles and make cuts, as in the photo. Do not cut the corners of the cuts to the end, they must be fastened together. 
2. Expand the square - you should get such a snowflake blank (photo below). 
3. Roll the first row of strips into a tube and fasten with glue or a stapler. 
4. Turn the workpiece over and fasten the second row in the same way. 
5. Thus, turning the workpiece alternately, fasten all rows of strips. 
6. Do the same with the remaining five squares.
7. Do-it-yourself crafts, first connect three blanks with a stapler. 
8. Then fasten both triplets together. 
9. In those places where each of the six parts of the workpiece is in contact with neighboring parts, you must also fasten the strips with glue or a stapler so that unusual snowflakes keep their shape. 
And you can make multi-colored paper snowflakes with your own hands by fastening multi-colored blanks into one snowflake. 
Snowflake #2
Doing crafts with your own hands, you can always add something of your own, which will make the product only benefit. A variant of the previous snowflake is a three-dimensional wavy snowflake.
1. It is carried out in the same way as the previous one, but with a small change in step 1. Having folded the square into a triangle, make the cuts not even, but wavy. The principle of how to cut voluminous wavy snowflakes remains the same, but it is better to use rounded, manicure scissors.

2. All lines are not cut to the end, and the top, shortest, is cut off completely.

3. Having expanded the square, it is better to number it so as not to confuse the rows of stripes.

4. We connect the rows, as in the previous snowflake, alternately on one side or the other.
5. Having made blanks from all the squares, we connect them with their sides.

6. Now we fasten all the blanks at the bottom.

It turned out very neat!

Snowflake #3
 This snowflake is for the "pros" who have mastered the first two snowflakes and are ready to make more original snowflakes for themselves and their friends.
For such a snowflake you will need:
- 2 paper sheets A4 or A5;
- glue;
- scissors.
1. We fold the sheets into triangles diagonally, cut them off and get perfect squares. 
2. Fold the triangles diagonally again. 
3. Cut out the petals. 
4. We make 2 cuts on the petals, not reaching the fold. 
5. It turned out such a snowflake blank (photo below). 
6. Glue the middle rows of strips to the middle. 
7. Do this with all the petals. 
8. We do the same with the second blank.
9. We glue the blanks together with the back sides crosswise. Snowflake is ready! 
Snowflake #4
Such unusual “accordion” snowflakes are very easy to make, and they look luxurious.
New Year is the most favorite holiday for most people. They begin to prepare for it in a few more weeks, or even months. Often on the eve of the holiday, apartments, offices, schools and kindergartens are decorated with various New Year's figurines. Among them, the most beautiful and interesting are do-it-yourself voluminous snowflakes made of paper. They are hung under the ceiling or in the window opening. It adds a festive atmosphere to the room and uplifts the mood. Due to their large size, they are often used in a single copy. Additionally, snowflakes are decorated with bright and shiny materials.
Making a paper snowflake
Before making a big paper snowflake, you need to choose the right materials. The appearance of the future snowflake will depend on this. To make a large volumetric snowflake, we need the following materials and tools:
- white paper. You can use a different color if you want to make a custom craft;
- scissors;
- glue;
- ruler;
- simple pencil;
- stationery stapler.
An example of that what can be made from paper and a stapler:

Volumetric craft round shape
Making a three-dimensional snowflake is a rather laborious process that will take a lot of time. If you don’t have it, but you want to decorate your house with an original product, then you can choose easier way to make a snowflake. It will have a round shape and will perfectly complement your interior. To create it, you need the following materials and tools:
- a sheet of white thick paper;
- compass;
- needle and thread;
- Ruler and pencil;
- colored fabric (preferably red or yellow).

Origami and kirigami technique
Not everyone knows that using the origami technique, you can simply and quickly make a beautiful snowflake.

Kirigami is a slightly more complex type of technique. It assumes sequential folding of the sheet and precise cutting of the pattern. It is better for beginners to draw a future pattern, and then start cutting it out. The easiest way to do this is with nail scissors. They are small and thin, which will allow you to cut out the pattern as accurately as possible. If you successfully coped with this, then feel free to bend the extra parts and enjoy the beauty of the snowflake.
paper strip product
To achieve the maximum 3D effect on crafts, use paper strips. This option is very convenient, since you can adjust the size of the protruding part and the bent ends. To make this Christmas decoration you need:
- glue;
- scissors;
- thin strips of paper.
To add lightness and airiness to your snowflake, use strips no more than five millimeters wide. For more voluminous and massive products, strips with a width of at least 8 mm should be taken.
The manufacturing process consists of the following steps:

A snowflake from paper strips can be made in another way:

How to make a snowflake in the form of an accordion is one of the easiest. To implement it, you can involve your child. We perform the following actions:

New Year crafts from modules
A beautiful craft turns out when using triangular modules. To create such a craft, you need to do the following:
- We prepare all the modules necessary for the snowflake.
- We connect the modules to each other, forming a future snowflake.
- If the result satisfied you, we glue all the details.
 The advantage of this method is the ability to make changes in the course of work. By adding or removing modules, you can achieve the desired size and shape.
DIY large paper snowflakes They are wonderful Christmas decorations. With their help, you can create a holiday atmosphere even in the simplest room. By combining snowflakes made in various ways, you can easily achieve the desired result and give joy and fun to the people around you.
Attention, only TODAY!

