21.09.2019
Announcement of Santa Claus's DIY crafts workshop. Crafts competition “Santa Claus’s Workshop. We wish you creative success and new victories
Our favorite holiday is approaching - New Year. We want to create a fabulous atmosphere and festive atmosphere, and creative crafts will help us with this. In this article we will look at: how to make Father Frost and Santa Claus with your own hands.
You will need: foam ball with a diameter of 6 cm, faux fur, chabrak, bias tape, holofiber, hemispheres for eyes, pattern, snowflake sequins, sewing machine, iron with sleeve block, scissors, textile glue, blue crepe satin, white, nude and fleece blue, staff wand, silver braid.
Master Class
- Cut out 2 pieces of the body from chabrak, glue on crepe satin, then finish the long sections with bias tape.

- Place the pieces of crepe satin next to each other and sew long sections with a seam over the edge.
- Form into a round shape using an iron and a sleeve block.
- Cut out the details of the fur coat and handles from blue fleece.

- Sew, turn right side out, and leave holes in the handles for stuffing.
- Cover the ball with flesh-colored fleece and create a neck by wrapping excess fabric with thread.
- Make and attach a nose, then attach hemispheres for eyes.

- Place the fur coat on the chabrak piece, insert the head into the hole in the body, then sew it on.
- Make a hat this way: cut out a rectangle to fit your head from blue fleece, sew the short side and wrap the top with thread.
- Prepare strips of fur for the lapel of the hat and the trim of the fur coat.
- Attach the blue hat with a basting stitch to the head, then sew the fur strip butt to the blue fleece and turn the fur up.

- Stuff the handles with holofiber, sew up the holes, decorate the wrists with fur and sew on the hands.
- Make a beard this way: cut out several rectangles of flesh-colored fleece with a difference in length of 1.5 cm. It is worth noting that the rectangles need to be cut so that the fleece stretches along the long side of the rectangle. Cut the fringe.
- Sew the beard pieces to the head, starting with long pieces and gradually working your way up to the nose.
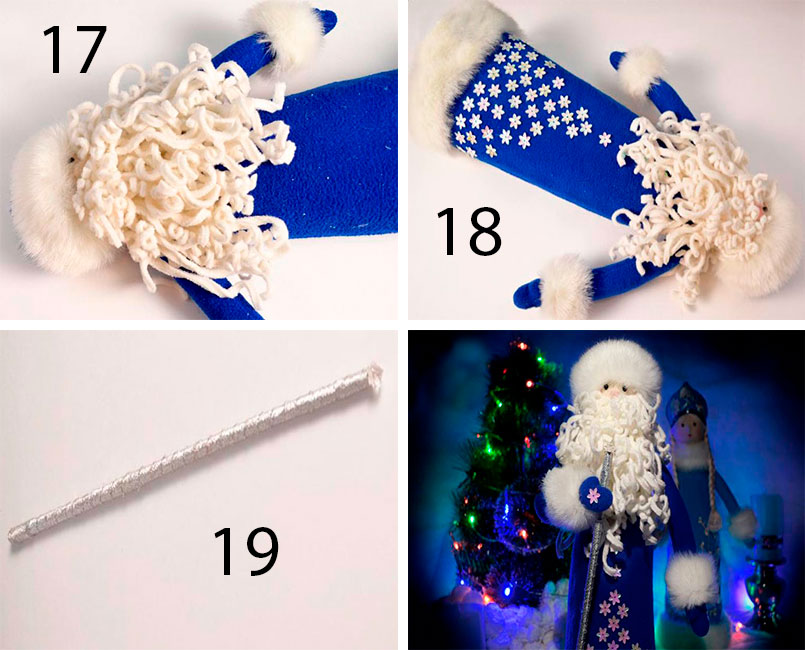
- Stretch and curl your beard into curls.
- Decorate your fur coat by attaching snowflake sequins.
- Wrap silver braid around the stick to make a staff.
Gorgeous Santa Claus is ready!
You will need: red napkin, template, marker, glue, scissors, paper, printer, hole punch, twine.
Master Class

Santa Claus from a napkin is ready!
You will need: cotton wool, ice cream sticks, red felt, decorative eyes, red pompom, glue gun, flesh-colored paint, brush, scissors.
Master Class

Santa Claus made from cotton wool is ready!
You will need: felt 1 mm thick in beige, white and black, white felt 3 mm thick, thick beige cotton fabric, white felting wool, padding polyester, wire, template, black beads for eyes, black and beige threads, scissors, pencil, glue gun, small bell and other decorations.
Master Class
- Print the template.

- Cut out the body of Santa Claus and transfer it to thick white felt.
- Cut out the body of Santa Claus from felt.

- Cut out the same body part, only from thin white felt.
- Cut the boots from thick white felt, then the same boots from thin black felt.
- Cut out the boot cuffs from thin white felt.

- Draw the mittens and cut them out of thick white felt.
- Cut out parts from thin beige felt - the trim of the fur coat and hat.
- Cut 2 circles according to the template from beige cotton fabric.

- Make a spout from a small circle: pull the thread, stuff it with padding polyester and sew the spout to the large circle.
- Sew black beads as eyes.
- Sew the face to the body from thin felt. It is worth noting that during sewing you need to add a little padding polyester for volume.

- Make the eyebrows and beard from felting wool, then attach with a glue gun.
- Glue the trim of the hat and fur coat.

- Prepare 4 pieces of wire, twist them onto a pencil, giving them the shape as in the photo.
- Glue the parts of Frost's body from thin and dense felt, gluing wire between them in place of the arms and legs.

- Glue the mittens and boots to the twisted pieces of wire.
- Twist a wire bell holder and glue it to the mitten.

- Stitch the Santa Claus figurine with beige thread.
You will need: bottle of champagne, hook, yarn, centimeter, edge, filler, regular threads, needle, doll strands, glue, decorations.
Master Class
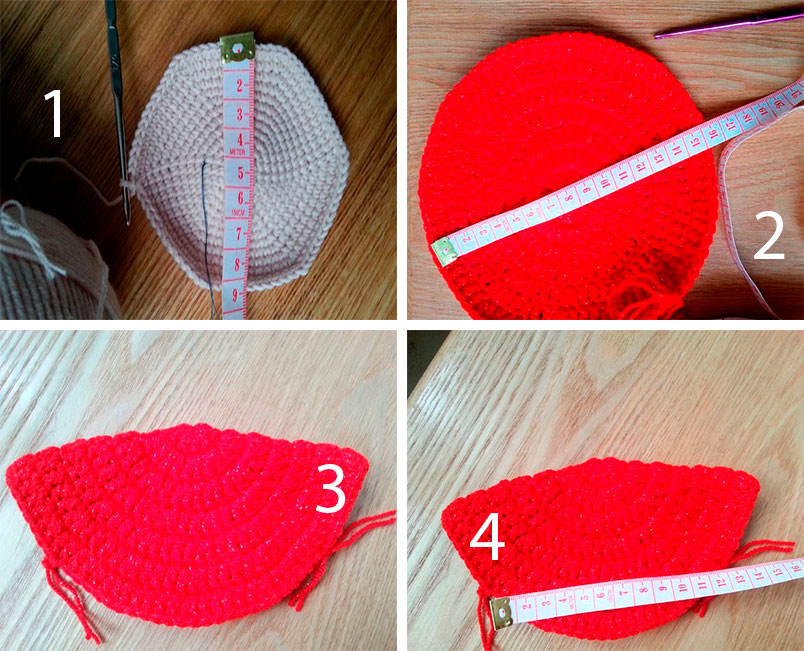
- Knit the head with single crochets using beige yarn, according to the principle of knitting a ball. It is worth noting that the number of rows without increases and decreases should be two rows less than for the ball.
- Make the base of the doll from red yarn: double crochet a circle, fold it in half and make knots at a distance, as shown in the photo.
- Knit your arms and torso in circular rows that taper towards the bottom.

- Tie the nozzle onto the bottle from beige yarn and don’t forget to constantly try it on so that it doesn’t fit too tightly.
- Connect the bottom of the nozzle and the workpiece with your hands on the bottle.
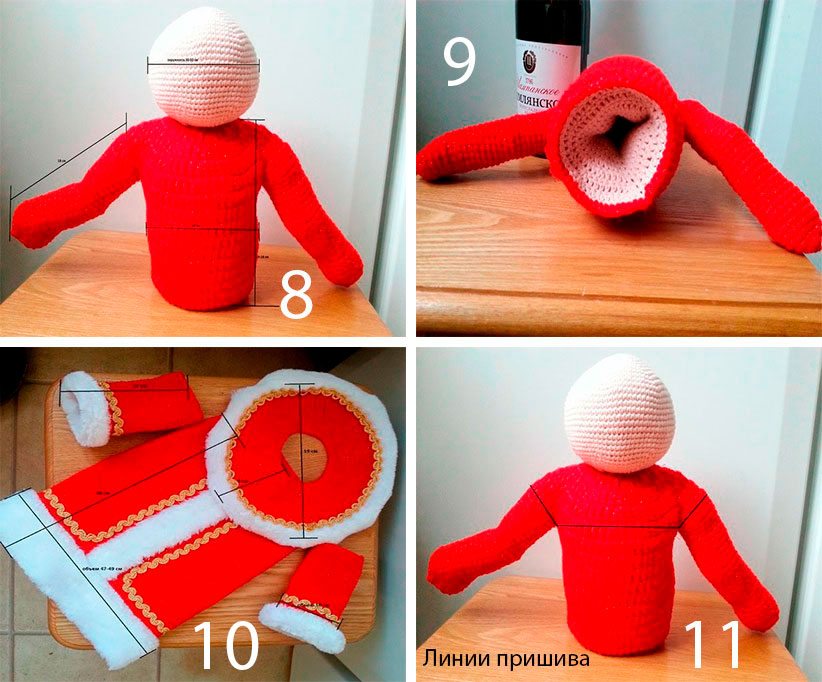
- Fill the handles of the red blank and the empty space with filler.
- Dimensions: head circumference 30 cm; arm length 18 cm; body width 30 cm; body height 16 cm.

- Knit and decorate clothes.
- Clothes dimensions: hat blank diameter 10 cm; sleeve length 12 cm; fur coat length 28 cm; sleeve volume 18 cm; fur coat volume 47 cm; The circumference of the finished hat is 32 cm.
- Sew the clothes with regular threads, the sewing lines are indicated in the photo.

- Attach the doll strands to the yarn and secure with glue. Make a beard from long strands, and use shorter strands for your hairstyle.

- Glue the hat to your head.
You will need: red cardboard, flesh-colored paper, 2 openwork napkins, scissors, marker, pencil, glue.
Master Class

Santa Claus from an openwork napkin is ready!
You will need: bright and flesh-colored cotton fabric, white and red fleece, felt, padding polyester or holofiber, combed tape (wool for felting), foam rubber, felting needle, thick and thin wire, glue gun, Moment-Crystal glue, thick cardboard, acrylic paints and brushes, wire cutters, pliers, stationery knife, buttons, beads, beads, floss.
Master Class
- Make a pattern from cardboard: cone with sides 13 cm; circle with a diameter of 6 cm and handles (optional).
- Draw a line through the center of the circle and divide it into 3 equal segments, then make holes for the wire at their joints.

- Place a padding polyester circle and a slightly larger diameter cotton circle on the cardboard circle, then pull the fabric around the cardboard using thread and a needle as shown in the image.
- Bend a thick wire into the letter P, then insert it through the holes in the cardboard, padding polyester and fabric.
- Bend the ends of the wire so that you get feet.

- Prepare a piece of thin wire 25 cm long and screw it to a thick wire, then glue it with hot glue. At this stage, make sure that the structure is stable.
- Prepare 2 pieces of cotton fabric 22 cm long and 4 cm wide. Fold in half lengthwise, sew, turn out, pull over the legs and sew with a blind seam to the bottom.
- Make a cone pattern from flesh-colored fabric, fold it in half, sew, leaving 2 mm of the tops unsewn, fold the edge around the circumference, baste and turn the cone out.
- Place the cone on a thin wire, leading its end through the hole in the top. Stuff the cone with holofiber so that the wire is in the center of the body, then sew the folded edge to the body around the circumference with a blind seam.
- Cut out large feet from cardboard, then hot glue them to the wire feet.
- Cut the boots out of foam and make a recess in the back for the ankle wire, then attach them.

- Cut 2 ovals from red fleece, cut a triangle at the top, cover the foam boots, sew the heel with a blind stitch and pull the fleece around the cardboard sole.
- Cut 2 felt ovals slightly larger than the cardboard sole, hot glue them to the sole, trim off the excess and sew the felt to the fleece with a blind stitch.
- Mark the lines for the top of the jacket and the bottom of the cap on the cone, then roll a padding polyester ball, cut a circle from the fabric, pull it along the edge and sew the nose in place.
- Draw a face to your liking.

- Cut the red fleece jacket into a truncated cone shape, fold it in half, sew along the edge, then turn it inside out.
- Sew handles and gloves from red fleece and cotton fabric as shown in the image.
- Pull the jacket over the body-cone and sew at the bottom and along the neck with a hidden seam.
- Cut out figures from felt - Christmas trees, houses, then glue them with Crystal glue and only then sew them on as desired.
- Sew a white fleece snowdrift ribbon with a hidden seam and decorate the composition with beads and buttons.
- Cut boot cuffs and cuffs from white fleece, fold in half, sew along the edges, stretch over the arms and legs, then hand sew. Make a wavy collar in the same way.

- Sew the arms to the body using a button fastening: pull the thread a little, tie a knot and glue it with Moment.
- Tear 10 cm of wool from the combed strip, gather it into a bun and felt the beard with a felting needle.
- Tear off a bunch 2 times thinner and 2 times longer, then roll it in place of the mustache.
- Tear off 2 more bunches as for the beard, then roll on both sides of the face.
- Felt the hair on the sides and back of the head in the same way.
- Cut out an elongated and narrowed cap from cotton fabric based on half a cone, sew it together, leaving a hole at the top.

- Turn it inside out and put the cap on, bringing the wire through the hole and sew it along the edge to the head. Bend the end of the wire into a loop.
- Make a pom pom and flap out of white fleece, then sew them on.
- Make a small felt Christmas tree and glue it to the hat as a decoration.
You will need: red and white colored paper, scissors, glue, marker, pencil, wooden bead.
Master Class

Santa Claus from a plate
You will need: paper plate, colored paper, scissors, glue, marker, printer, eyes, hole punch, rope.
Master Class

You will need: box, colored paper, scissors, glue, marker, pencil, button, eraser, envelope.
Master Class

You will need: plastic bottle, paints, colored paper, pompom, scissors, buttons, 2 bushings, glue, cotton wool, white and black lace.
Master Class

Santa Claus from a bottle is ready!
You will need: white and red paper, scissors, template, printer, pencils or markers.
Master Class

Creative grandpa is ready!
You will need: cotton pads, plastic spoon, glue, red yarn, buttons for eyes, ribbon or thread for hanging, red felt-tip pen, scissors.
Master Class
- Take a cotton pad.
- Fold its side into the center.

- Make cuts along the edge of the circle.
- Draw a smile with a felt-tip pen.
- Take a plastic spoon.

- Apply glue to the spoon, leaving the tip without glue.
- Wind the yarn tightly.
- Apply glue on both sides to the tip of the spoon and glue the face of Santa Claus to the convex part.

- Glue a clean cotton pad onto the concave part of the spoon.
- Cut a circle out of a cotton pad and glue it onto the tip of the spoon handle.
- Cut a circle from a cotton pad, color it with a felt-tip pen and glue it as a nose.
We invite educators, teachers, additional education teachers, students of pedagogical educational institutions and children to take part in our creative competition
Conditions of the competition
Any work on a New Year theme is accepted to participate in the competition:
Crafts from various materials on the theme "New Year" and "Christmas"
DIY New Year's gifts
DIY New Year's characters (Santa Claus, Snow Maiden, Snowman, Christmas tree....)
DIY New Year cards
DIY monkeys
Applications on the theme "New Year" and "Christmas"
DIY interior decoration for the New Year. Decorating a kindergarten, decorating a school with your own hands
DIY New Year's toys
New Year's newspapers (master class on creating a New Year's wall newspaper)
Stories on the theme "New Year", "Christmas" with your own hands and other New Year's crafts.
New Year's recipes.
- New Year's games, New Year's quizzes, New Year's fairy tales and New Year's poems ( Attention! Only children's work is accepted here). This work must be original, neatly designed, and contain at least 2 pages of printed text. Teachers can participate in a competition on this topic New Year's Marathon
The following are accepted for participation in the competition:
Works completed together with children (the author of the work is a child, and the leader is a teacher);
Master class of a teacher, educator (without the participation of children)
The competition work is designed as a master class (exception: New Year's games, quizzes, fairy tales and poems)
2. Your materials must contain photographs of the detailed manufacturing process, as well as a detailed step-by-step description of the manufacturing of your project (work).
Copying from the Internet or other publications is prohibited. If plagiarism is detected, the work will be removed from the competition.
You can take ideas from the Internet, books and magazines, but the text, step-by-step manufacturing process and photos must be yours and unique.
Works for which awards have already been received from our website cannot take part in the competition.
4. The number of works from one participant is not limited.
5. Collective works are not accepted for the competition.
Procedure for holding the competition
1. The competition is International. We accept works only in Russian.
2. The competition is held among teachers and children who have blogs on the website
If you don't have a blog and want to take part in the competition, then you need to:
Register on the site;
Leave a request to open a blog (follow the link)
After reviewing your application, we open a personal blog for you.
3. You post the competition entries yourself on your blog during the period from September 30, 2015 to January 15, 2016 inclusive.
At the beginning of the text of the work, be sure to indicate all your complete data (full name, position, place of work). If you are participating with a child, be sure to indicate the child’s details.
4. The number of works from one participant is not limited
5. After posting the competition work on the blog, you leave a request in this article (follow the link)
The application must be submitted within 5 days after posting the work on the blog(applications for work on the blog posted more than 5 days will not be considered)
6. After receiving your application, the editors conduct an expert review of the work for compliance with competition requirements within 3 business days from the date of placement of the application.
If the editor gives permission for your work to participate in the competition, then you send your master class (photo + text) to
After receiving your work, it is assigned a number and placed in the competition table within 2 working days.
If your work has not passed peer review, then you do not need to send it anywhere. We will not report the reason for the refusal, since the work will not be accepted for participation in the competition only if the competition requirements are not met.
Your work remains on the blog.
If your work (master class) was not accepted for participation in the competition, then you can offer another NEW work. You can correct (redo) this work, but it will no longer be able to participate in the competition.
7. Those interested will be able to express their opinion on each of the works and support the participants in the comments to the relevant articles.
9. When summing up the results of the competition the following will be taken into account:
Site administration ratings. The administration will take into account the quality of the master class, the level of complexity of the work and the ability of readers of this master class to repeat your project (master class);
10. January 25, 2016 The results of the competition will be published and the winners announced.
11. Dear competitors, remember that this is not a competition for the best craft, this is not a children’s photo competition, but a competition for the best master class on making crafts.
12. Additional terms and conditions.
Participation in the Competition means acceptance of the following conditions:
● the organizers of the Competition do not enter into correspondence with participants whose applications were rejected (did not meet the requirements of the Competition);
● the organizers of the Competition reserve the right to use the materials provided for the Competition at their discretion.
How to apply for a job
1. A text description of the job is drawn up in the Word editor.
The title of the work must be written first. The data of the authors is indicated: the child and the teacher who helps in making the craft. The age of the child must be indicated. If this is a teacher’s master class, then only the teacher’s data.
When describing, you can use poems, riddles, interesting stories or stories, taking into account the theme of your master class.
A creative approach in describing the master class is encouraged.
Presentations and master classes presented in tabular form are not accepted as a master class.
2. Your work must contain:
A detailed text step-by-step description of the process of making crafts, decorations, dishes... The work must describe and show in the photo all stages of production, all the necessary templates must be presented, all the necessary materials and tools must be described;
Photographs (at least 11 pieces; if the work is complex and voluminous, then the number of photos should be more than 15 pieces), demonstrating step by step the entire process of making the work. In addition, you must provide 2-3 photos of the finished work from different angles (without the participation of children). The finished work should be visible in close-up, beautifully designed, showing individual interesting fragments of your work.
3. Photo requirements:
Photo size: at least 700 pixels. in width (it is better to place the originals);
Photos must be of good quality (photos must be sharp and bright);
Photos must not contain any watermarks, signatures or dates;
- Photos should be placed according to the text, and not separately text, separately photo.
We would like to warn you right away that you should not deliberately increase the number of photos, for example, show how you cut out elements with scissors or hide salt dough in the refrigerator, etc. The level of your work should be such that you can show all the main stages at least 11 photos. If the work is simple, then in one master class you can demonstrate the production of several crafts (appliques, postcards...), made using the same technique or on the same theme.
If you use children in the description of the master class (work), then you need to make sure that all photographic materials are addressed to the reader, and not to the child. The emphasis should not be on the child, but on the process of making the craft. The photo should not be 90% the image of the child and only 10% the manufacturing process.
All stages of production of the work should be visible in close-up.
We pay special attention! It is prohibited to post photographs of other people's children or adults without their written consent. On July 1, 2011, Federal Law 07/25/2011 N261-FZ “On the Protection of Personal Data” came into force, according to which no one can publish data about a person, including biometric data, incl. photographs without the written consent of the person himself or (if he is a minor) of his parents, certified by a notary. Please take this fact into account.
That is, if you post a photograph that does not depict your child, then, at the request of the site Administration, you must attach written permission from the parents, certified by a notary, to the competition entry.
Therefore, if you do not have such written permission from the parents, certified by a notary, then it is better to do the entire process to the teacher or show a photo of the process without the child, and at the end of the master class, take a photo and show the child’s work completed according to your master class.
By posting photographs, you confirm the fact that the photographs are yours personally and you bear all moral and material costs in case of violation of copyrights and human freedom rights.
4. Tables cannot be used in the text description.
So, your work must contain: a text document with a detailed description of the manufacturing process; at least 11 photos (at least 7 photos of the manufacturing process + 1 photo of the necessary tools and materials + 2-3 photos of the finished work; if the work is complex, then the number of photos should be more than 18 pieces).
Wishes to the competition participants. To participate and win the competition, it is not necessary to submit a complex and time-consuming project; you can submit a simple project, but consisting of the process of making several crafts. For example, the topic: Application on the theme “New Year” (in this project you can show the process of making not one application, but several different applications: Christmas trees, Santa Claus...)
ATTENTION
Dear future participants of the competition, we ask you to carefully read all the rules and remember that you are doing a master class not only to participate in the competition, not only to receive a Certificate, Gratitude, Diploma, but above all for the readers, so please respect them. Your work will be viewed by tens (hundreds) of thousands of people.
What should a master class be like?
1. Neat. The photo should only show the process of making the work, there should be no foreign objects, debris, surrounding interior... there should be no. Showing hands should only be used in extreme cases, and make sure that your hands and the hands (nails) of your students are clean.
2. The entire manufacturing process should be facing the reader and visible in the close-up photo.
3. All photos must be of good quality, without logos or extraneous inscriptions. The number of photos in the master class must be at least 11. Photo size: at least 700 pixels. in width
Photograph the work process and the finished work in daylight (not in bright sun, as sharp shadows are created), frontally (without rotation), with sharpness (not blurred). Don't add frames or make a collage of photos.
Photograph your work on a plain background (white or colored), try to avoid glare (especially on glossy photographs, if they are in the frame). The background should not blend into the work.
4. The master class should be such that readers can repeat it without any problems. That is, it should contain enough theoretical description and photographic materials.
5. In a master class on applique from paper, plasticine, fabric, templates (patterns) must be offered, and in such a form that they can be printed.
6. If the work is simple, there is no need to artificially increase the number of photos. Offer readers the process of performing several works (crafts, applications...) in one master class.
7. Show how you can use your finished work (craft).
8. Be sure to offer and show photos of the finished work from different angles. Show three-dimensional crafts from different sides. You can take large photographs of interesting or textured fragments of the work.
9. In the text description of the work, be sure to indicate the goal, objectives, purpose and implement them with the help of your master class. In the text description you can indicate links to materials located on our website.
The competition organizers reserve the right to reject the work if the submitted materials do not meet the stated requirements or are of unsatisfactory quality.
Summing up the results of the competition
The results of the competition will be summarized as follows. Children's work and teachers' work will be assessed separately.
Number of winners 10-15% of the total number of competitive works (master classes)
Based on the results of the competition, the following prizes will be awarded among children's works:
1st place Awards: Diploma of the winner of the 1st degree, Diploma for a teacher.
II place. Awards: Diploma of the winner of the 2nd degree, Diploma of a teacher
III place. Awards: Diploma of winner of the III degree, Diploma of teacher
Based on the results of the competition, the following prizes will be awarded among the works of teachers:
1st place Award: 1st degree winner diploma
II place. Award: Winner Diploma, II degree
III place. Award: Winner Diploma III degree
Attention! Each work (master class) will be assessed separately. If you offer several works (master classes) for participation in the competition and want them to be evaluated jointly, then you need to send a personal message to the site editorTatyana Alekseevna until January 15, 2016, indicate in it which works need to be combined and what to call your combined work.
All participants of the competition will receive Certificates of participation during the competition period.
Teachers who help children will receive Gratitude.
If it turns out that your work has already been posted on other sites, or you have violated someone’s Copyright, then the work will be removed from the competition and all previously issued documents will be canceled. Your work remains on the site.
Answers to frequently asked questions
How to send approved work (master class)
After approval of your work, you send it to the address indicated there.
The text description must be in a Word document. Photos must be attached to the letter as separate files in jpg format. If the size of photographic materials exceeds 20 Mb, then the photo must be sent in several letters (up to 20 Mb in size).
You cannot insert a photo into the text of the letter! You cannot send a copy of your recording (your master class) posted on the website (with logos).
Is it possible to receive a Certificate of Publication for a competition entry?
For your competitive work you can receive a Certificate of Participation, and if you win, a Winner’s Diploma.
We do not issue a certificate of publication for competition work.
Do I need to pay money to participate in the competition? Do I need to pay money for Certificates, Diplomas?
No, you don't need to pay for anything.
Participation in the competition and issuance of all documents (Certificate of Participation, Winner Diploma) is free. We don't have any org. contributions.
Participation in all competitions on our portal is free.
The procedure for obtaining a Certificate of Participation and Teacher Appreciation
As soon as your work is placed in the competition table, the “Download Certificate” button appears on the page with your material (next to the “Edit” and “Delete” buttons).
You can download the Certificate of Competition Participant and Gratitude to the Teacher within 14 days of approval of your application.
If the master class was provided by a teacher, then he receives a Certificate of Participation in the Competition (he does not receive a Gratitude).
The issuance of award documents begins from the moment the competition is announced, i.e. from September 30, 2015
Samples of Gratitude, Certificate and Diploma
You can see the results of the competition
Competitors
|
Participant #1 |
|
|
Participant #2 |
|
|
Participant #3 Supervisor: |
|
|
Participant #4 Supervisor: Berdnik Galina Stanislavovna, primary school teacher of the KOU KHMAO-Yugra "Laryak boarding school for students with disabilities" |
|
|
Participant #5 Supervisor: Berdnik Galina Stanislavovna, primary school teacher of the KOU KHMAO-Yugra "Laryak boarding school for students with disabilities" |
|
|
Participant #6 Supervisor: Berdnik Galina Stanislavovna, primary school teacher of the KhMAO-Ugra "Laryak boarding school for students with disabilities." |
|
|
Participant #7 Supervisor: Petrichenko Elena Nikolaevna, social teacher, MDBOU "DSOV No. 50", village of Novomyshastovskaya, Krasnoarmeysky district |
|
|
Participant #8 |
|
|
Participant #9 Supervisor: Romanova Maria Vladimirovna, teacher of grades 1-4, MCOU "Boarding School No. 92", Nizhny Novgorod |
|
|
Participant #10 |
|
|
Participant No. 11 |
|
|
Participant No. 12 Supervisor: |
|
|
Participant No. 13 |
|
|
Participant No. 14 |
|
|
Participant No. 15 Supervisor: Zhuk Svetlana Viktorovna, teacher of Russian language and literature, Municipal Budgetary Educational Institution “Secondary School No. 41”, Biysk |
|
|
Participant #16 Supervisor: Shabanova Marina Gennadievna, primary school teacher, head of the "Do-it-yourself miracles" community educational institution Sarasinskaya secondary school, p. Sarasa, Altai district, Altai Territory |
|
|
Participant No. 17 Supervisor: Shabanova Marina Gennadievna, primary school teacher, head of the organization "Miracles with your own hands", MBOU Sarasinskaya Secondary School, Sarasa village, Altai district, Altai Territory |
|
|
Participant #18 Supervisor: Tretyakova Olga Nikolaevna, Deputy Head of Education and Resource Management, Child Development Center - kindergarten No. 8 "Ryabinushka", Dimitrovgrad |
|
|
Participant #19 |
|
|
Participant #20 |
|
|
Participant No. 21 Supervisor: Pestova Natalia Nikolaevna, teacher, MDOU No. 23 "Solnyshko", Rostov, Yaroslavl region |
|
|
Participant #22 Supervisor: Yakovleva Yulia Pavlovna, teacher of MBDOU kindergarten No. 4, Ivanovo |
|
|
Participant No. 23 Supervisor: Berdnik Galina Stanislavovna, primary school teacher of the KOU KHMAO-Yugra "Laryak boarding school for students with disabilities" |
|
|
Participant #24 Supervisor: Shilkina Tatyana Anatolyevna, teacher, State Budgetary Institution KO "Meshchovsky Social Rehabilitation Center for Minors", Meshchovsk |
|
|
Participant No. 25 Supervisor: Lebedeva Svetlana Vladimirovna, Teacher of the after-school group of the State Educational Institution “Educational and pedagogical complex nursery-kindergarten-secondary school of the agricultural town of Lutskovlyany” Grodno district, Grodno region, Republic of Belarus |
|
|
Participant #26 Supervisor: Berdnik Galina Stanislavovna, primary school teacher of the KOU KHMAO-Yugra "Laryak boarding school for students with disabilities" |
|
|
Participant #27 Supervisor: Berdnik Galina Stanislavovna, primary school teacher of the KOU KHMAO-Yugra "Laryak boarding school for students with disabilities" |
|
|
Participant #28 |
|
|
Participant #29 Supervisor: |
|
|
Participant #30 |
|
|
Participant #31 Supervisor: Shabanova Marina Gennadievna, primary school teacher, MBOU Sarasinskaya Secondary School, Sarasa village, Altai district, Altai Territory |
|
 |
Participant #32 Supervisor: Tsukanova Tatyana Petrovna, teacher of the "Paper Fantasies" class, MKOUDO "Spas-Demenskaya Children's School of Art", Spas-Demensk, Kaluga region |
|
Participant #33 Supervisor: Tsukanova Tatyana Petrovna, teacher of the "Paper Fantasies" class, MKOUDO "Spas-Demenskaya Children's School of Art", Spas-Demensk, Kaluga region |
|
|
Participant #34 Supervisor: Shilkina Tatyana Anatolyevna, teacher, State Budgetary Institution KO "Meshchovsky Social Rehabilitation Center for Minors", Meshchovsk |
|
|
Participant #35 |
New Year is a time of joyful fairy tales for both children and adults. However, most of all, the atmosphere of magic and celebration delights little children, so Father Frost with his beautiful Snow Maiden, sparkling multi-colored garlands and a decorated Christmas tree always bring children a feeling of real miracle.
Celebrating the New Year in kindergarten brings special joy for preschoolers. After all, in the kindergarten you can hold real, large and numerous round dances, and receive gifts from the hands of Grandfather Frost and the Snow Maiden. Pleasant memories from a holiday held in this way remain with the child for life.
A variety of crafts made together with parents play an important role in preparing for the New Year.
Children always enjoy making crafts. And those creative works that are being prepared for the New Year are especially interesting. And if a mother, father, grandmother or grandfather, whose participation is especially dear to the child, also works together with the child, then this joint creativity turns into a real holiday! 
In our kindergarten, on the eve New Year,
was announced contest for parents and children on making crafts "Santa Claus's Workshop".
All competition participants were able to show their imagination and creativity. It was difficult for the jury experts to choose winners among such a variety of works; the winning works will participate in the regional competition. 
As a result of the competition, an exhibition called “Winter's Tale” was organized, where you can see the unusually beautiful creations of children and their parents. The purpose of this exhibition was to create the necessary conditions for the creative activity of all participants, to promote and strengthen connections between kindergarten and family, to create a festive, magical , New Year's atmosphere.
Senior teacher Nazyrova G.A.
Let's see what ways you can create unique New Year's crafts for a competition for school or kindergarten in the form of Santa Claus. I will also show you how to beautifully decorate gifts for the New Year with the symbol of Santa Claus. Let's start with gifts...
Santa Claus on a gift
How to do it yourself.
(simple options).
Here in the photo below we see an excellent New Year's decoration of the most ordinary gift packages made of gray wrapping paper.
For the first idea you will need:
- a round shape made of white cardboard, a piece of red cardboard,
- red pompom (or regular cotton wool + PVA glue + red gouache)
- a piece of white foam packaging interlayer (which is often placed in boots in the store, or in boxes with equipment). Or (if you don’t have such material) you can take white cardboard and cover it with cotton pads.)

On a white round cardboard eye shadow or blush Draw spots on the cheeks and black beady eyes with a marker. In a bowl, stir red gouache and PVA glue (a couple of drops of paint per teaspoon of glue); dip a piece of cotton wool into this mixture. We form a ball from this sticky red cotton wool with our hands and dry it on a radiator (it will dry overnight).
Cut out a triangle-cap from red cardboard. We glue it to the edge of the white round piece (Santa Claus's forehead) - it is better to glue it dry, that is, use a glue stick or double-sided tape, since wet PVA glue will wet the cardboard and make it bend.
On top of the connecting line (between the hat and the head) we lay a “fur edging”, as I already said, it is better to cut it out of foam packaging material. Or cover the cardboard with cotton pads and cut out the edging of Santa Claus’s hat from such “cotton-shaggy paper”
And here two more ideas craft pendants in the form of Santa Claus - already from just cardboard... and cardboard with paper cupcake tins.

Here are the large bags with large size Santa Claus.

You can even make a package yourself from a sheet of gift paper. The template here is very simple. You can make such a drawing yourself with a pencil, cut it out, bend it along the fold lines and you’re done. A beautiful box - glue the face and beard of Santa Claus to it and you're done. 
With your own hands, you can make PACKAGING POCKETS for gifts from cardboard (or soft felt, or formiam as in the photo below), decorated with Santa Claus appliqué on top.

Here is a diagram of such a pocket made of colored paper or cardboard. We bend along the lines, glue the sides and the container for sweets and chocolates is ready.

All that remains is to glue on top the head of Santa Claus with a beard and a hat. Simple and fast, no complexity. You will love making these quick pocket crafts with your own hands with Santa Claus, a snowman, angels and other New Year's characters.

Here is a pocket package made of soft felt or fleece, which is suitable for gifting a smartphone or jewelry. It will be a pleasure to receive such a gift, decorated with manual labor and the imagination of the giver.

Santa Claus WITH CANDY
(just do it yourself).
Here's another new craft for this year. Santa Claus hides a candy in a bright wrapper in his tummy. A simple children's craft that you will quickly understand and can do with your own hands in one sitting.

As you can see (in the photo below) there is nothing complicated or tricky here. It’s just that the tummy and back of Santa Claus are a FULL DETAIL - in shape it looks like a FIG. which has a hole only in the upper turn of the number.

This “figure eight” is bent in half - and we get a tummy with a hole in the center in the front and a closed back at the back. At the top we fix our halves with a drop of glue, or a stapler or tape. And all that remains is for our Santa Claus to glue on the head with a beard and the legs-stand.
Santa Claus do it yourself
Craft using the spider web technique.
There is an article on our website where I show in great detail how to make these balls with your own hands from glue threads and a small balloon. In this article “Balls of thread and a sea of crafts using the spider web technique,” I posted a master class. Therefore, I will not explain in detail here, so as not to waste unnecessary words. Follow the link, everything is explained there.
Just look at the photo below and fall in love with these cute New Year characters made from yarn balls. Simple and fast. In one evening we make balls, in the second evening we cover them with pieces of colored paper - and the craft is ready and worthy of going to a New Year's exhibition at school or kindergarten.

You don’t have to cover the balls with paper parts, but just put a cap like this on the top ball - where a face with a mustache and beard is already glued to the cone-hat.

In general, such cardboard caps (from the photo above) can be put on ordinary white inflatable balloons. And you’ll get a quick craft for the New Year in the form of Santa Claus. Such quick crafts are convenient. (By the way, the link contains a lot of quick ideas for crafts for decorating a New Year’s office).

DIY Santa Claus.
Balloon craft
using papier-mâché technique.
You can make such a pot-bellied, big-nosed, sweet and charming Santa Claus from the cheapest materials. PVA glue + white paper napkins + balloon + gouache for coloring.

What is the secret of the SIMPLICITY of this Santa Claus craft.
The papier-mâché technique is very simple. If you mix a paper napkin with PVA glue and mold something out of this mixture and dry it, we will get a dense, almost wooden, hard craft.
This principle of creating a durable material from fragile paper and liquid glue became the basis of the Papier-mâché technique.
Instead of white paper napkins, you can use regular NEWSPAPER. But then you will need to paint it on top with white paint (acrylic or gouache) before drawing Santa Claus on it.

What do we do.
Step 1 Let's buy a balloon with an elongated tail (that is, pear-shaped). Let's inflate it so that it retains its slightly elongated pear-shaped shape. Turn the ball upside down and insert it inside the vase (to make it easier to work with). You can even tape it a little to this vase so that it doesn’t jump out of it.
Step 2 Tear the white napkins into shreds (or leave them whole, whichever is more convenient for you). We coat part of the ball with PVA glue and place a white napkin on this puddle. On top of the napkin, again apply PVA glue with a wide brush and again place the napkin on this wet place. Thus, we glue the entire ball in several layers - generously pouring glue and generously laying down layers of napkin. Let it all dry (overnight).
Note – you can cover the ball with newspaper, dry it and paint it white. Or start the first layers from newspaper. And the last upper layers should be made from a white napkin, then there will be no need to paint it white.
Step 3. We crumple the napkins into large lumps - these will be tozhki. We also pour glue over it, and we also cover it with napkins, forming a wet crust of papier mache. We also leave it to dry.
Step 4. We take the ball out of the vase-pot on which it stood. We turn it with its tail up (we will cover this empty space that was in the vase with Santa Claus’s hat, it will not be visible. Using a marker on the dry round paper surface of the ball, we draw the silhouette borders of all the elements of Santa Claus - a face with a nose, a beard, a fur coat. We decorate this with gouache round decoration. Don't forget to glue the legs.
Note. For papier mache you need a lot of PVA glue. If you buy it in the stationery department (where the glue is in small tube jars) you will overpay 5 times the price. Better and It’s cheaper to buy PVA glue in liter buckets in the construction departments of the store. For one liter of glue you will pay about 2 dollars. And such a bucket will be enough for you for a whole bunch of crafts. Any PVA glue labeled “universal” or “construction” will suit you. In composition, it is no different from ordinary school stationery PVA glue. The manufacturer can be any company. With this bucket you will not only make Santa Claus from papier-mâché, but also a snowman and a penguin (also based on a balloon). Details in other articles on this site.

By the way, based on the BALLOON, you can make a variety of crafts with Santa Claus. You can decorate a ball covered with newspaper with strips of colored fringe. We buy rolls of crepe colored paper from the stationery store. cut it into strips, cut them into fringe, paste the BALL IN A CIRCLE with fringed stripes. It turns out another version of the Santa Claus craft with your own hands - mischievous and shaggy.

Or you can decorate a balloon covered with newspaper with a FLEECE WRAP - the soft material will make a very cozy and warm craft. 
Making our own Santa Claus
from stones and natural materials.
Ordinary stones - small or large river cobblestones can become the basis on which a New Year's fairy tale will grow.
You can simply find oval stable stones (or make them stable using play dough). Cover the stones with white gouache (spray with hairspray to fix the color and prevent it from staining your hands). Then draw all the lines of the future Santa Claus on a white background. Decorate each drawn sector with gouache. And then once again draw clear black boundaries between the elements of the drawing - make outlines with a black marker. Markers work great on rocks. It is best to use a marker for signing CDs - it does not wash off and does not stain your hands.

You can depict any New Year's theme on suitable flat stones. An article-lesson on creating beautiful New Year's drawings is already on our website “Family Heap”.

And from several stones (also painted with gouache) you can put together a whole plot applique on a single background cut out of plywood.

We buy a small sheet of plywood at a hardware store (or find a suitable one in a pile of trash near the entrance). We cut a round piece out of it. We tint with ink the color of snow and the color of sky. And against this background we lay out Santa Claus, his sack, his reindeer, his sleigh... whatever.
Please note that the stones perform only one part of the element - the rest are painted, laid out from twigs, ropes and other natural materials.

It is not necessary to choose smooth round stones. The most uneven curved stones can work to your advantage. Lay them out, try them on next to each other and try to see the outlines of your future craft in this arrangement. Who knows what masterpiece your little “rock garden” will give birth to on a piece of paper.

You can also use shells as a natural material for crafts in the form of Santa Claus. It will turn out interesting and beautiful.

You can come up with your own New Year's pictures from magic pebbles. Do not forget to spray the craft with hairspray - this will make it brighter and will not stain your hands with gouache or smudge. You can also sculpt some details of such a panel craft from plasticine (it can also be coated with hairspray)... or sculpt it from papier mache (paper napkin mixed with PVA glue, see point above in this article).

Craft Santa Claus
Made from plasticine.
You can also make a beautiful Santa Claus from ordinary plasticine (or polymer clay). The main thing is to work slowly and remember to wash your hands when moving from one color of plasticine to another. There we will get pure colors of the parts and the whole craft will look neat.
After making the craft, you need to dry it in a cool place and spray it with hairspray. This is necessary so that it stops being sticky and does not collect room dust. You can cover the craft with acrylic matte varnish with a soft brush. Acrylic varnish for crafts is sold at office supply or craft stores.

Such varnished, non-sticky plasticine figures are also good because they can be used inside small Snow capsules. Where the foam snowball will fall. You can make capsules for plasticine Santa Claus with your own hands - from transparent plastic bottles. Cutting off the top and bottom of them and joining them together. Sprinkle nail glitter, sequins or foam balls inside, or cut the fluff from pillows with scissors - the fluff will slowly settle, creating the illusion of snowfall.


Can be done flat crafts made from plasticine. Roll out colored plasticine with a rolling pin on the table. A wooden rolling pin is not suitable - it leaves rough marks on the plasticine. A round glass bottle or a can of any deodorant can be used as a smooth rolling pin.
Place a stencil image (details of Santa Claus, or his clothes) on the rolled out layer of plasticine. We trace with a sharp object. Remove the stencil and cut with scissors along the scratched lines. We get planar parts from which you can put together a plasticine graphic applique. Or make something like this to decorate your kitchen in New Year’s style (as in the photo below).

You can get ideas for plasticine crafts in the form of Santa Claus from New Year's cakes decorated with mastic characters. Santa Claus is often sculpted from sweet confectionery mastic from different angles. Look through New Year's cakes on Google and you will find many ideas for plasticine New Year's heroes.

You can find even more New Year's plasticine ideas for children's crafts in the classroom and at home in a special article on our website
DIY Santa Claus
FROM CONES.
Pine and fir cones can also be painted with gouache (like the stones from the paragraph above). And when painted, the cone immediately becomes interesting basis for a New Year's craft in the form of Santa Claus. We insert beads and buttons, a fluffy dusting brush painted with white gouache becomes a fluffy beard. Cut out a hat from a piece of felt.

Also in the company of Santa Claus With your own hands (also from pine cones) you can make a deer (with antlers made of fluffy wire), a snowman, a penguin in a felt scarf, and a green Christmas tree pine cone, decorated with beads and flowers cut from lace.

Other bright crafts and toys made from pine and fir cones are collected in a large article with photographs
Volumetric Santa Claus
From modular origami.
If you know how to fold an Origami module. It doesn’t cost you anything to create such a pot-bellied Santa Claus. YouTube is full of videos that will teach you how to fold a triangular paper origami module in 2 minutes. For 2 pm make yourself a bunch of modules (the family will help), and on the third evening fold Santa Claus. Assembly takes place without glue. Each module fits into each other - like a groove into a groove.

Green Christmas tree also made from modular origami. And you can make a snowman and a deer, if you think with your head...

DIY Santa Claus
FROM PAPER CONES.
We all know how to make paper cones - like bags for seeds. We need a semicircle - which we roll into a bag and glue the side seam of the bag with glue (or not with glue, but with a stapler).
Or you can provide paper latches on the bag - slits and ears that fit into each other. On the template below we see that on the left we have an incision (short dotted line), and on the right there is a protruding eye (along the edge of the hem of the fur coat). We cut out such a template (diagram below), paint it and connect it into a bag - inserting the eyelet into the cut (or you can simply fix everything with glue without any ears).

Santa Claus is easy and quick to make based on a regular cone. Below I give large diagrams for large figures. The actual size of the diagram corresponds to A3 format - it’s like two landscape pages. You won't be able to print it on a printer - you need to go to the printing center. But the craft will be large and nice in size.

Here is another large template for making Santa Claus out of paper - it is also in A3 format - print in the center of the printout.

But this template is smaller - if you want, you can also enlarge it to a large size. Each craft is beautiful - you must agree. You can just imagine how Grandfather Frost stands proudly on the windowsill and pleases the eye. Great craft - elegant and simple.

Children's craft Santa Claus
From toilet paper rolls.
Cardboard rolls are great for children's crafts. In the photo below we see how you can play up the image of Santa Claus based on this “toilet roll” form.

The elements can be made from paper, felt, cotton wool, formiam, fabric or knitted socks.

Santa Claus and dishes
(pots, cups, plates).
And in this section of the article I want to show how to make an original craft from non-standard materials with your own hands.
You can make Santa Claus from flower pots. We will make a beard for this grandfather from gypsum plaster. You can buy it at a hardware store gypsum plaster(it’s cheap in small packaging, you can buy half a kilo). We dilute the gypsum mixture with water to a thick porridge. And quickly, before it thickens and dries, we sculpt a beard for Santa Claus. Pots can also be coated with plaster porridge, in those places where we depict fluffy fur or snow. If sprinkled on top glitter(nail polish) it will turn out that snowy places sparkle in the sun.


Or here are New Year's crafts from disposable colored cups. Here the cups are placed in a circle on the floor (glue the round dance together using hot glue from a gun). Then on a round dance we make a second tier-floor, then a third - they themselves will be rounded into a spherical shape (because the cups at the bottom are narrower than at the edge). We make one ball for the belly and one ball for the head of Santa Claus. We make mittens, a belt, eyes, a mustache, and a hat from paper and fabric.

And we begin to make a green Christmas tree from cups according to the principle of a round dance. But we put a paper cone inside it. And we also attach the cups along the upper floors to the walls of this paper cone.
From the remaining red cups and toilet paper rolls you can make cute Frosties with a cotton wool beard.

And disposable flat plates can become a source of such children's crafts. Place beige paper on the bottom of the plate (this will be the background of the face). Without a beige or pink background (just on a pale plate) it will not be beautiful.

Craft Santa Claus
Made from felt and formiam.
Now a new ornamental material has appeared on sale - formiam. This brainchild of modern technology is very suitable for making voluminous, plump crafts that are well attached to each other using hot glue. In the photo below you see a Santa Claus craft made from formim (a porous thick material).

But crafts made from felt will still be more durable. And warmer to the touch. More dear, closer.


You can make Santa Claus appliques from felt on a round piece of paper - you will get a toy pendant for the Christmas tree.
Please note how in the photo below the fastening of the applique parts is done - with sparse stitches, parts are tacked here and there (the beard and mustache are held on by 4-5 stitches).
If you make a HOOP from cardboard, wrap it in fabric and decorate the front with a figure of Santa Claus, then we will get a headdress for the New Year. It can be worn for children's holiday dinners, or worn directly over a hat on the street - delighting passers-by with its New Year's look.

In addition to hard felt, you can use SOFT FLEECE. This is the material from which sweatshirts and bikers are made. It is suitable for sewing soft toys in the form of Santa Claus or plump pillows (as in the photo below).

But Santa Claus, where FELT (wool for felting) is present, is in the left photo below. And also a figurine of Santa Claus made from a ball of red thread and a piece of white centipon and a felt cap. The face can be made from a tennis ball, tinted beige.

Knitted Santa Claus.
You can also knit a New Year's Santa Claus from threads with crochet or knitting needles. Below, for inspiration, I have posted several photo samples of such DIY crafts.
You can simply crochet a flat figure. Use it as an applique for a craft, or as a toy pendant for the Christmas tree.

You can make a beard from chopped bundles of thread (fluffy like a real one) or simply tie it with a wedge (like a knitting sprout).


And here is an example of Santa Claus knitted with his own hands. Choose your favorite knitting method and start making a real surprise for the whole family with your own hands. Such a New Year's toy will accompany your holiday every year, like a tradition, like a family heirloom, made by your mother's beloved hands.

Here are some ideas on the theme of Santa Claus with your own hands - from everything - from paper to knitting. Now you will definitely make yourself a magical Santa Claus who will fulfill your wishes this year. Because you deserve it. Because you are good.
Continuation of PAPER crafts in the form of Santa Claus - in our SECOND article
Olga Klishevskaya, especially for the site ""
If you like our site, you can support the enthusiasm of those who work for you.
Happy New Year to the author of this article, Olga Klishevskaya.
There is no doubt that Santa Claus is the main character of New Year's celebrations. It is his miracles and gifts that children wait for, they send letters, postcards, and under the tree for the fairy-tale wizard, a return gift for children is often hidden - a New Year's craft. Santa Claus himself often becomes a character, embodied in various types of creativity.
DIY origami
A person who is interested in origami will have no questions about how to make small paper figurines in the form of Santa Claus. By choosing the simplest and most understandable option among the proposed schemes, even a person inexperienced in this type of creativity can make a New Year’s figurine out of paper. Santa Claus, created with your own hands from a small piece of colored paper, will be an excellent addition to the main gift or card, and will also be a wonderful sign of attention.


Felt crafts
Felt is a very practical and convenient material for creativity. Felt toys are not only colorful and pleasant to the touch: due to the fact that the pattern pieces can not only be sewn, but also glued to each other using hot glue or an adhesive stick, the creation is also suitable for children.
In order to make a felt Santa Claus with your own hands, you will need:
- red felt:
- flesh-colored felt;
- white felt;
- white floss;
- needle;
- padding polyester or cotton wool;
- pencil;
- scissors.

Work progress (step by step):
- Print or redraw the product pattern on paper, cut out the details.
- Bend the red felt in half, use a pencil to transfer the largest part of the pattern (in the form of a drop) onto it and cut it out. Sew both parts of the part together, leaving a centimeter section unstitched. Through the resulting hole, fill the product with padding polyester or cotton wool (for convenience, you can use a pencil), and then sew up the hole.
- From flesh-colored felt, cut out 1 piece in the form of an oval. This is the face of the future figure. Having placed the part in the desired place, place white felt parts on top of it: the beard and the frill of the hat. The frill should be sewn around the entire perimeter, and the beard should be sewn only at the point of contact with the figure’s face.
- Cut out the remaining parts from white felt: mustache and pompom of the hat (2 pcs.). Sew the mustache over the beard, stitching the piece only along the top edge.
- Cut a small circle (nose) from flesh felt and sew it on top of the mustache.
- Place the end of the Santa Claus hat between two pompom pieces and sew them together.
- Embroider or draw eyes. Fasten the thread in the form of a loop.


Various decorative elements will decorate and diversify the craft. Santa Claus can be made not only in the traditional red and white color scheme, but also have a blue or green suit.
Bottle decoration
It's no secret that the most universal New Year's gift for people in close social circles is champagne (or other alcohol) and chocolate (or candy). The original Santa Claus, hand-sewn from colorful materials, will make the gift unique and memorable.

Making crafts from bottles is also suitable for younger groups of kindergarten: to do this, simply fill transparent bottles with red paper, glue a cotton wool beard and plastic eyes on top, and complete the image of the main New Year's wizard with a red sock or paper cap that imitates the character's hat.


Crafts made from cotton pads
Cotton pads and cotton wool are the easiest materials to use in kindergarten. Children can glue cotton pads (or balls) onto templates prepared in advance by adults or make a craft entirely with their own hands, first painting it and then decorating it with cotton wool parts. These can be snowflakes cut out with a figured hole punch, the cotton beard of Santa Claus, as well as details of his costume.

Identical templates, decorated with details from cotton pads and cotton wool in accordance with the tastes and skills of each child, will become wonderful and different gifts that children can take home and give to their loved ones.

For creativity in older groups of kindergarten, more painstaking and complex work is suitable - creating crafts from cotton swabs. Sticks attached with glue will be a good building material for creating fabulous winter landscapes.


Santa Claus made of plasticine
For children in older groups of kindergarten, as well as for younger schoolchildren, modeling from plasticine will be easy. Depending on the child’s skills, you can choose step-by-step instructions for products of varying degrees of complexity: from the simplest to figures with a large number of small parts.
Santa Claus made of plasticine will become the main character of fabulous winter scenes and New Year's stories.


Figures made from threads
Creating a fairy-tale character from woolen threads is a labor-intensive process that requires not so much special handicraft skills as it takes a lot of time and painstaking work. However, the resulting figurines have a very “homey” appearance, evoking a feeling of coziness and warmth.


Santa Claus made of paper
Paper crafts are extremely diverse not only in type, but also in the types of techniques used in the process of their creation. Paper of only two colors (green and red), rolled and fixed in the form of cones and complemented with small details (a face with a beard, Christmas balls) will become the basis for creating a beautiful

