09.09.2019
That's what the bar is. — Stand with outstretched arm. What muscles work in the plank exercise?
Plank exercises are aimed at strengthening Cortex muscles, which are responsible for stabilizing the pelvis, hips and spine. These are the abdominal muscles (anterior, lateral and deep), the lower back muscles and the pelvic muscles (buttocks, hip flexors and pelvic diaphragm muscles).
Thus, this original exercise is primarily designed to create a rigid muscular corset of the abdomen and hips. In other words, the Plank will allow you to simply but effectively tighten problem areas, which are most often loose and thick.
Classic exercise - straight front plank is isometric, that is, performed without moving the joints. Exercise is a great way to impact your waistline - get rid of your belly fat and reveal your six-pack abs.
The Planck exercise is often recommended as a therapeutic exercise to strengthen the back muscles (for example, after injury) and after childbirth (removes a flabby, saggy belly after pregnancy).
Technique for performing the plank exercise:
It consists of “hovering” above the floor for several minutes, leaning only on your arms and toes.
The feet should be together. This position of the feet complicates balance, and, consequently, the load on the abs and core muscles will increase.Legs and buttocks should be kept straight and tense.The lower back must be straight while performing the plank. The stomach is inward and pulled towards the ribs. However, the retracted abdomen should not in any way affect breathing, which should be uniform. The elbows should not create excessive stress on the shoulders, and therefore are located exactly under the shoulder joints.
Side plank.
Involves increased stress on the lateral abdominal muscles and shoulders.
With support on the elbow.

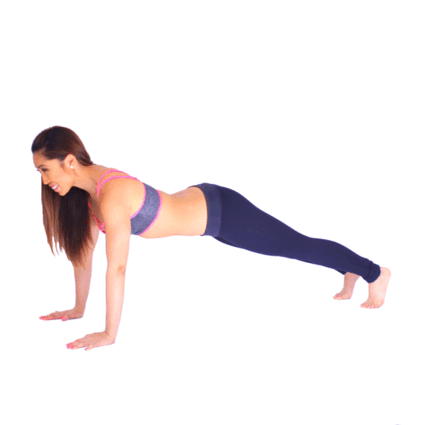
Supported by an outstretched arm.

The front or side Plank must be held for 30 seconds to 2 minutes.
If you cope with this task relatively easily, the exercise can and should be complicated.
There are a large number of Plank options with added dynamics. The effect of such dynamic exercises increases significantly compared to the classic straight Plank. To the static load, which is aimed at achieving elasticity and firmness of the flesh, aerobic exercise is added to combat fat deposits.
For clarity, all options for correctly performing Plank exercises are illustrated with animated photos - gifs.
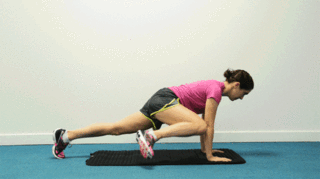
Straight Leg Raise in Plank Position on outstretched arms - for the muscles of the back of the thigh, buttocks and abs. This exercise can also be performed using your elbows.

Combined exercise: Plank with arm extension and push-up.
Starting position - PLANK with outstretched arms (lying position). Perform push-ups and alternately raise your arms. Obviously, performing such an exercise is more difficult than classic push-ups.

Lowering onto the forearms.
Take a classic Plank position with your elbows supported. Raise your body to the top position using your arms. Pause at the top, then change the direction of movement and return to resting on your elbows.
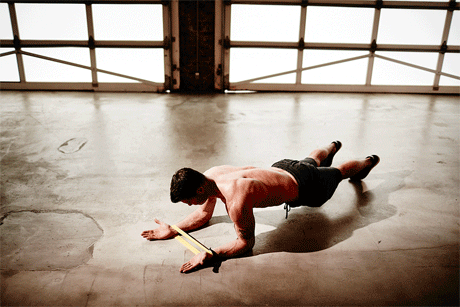
Plank exercises with elastic band.
Walking in Plank position with straight arms.

Dynamic Side Plank
for the oblique abdominal muscles. An excellent exercise to combat fat deposits on the sides of the abdomen.

Side plank with twist
A more complicated version of the dynamic side plank for the oblique (side) abdominal muscles.

Plank exercise with knee bending outwards.
Take an emphasis lying on outstretched arms. Bring your right leg forward until your knee touches the elbow of your right hand, or as close to your right hand as you can. Watch your hips - they should not sag or go too high. Return your leg to the starting position and repeat on your left leg.
With the knee and elbow bent outward.

With the knee bent inward.
Jumping with legs raised in Plank position.
Take a plank position with your arms extended. Jump slightly, spreading your legs out to the sides. Make sure your upper body does not rotate. Then jump and return your legs to the starting position.
The same can be done in the classic Elbow Plank.

Dynamic performance of the Plank exercise using a Fitball.
A functional exercise that works all the muscles of the back and abs, forcing you to concentrate your attention as much as possible.
We place our legs below the knees, the closer to the toes, the more difficult it will be to maintain balance, and we stand in a stance (as for push-ups, with outstretched arms).
If you cannot lift yourself up with straight legs, bend your knees and perform the exercise with a small amplitude.

Plank with twist.
Another exercise to strengthen your waist.
Obviously, some of the exercises given here can only be performed by physically trained people. But almost anyone can hold the classic Plank for at least 10 seconds. And then more! You will still be surprised at the capabilities of your body!
Don't forget about Plank, and your body will become slimmer and more sculpted!
This is a static exercise, and this fact mainly makes those craving toned muscles doubt its effectiveness. What is our psychology like? It must be hard. And then you stand in the plank for a minute or two. But first try to stand correctly for this minute.
The exercise involves several muscle groups in the process at once. And by changing the positions of your arms and legs, experimenting with the number of support points, you will train your abs, arms, back, buttocks and a large number of different muscle groups. And the best part is that this exercise does not require special conditions. At home, in a hotel room (what if you're on a business trip?) or, as we did this time, right in the park - wherever there is a flat area for support, you can make a plank.
These exercises do not require additional equipment, but at the same time they are very effective for the abdominal muscles and core muscles. If you always don’t have enough time for sports, then the bar is a godsend for you. A minute-long exercise instantly warms up your entire body, and if you do the plank every day, you will notice that you have not only pumped up your muscles, but also become more resilient. I will show you classic and complicated types of planks. Only one thing is important - to monitor the technique. Let you stand in the plank for less time, but load your muscles correctly.
Straight arm plank

Effect: Works the abdominal muscles well.
Technique: your hands are under your shoulders, do not bend your knees, your back should be straight. Make sure that your head does not fall down, direct your gaze forward. Tighten your abs as much as possible and twist your pelvis, that is, your butt should not sag or stick out.
Start with 1 minute, increase the time by 30 seconds every two days. So gradually increase the bar to 3 minutes. If you are tired, do not lower your knees to the floor, but go into the “downward-facing dog” pose - this way you will rest, but maintain the effect.
Elbow plank (a more complicated version of the classic plank)

Effect: works well on the abdominal muscles, pectoralis major muscle, deltoid muscle, quadratus lumborum muscle.
Technique: We still watch our back - it is important that it is straight, the lower back does not sag, and the butt does not stick out. If it’s easy for you to do a plank on your elbows, then you’re doing something wrong! In this position, the muscles that hold your body in an upright position tighten; Not only the stomach is pumped, but also the muscles of the arms, back and front of the thigh.

Full vacuum: super yoga exercise for a flat stomach
- More details

Splits like Volochkova: 20 stretching exercises
- More details
Side plank with straight arms or on the elbow (complicated version)

Effect: The external and internal abdominal muscles are well worked out, the gluteus medius and latissimus muscles are involved.
Technique: the body is one straight line, the legs stand either on top of each other (this is more difficult) or one in front of the other (as in the photo). You need to keep your abs as tense as possible, your upper hand on your lower back or pointing upward with your palm open. Make sure that your pelvis does not sag down.
To change sides, do not kneel. Go to the classic plank with straight arms, and then turn in the other direction.
We start with 1 minute on each side. If it is very difficult, rest, but again in the downward-facing dog position. Return to the starting position and hold for a minute. You will notice that each time you need less rest, you will become more resilient. Then increase the time.
Who, if not doctors, will help cope with health problems, people often think. But in fact, in some cases, everyone can help themselves. For example, with spinal problems, the well-known plank exercise can help.
This is not its only purpose. For people seeking to lose weight and interested in helping their spine and strengthening their muscles, the article provides information about the plank exercise, why it is done and how to learn how to do it correctly.
You can achieve effective results with a set of simple cardio exercises, but be sure to add a bar to this list.
Static load, when performed regularly, can work wonders - the main muscle groups are pumped, the buttocks are tightened, the shoulder girdle and limb muscles are worked out.
Everyone has heard, but not everyone has learned
Recently, the plank exercise has become one of the most popular among all athletes, including dancers, swimmers and just people who play sports at home.
Weight loss groups promote the plank exercise all over social media. But unfortunately, not everyone has yet learned the technique of performing this exercise. Important! Doing planks incorrectly is harmful to health. Especially for .
The plank exercise is considered very convenient because it can be practiced anywhere, at a convenient time and without the use of additional equipment.

Increase the load gradually; if you can’t do the plank for a minute, start with 30 seconds, or even 20, then add 5 seconds every day.
Let's talk about the benefits of the plank exercise
Every step in life has its own purpose and consequences. The same goes for physical exercise. Each exercise is designed to bring some benefit to the body or leave consequences if performed incorrectly.
It is worth noting that the plank is a fairly universal exercise and will come to the rescue in many ways.
By doing this exercise, the following muscle groups are strengthened:
Gluteal muscles
They are strengthened and pumped up. And those people who are rarely friends with sports will encounter the problem that it will be difficult to raise their legs high, but these are only temporary difficulties. The good news for women is that the bar will help fight.
Back muscles, as well as shoulders and cervical spine
This is a good prevention of osteochondrosis of two parts: and. It also helps with discomfort between the shoulder blades. And, of course, for shoulder pain.
Leg muscles
This exercise involves all the muscles of the lower extremities, because they bear the greatest load.
During the process, you may feel some unpleasant sensation in your legs, but this only indicates that the leg muscles are actively working.
And one more good news for the female audience - after systematic training that includes this exercise, you will be able to admire your hips.
Abdominal muscles
With this exercise, the entire torso is actively involved, which means you can’t do it without the abdominal muscles. It is advisable to know that the main thing here is pumping the lower and lateral muscles.
Arm muscles
During training, the upper limbs bear about half of the body weight. Accordingly, with the correct positioning of the body, the biceps and triceps are strengthened. After a couple of weeks, you will feel significantly more strength in your hands.
Sequential techniques for performing plank variations
Based on where you need more pumping and special attention, you can choose the option to perform this exercise.

Classic plank
In this variation, the muscles of the arms are most involved.
Subsequence:
- Take the “lying support” position that you occupy when doing push-ups from the floor.
- Be sure to lift your heels off the floor, and your hands to create a right angle with your wrists.
- You need to exhale, tensing your abdominal muscles and straightening your body. The face is directed straight down. Keep your shoulders as relaxed as possible.
- Stay in this position for one minute, then rest for another three. And proceed to another approach.
- Keep your body as straight as possible, otherwise you can harm your spine.

Side plank
The muscles of the shoulders and abs are most involved in this variation.
Subsequence:
- Starting position – lie on your left side and lean on your straightened left arm. Make sure that the hand is parallel to the shoulder joint.
The feet must be closed together and the hips raised.
- You need to keep your balance.
- It is advisable to remain in this position for 15 to 30 seconds. If this time is easy, it can be gradually increased. You can rest for a few minutes and repeat one more time.
- If you have problems with balance or your hand, you can take the starting position leaning on your forearm. This type of plank is difficult, but very effective for seriously working out the abdominal muscles.
Forearm plank
This variation of the plank uses all of your muscle groups to the maximum.
Subsequence:
- Starting position - lying down, leaning on your forearms, and not touching the floor with your feet, just your toes.
Place your elbows shoulder-width apart and clasp your hands.
- Keep track of the distance between the forearm and the shoulders; a right angle should be obtained.
- The body is positioned as evenly as possible, parallel to the surface (not higher, not lower). Shoulders are relaxed.
- Perform the exercise for at least one minute, repeat after a break.
When creating training programs, it is important to use the majority of muscle groups, increasing the strength and endurance of the body as naturally as possible. Strengthening the core muscles is important. The abdominal plank is one of the core stabilizing exercises. It is actively used in yoga, strength training, Pilates - one of the fitness techniques.
Regular practice of this exercise reduces the risk of back problems that modern athletes so often face due to intense training.
Correct technique for performing the elbow plank exercise
The classic version of the exercise does not require any special equipment. It can be practiced in the training room, at home or in nature, using any convenient time. The key to quality results is following the correct execution technique. The exercise is static and as simple as possible.
However, beginners can make mistakes that reduce the effectiveness of the pose and can even harm their health. Knowing how to do the abdominal plank correctly, unpleasant consequences can be easily avoided.
- Starting position - lying on your stomach, rest your forearms on the floor, place your elbows below the level of your shoulder joints.
- Execution technique: pushing off, exhaling, lifting the body.
- The arms remain in the same position: they should be bent at the elbows at a right angle, the forearms pressed to the floor.
- The head, neck, torso, and legs are held in the same plane.
- The toes of the feet rest on the floor.
Is it important to know how to hold the abdominal plank correctly?! To maintain the desired position of the body, make sure that the stomach and hips do not sag downwards, and the pelvis is not raised upward. The muscles of the legs, buttocks, and abs should be tense.
This position is the most stable. The body should be stretched along a straight line. It is recommended not to overstrain your back and neck. While holding the position, you need to breathe calmly and evenly. This is how the best effect of training muscle groups that support the desired posture is achieved.
Beginners need to monitor the correct body position. It's best when a trainer does this. When practicing on your own, you can monitor the progress of your workout using a mirror. Holding this pose helps to pump up the muscles of the core and shoulder girdle, improves the strength, flexibility, and endurance of the practitioner.

The classic technique allows you to strengthen your abs by loading the rectus abdominis muscles. If it is chosen as an abdominal exercise, how many sets should you do per day or week to achieve the desired results? How long should you hold the pose for maximum effect? Is it possible to pump up your abs with just a plank?
The speed of obtaining results depends on the frequency of training and the effort per approach. The most useful and effective will be a gradual increase in loads. For example, this could be a monthly training program, providing training 1-2 times a day with a gradual increase in the time of holding the pose from the initial level to 5 minutes.
Expanding your workout routine with different variations of the plank and other exercises that strengthen the abs will increase the effectiveness of your training.
Benefits of Regular Practice
- Simplicity of training, combined with the possibility of increasing the load, as well as the inclusion of different muscle groups in the training process. Therefore, beginners and professionals can build muscle strength with the help of a plank.
- Maintaining a straight body requires the use of many muscles in the body. Variations of the exercise make it possible to redirect the load to different muscle groups, achieving the goal.
- Including a plank in a set of exercises allows you to strengthen your core muscles, reducing the risk of injury to the lumbar region during intense training. This will significantly reduce the likelihood of various spinal problems and back pain.
- Regular practice helps improve posture. Although the plank is described as an abdominal exercise, maintaining the pose requires tension in the muscles of the neck, shoulders, core, and lower extremities. The muscles are strengthened, and a useful habit of maintaining the correct position of the body is formed. The result is a toned figure and beautiful posture.
- Performing various variations of training helps to develop a sense of balance, which will help achieve significant athletic success.
- A static pose promotes gentle stretching of muscles and ligaments, which means an increase in flexibility - a quality that is useful not only for sports, but also for everyday life.
- For those who want to lose weight or dry out their belly through physical training, daily plank practice is perfect. With its help, not only the muscles of the abdomen, thighs, and buttocks are strengthened and tightened, but also a large number of calories are burned and metabolic processes are accelerated.
- Improved psychological state. Stress leads to the formation of muscle tension. Prolonged forced positioning of the body during the working day causes tension and poor health. Holding the pose for several minutes every day has a positive effect on the nervous system, providing a lasting boost of energy and vigor. It is not for nothing that the plank called kumbhakasana is one of the basic yoga asanas and an integral element of the “Sun Salutation” complex.
Plank variations and their features
By exercising regularly, you can gradually increase muscle strength and endurance. As a result, the time spent holding the pose is lengthened. How long can you hold the bar maximum? There is no point in endlessly increasing the duration of the training.
It is better to start using its more complicated versions, which allow you to increase the work of various muscle groups. There are several dozen such variations, which makes the plank a universal exercise. It is recommended to start with the classic position, expanding the training with new options as you practice.

Main training variations:
- One hand emphasis. The starting position is the same as with the classical method. The practitioner extends his arms one by one, continuing the straight line of the body, and holds the pose as long as possible.
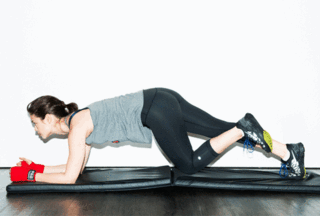
- On one leg. In this variation, the elbow plank is done with the limb extended back. It is held parallel to the floor, maintaining the correct position of the body, then the leg is changed.
- Emphasis on the leg and arm. With this method, stretch the right arm forward and the left leg back. They maintain the position for some time, then change the position to the mirror opposite.
- Tilt up. Unlike the classic version, the hands rest on a higher surface: a gymnastic ball or a bench.
- Tilt down. For this variation, your legs must be elevated. They are placed on some kind of support. We must not forget that any method of execution requires maintaining a straight body position.
- On straight arms. This training option is also called the upper bar. Support is carried out on outstretched arms. This is an exercise to pump up the abs, but with its help you can also strengthen the muscles of the shoulder girdle.

Beginners may find it easier to do a simplified plank on their knees. It’s not difficult to figure out how to do this exercise. The emphasis is transferred from the feet to the knees. The angle of flexion of the limbs at the knee joints is 90°.
How can you make the plank exercise more difficult?
You can make the exercises more difficult by moving from the classic position to a position with straightened arms. To do this, alternately straighten the right and left limbs, hold the upper bar, then bend your arms at the elbows one after the other, returning to the starting position.

This type of training to some extent adds dynamism to the static posture. There are many dynamic training complexes that include different plank techniques.
Transitions from one method of execution to another increase the intensity of the load. You can find out how to pump up your abs using such a dynamic complex from a fitness trainer. You can consistently perform different variations for a minute each, or alternate static exercises with dynamic ones.

How to learn to do a side plank?
The side bar is noticeably different from the classic version. This training involves other muscle groups.
By alternating two different types of exercise, you can achieve a deeper impact on the abs and core muscles, work the rectus, transverse, and oblique abdominal muscles. How to do a side plank?

- Starting position: lying on your side, leaning on your bent arm. Feet together, legs straight.
- As you exhale, lift your body up, stretch your body along a straight line, while resting on the edge of your foot and forearm.
- Hold the position as long as possible, without overexerting yourself and monitoring your breathing.
- Relax, returning to the starting position.
- Repeat all movements on the other side.
The side plank, like the elbow plank, can be done in several variations: with the leg raised up, the legs elevated, or the arm extended upward.
Restrictions on performing the plank
Looking from the outside at a person actively engaged in training, one may get the wrong impression of the ease of the technique. After all, you just need to maintain a straight body position. But for a beginner, maintaining the correct position even for a few seconds can be difficult.
Therefore, at the beginning of training, you should be reasonable in dosing loads. Exercise regularly, but without excessive fatigue, gradually increasing the time you hold the pose.
Planking is considered one of the safest methods of core strengthening. Damage from it is usually associated with incorrect execution technique. If the pelvis and hips sag downward, the load on the lower back increases.
You should not transfer weight to the shoulder girdle and forearms: the whole body should be toned, and the core muscles should be tense. An important part of the plank is breathing. It should be smooth and calm. Concentrating on breathing helps relieve excess tension in individual muscle groups. Here are a few more mistakes to avoid while practicing:
- stooped back;
- raised pelvis;
- deflection in the neck, head thrown back;
- relaxed muscles of the legs and buttocks;
- a rounded lower back or, on the contrary, excessive deflection of this part of the spine.
How long should you hold the bar?
The question of how long you need to hold the bar at the beginning of practice cannot be answered unambiguously. Much is determined by initial preparation, muscle fitness, and the general condition of the body. But there are situations when you should not train:
- pregnancy;
- intervertebral hernia or condition after recent neurosurgery;
- abdominal wall hernia;
- acute back pain, radiculopathy of one part of the spine;
- diseases of internal organs, for which the doctor does not recommend static physical stress.
The presence of a particular disease is often not an absolute contraindication to plank practice. Restrictions are often temporary and can be eliminated with properly selected treatment. The doctor will help you draw up a training program, clarify the permissible loads, and recommend the pace of increasing the duration of the training.
Just a few minutes of exercise and within a month you will notice improvements: the reward will be a flat stomach, a strong core, slender legs, toned arms. An additional bonus will be improved health, nervous system, and improved mood. You need to practice static exercises regularly, then the effect will be maximum.
OK it's all over Now! Thank you all for your attention. We also recommend reading the article on how to pump up your abs at home. See you soon! Leave your comments.
It's spring outside, which means we need to quickly get rid of the excess fat that has accumulated on the stomach over the winter and hone the muscle definition and contours of the figure. Under light clothing, a sleeveless T-shirt or a top, you cannot hide, alas, either your belly or the looseness of your muscles. A wonderful exercise that strengthens the abs, shoulder girdle and back is the plank.
In addition, the bar is simply good for maintaining the muscular-ligamentous corset in good shape. It maintains the elasticity of the back muscles and their tension. What could be the best way to prevent degenerative processes and the development of dangerous posterior protrusion - protrusion of part of the intervertebral disc into the spinal canal? Only exercises to stretch and strengthen the spinal erectors, which include the famous “plank” exercise.
The rectifier muscle is the most powerful:
- It maintains the spine in the correct balanced position.
- Forms posture.
- With its help, the ribs move up and down when breathing.
By straightening and extending the back, the erector muscle simultaneously separates the vertebrae, which reduces pressure on the intervertebral disc. This contributes to an increase in disc height and regression of protrusion. The disc begins to restore its elastic properties not only due to reduced loads:
- Daily training of the erector muscles accelerates microcirculation in the paravertebral tissues.
- The nutrition of the disc, which receives the necessary amino acids and microelements, improves.
- The production of new chondrocytes begins - the cells that make up the hyaline cartilage of the disc.
This is the truly life-giving power of the simple plank exercise.
Development of the muscular frame with the plank exercise
This static exercise develops almost all large muscles of the body and fascia:

- Muscles of the shoulder girdle and upper limbs:
- pectoralis major;
- deltoid;
- supraspinatus and infraspinatus;
- two-headed and three-headed;
- shoulder
- Back muscles:
- trapezoidal;
- widest;
- diamond-shaped;
- thoracolumbar fascia.
- Abdominal muscles:
- oblique (external and internal);
- transverse;
- direct.
- Gluteal muscles.
- Quadriceps femoris muscle.
- Muscles of the back of the thighs.
- Triceps surae muscle, etc.
The plank exercise is available to both men and women and is widely practiced in yoga in a static version.
How to do the classic plank exercise
When performing a classic plank, the following conditions must be observed:

- Absolute evenness of the back - it should be perfectly flat (neither bending nor arching). Hence the name - plank.
- The legs are also always straight and in line with the spine.
- The spine and pelvis should be horizontal to the floor.
- The head, neck and shoulders are also on the same line.
- The position is held for 30 - 60 seconds.
- Support on the forearms or palms: the elbow joint is strictly in the same vertical plane with the shoulder joint.
This position is given by a lot of tension in all muscles, so it will not be possible to take the plank pose from the end. If you rush, you can injure yourself. The exercise requires little preparation.
Who is contraindicated for the plank?
The exercise cannot be done for dorsal lumbosacral hernias with compression of the nerve root or spinal cord, coxarthrosis, hip dysplasia, brachial arthrosis, spondylolisthesis and other serious pathologies of the spine.
Preparatory phase of the classic plank
- Get down on your knees and lean on your elbows, placing them parallel to each other at shoulder level.
- We hold our neck horizontally on the floor, stretching it forward.
- Raising your knee a little, slowly straighten your right leg, resting your toe on the floor.
- Straighten your left leg in the same way.
- Stay in the classic plank for a few seconds, then, lowering your knees one at a time, return to the starting position.
- In the same way, you can prepare a classic plank on your hands (with support on your palms).

Features of the classic plank
By observing the above conditions (horizontalness of the spine, pelvis, neck and head lines), you can gradually increase the time of performing the exercise to one minute.
- In the position with outstretched arms, it is easier to perform the plank due to the greater leverage (the role of the lever-support is played by the hands).
- The wider your arms are, the easier it is, as the area of support increases.
- It is also easier to maintain the position by increasing the supporting area for the legs, that is, spreading the feet. The most difficult exercise to perform is with the feet connected.
This can be taken into account in the scheme of successively complicating the planks, starting from easier positions.
The classic bar can be supplemented with other elements:
- for example, lowering with outstretched arms onto the left or right thigh (twisting);
- making rotational movements of the hips, etc.
When performing all variations of the classic plank, you must ensure that there is no arching in your back.
Other types of planks
Single leg plank
- Take the position of a classic plank (at first it is better to place your hands wider).
- Move the left leg towards the midline of the body.
- Raise your right leg up and keep it straight as much as possible.
- Repeat the plank on your right leg.

Dynamic power option: alternate leg swings.
You can modify the simple leg raise by adding:
- circular rotation of the leg;
- moving it to the side (straight or bent);
- bringing the leg to the chest;
- bending and abducting the leg in the opposite direction.

One arm plank
- Take the previous classic pose, but increase the supporting area for the legs, placing the feet wider than the hip line, and, on the contrary, connect the hands in the middle.
- Maintaining balance with emphasis on your right arm, extend your left arm forward, to the side or raise it up.
- After staying in this position as long as possible, return to your previous position.
- Repeat with emphasis on your left hand.
The more preparation and better physical condition, the more dynamic the change of hands should be.

You can complicate the exercise by adding a rotation of the body towards the supporting hand, keeping the hips motionless.
You can also use a dumbbell for strength.
Plank on one arm and one leg
- Place your palms and feet wide apart.
- At the same time, extend your left arm forward horizontally and raise your right leg.

The exercise also has two options:
- Static - you need to stay in the main pose for as long as possible.
- Dynamic - fast movements with changes of arms and legs.
For those who have all kinds of pathologies with the spine, only static exercises are recommended.
Side plank
- Squat on your left thigh, leaning on your left elbow and straightening your legs.
- Raise your pelvis so that it is in line with your body.
- Place your right hand on your side, behind your head or stretch it up, and hold this static position within your strength.
- Lower your pelvis, returning to the starting position.
- Repeat the exercise on the right side.

The side plank can be complicated by adding:
- twisting elements, moving the raised hand under the opposite side;
- connecting the elbow of the raised arm with the knee of the upper leg, etc.
You can perform the exercise with support not on the foot, but on the knee.
Plank in yoga
There is a reverse plank, when the spine of the pelvis and legs are also straightened, but the emphasis on the palms or forearms is placed behind the body.
In yoga, this pose is called Purvottanasana.

Let's consider another interesting plank, often used in yoga - Chaturanga dandasana.
It resembles a classic plank supported on the palms, but here the arms are bent at the elbows and the body is strictly parallel to the floor. The pose is otherwise called the four-point plank. It is much more difficult to do.
And there is no limit to perfection. For physically trained people, it is possible to hold the body:
- on three points (on one hand and two feet);
- on two points (opposite arm and leg);
- on two points on the weight (only hands).


