28.07.2019
Make a volumetric rooster of paper self-adhesive. Printed toy Cockerel - a caring father. Rooster from threads - Toy on the Christmas tree
DIY in the form of roosters made by their own hands will be relevant not only for the holidays in the new 2017, but every year at Easter. And without them, it is simply impossible to imagine the interior in the style of Provence, Country or Rustic. In this material we presented 6 step-by-step master classes, how to make cute crafts in the form of roosters to decorate the house, christmas tree or festive table from handicraft and even thrust materials.
Master class 1. Cantle in the form of a rooster
Looking at this elegant candy man, it is difficult to imagine that it can be done with your own hands, and also from ... cardboard boxes for eggs. In fact, in order to make no time for making a long time, no time nor the skills of the sculptor artist. By the way, even a child can make most of the job, so this is a great idea of \u200b\u200ba New Year's craft for school or kindergarten.
Such a candy can be decorated with a festive table and surprise your guests. However, it can be filled with not only sweets, but also tangerines, small presents for contests, notes with predictions. And the cockerel can be put under the Christmas tree along with the gift
Materials:
- 7 packs for a dozen eggs;
- Scissors;
- Acrylic paints and brushes;
- Hot glue pistol;
- PVA glue (at least 250 g);
- Balloon;
- Old newspapers;
- White paper.
Instruction:
Step 1. Cut the cones located in the middle of the tray, then their sidewalls cut on the petals of the feathers. Each cone must have 4 pen.


Step 2. Now we need to make head blanks and a rooster throat on the principle of having feathers to cones: the head will consist of 5 feathers, the second cone (throat) is from 6 feathers, the third cone from 8, the fourth - out of 10, the fifth 12 feathers. Finally, make the sixth workpiece, but already in the form of a fan of 8 feathers, and not in the form of a cone, since this part will cover the beginning of the back. To build feathers, use tape, gluing it from the inside of the blanks.

Step 3. While I will postpone the cones and cut the beak, scallop and rooster beard. Scallop need to simply draw and cut. For the manufacture of a beard, you need to cut a blank of two sidewalls of adjacent tray cells (see photo).

The following two photos show the principle of making the beak of our craft. Please note that the beak consists of two cones, because our rooster must cook!

Step 4. Now we begin to form a piece of rooster, namely the head and throat. Slit all the cones, starting from the smallest and ending with the largest glue-gun. Stick also beak, beard and scallop.

Step 5. Draw and cut down two blanks in the form of a 15 cm long wings, then with the help of glue-guns, cover them with flips ... from the same cones.

Step 6. From the covers from the tray, cut the feathers for the tail of the rooster (from one cover there should be 4 pen).

Step 7. Let's go to the manufacture of abdomen-bowls for sweets in the technique of Papier-Masha:
- Inflate the air ball and dig strips from white office paper and strips from old newspapers.
- Tightly cover the entire ball moistened in PVA clay strips (glue can be slightly diluted with water). The first and last layers must necessarily be white. There should be at least 4 layers of paper.
- The next day, when the paper is completely dry, burst the ball and cut the resulting "egg" into two unequal parts (one half must be slightly more). Then put the small part into the big and stick to the bowman gets strong.

Step 8. Attach the rooster's head to the stomach with a cardboard substrate (from the inside). Hot glue glue to the body of the rooster wings and tail. Our caretaker in the form of a rooster already looks surprisingly true!

Step 9. It is time to dye the candlers. You can choose the shades of paint to your taste, because the roosters are different and not necessarily achieve complete realism. Perhaps your rooster will be beautiful in a completely golden plumage? In the same project, brilliant paints for paws, beak, scallop and beard were used, and for painting feathers - pearl.

Please note that color transitions on the cockerel are performed smoothly - from pearl-white to gold and then to green.

Step 10. In order to provide greater stability of your canifier, stick to the bowl of any square support and, of course, two paws made from cones with 3 petals. Finally, paint your paws, fill the bowl of candies and put your handsome on the most prominent place. Now he is ready to raise the mood of all guests after the New Year or Easter table!
Master class 2. Christmas decorations in the form of roosters
In the coming 2017, the Christmas tree must be decorated with decorations in the form of roosters. With your own hands, making Christmas tree decorations is easier and best of the felt, because it is such a bright, affordable and easy to work.

And here is the video instruction on how to make crafts in the form of heart roosters with their own hands.
In this video you can see the general principle of manufacturing felt crafts in the form of cocks.


In addition to the egg with a cock, make some more felt pendants and decorate them willow sprigs at Easter
Master class 3. Paper roosters with hanging legs (for children)
But the idea for children's crafts on the topic of 2017 symbol, which can be done both for school / kindergarten and to decorate the Christmas tree or walls at home.

Instruction:
Step 1. Download and print the template, then cut out all the details.

Step 2. Cut one rope, stick to its ends of the foot - these are legs.
Step 3. Put the legs on the lower loop, bend it on the dotted line and stick to the body.

Step 4. Sharpen the upper loop.
Step 5. Well, that's all, now it remains only to paint the roosters on your taste.

Master class 4. Panel with a silhouette of a rooster in the style of Provence
The silhouette of a rooster, drawn on the roughly sworded old boards, will become an excellent decoration, Rustic or. And the panel with the symbol of 2017 can be a great New Year gift. In the next selection of photos, several ideas of such crafts are presented.


Materials:
- Wooden boards of small thickness. In this master class, the boards made of pallets (pallet) were used, boards disassembled from a wooden drawer for fruits. Whatever boards you choose, fresh or old, before making crafts need to be cleaned and dry.
- Saw or jigsaw.
- Small nails.
- A hammer.
- Morid or acrylic paints of the desired color for the background. If you wish, you can use chalk paints that are sold in finished form or bred on their own (from acrylic paints with the addition of gypsum). With their help, create the effect of an old tree will be easier.
- White acrylic or chalk paint for the image of a rooster silhouette.
- Colorless matte primer for wood (preferably).
- Matte varnish (preferably).
- Brushes.
- Sand paper shallow grain.
- Pencil.
- Paper.
- Stationery or dump knife and scissors.
- Wax for wood transparent or dark (optional).
Instruction:
Step 1. Take up how many boards you need to be led by the panel of the desired size.
Step 2. Make measurements and sawing the boards of the same length. Also prepare two smaller boards - they will play the role of the crossbar and will connect all the other boards.
Step 3. Fold the main boards face down, align them, then across put two smaller boards as shown in the photo below. Now each board is adjacent to nails to transverse crossards.

Step 4. Clean the surface from dust, then apply the primer in 1-2 layer on the panel, giving each layer to dry. This stage is not required, as we need a rough and "old" type of wood and paint, but still the primer is needed if you want to extend the life of your picture and facilitate her care.
Step 5. Now you need to paint the boards, that is, create a background for our rooster. To create the effect of faded paint, a water cell of white and blue color was used in this project, which was unevenly applied. There is another way of staining under the ancient: Color acrylic paint boards in 1 layer, wait for the paint to dry, then wipe the surface with sandpaper in some places or over the entire area.
Step 6. It's time to start making a stencil. If you make a small panel of approximately A4 format and less, you can simply print the picture below, adjusting its size in any photo editor. Then you will only have to illuminate the paper with transparent scotch and cut the silhouette of the rooster with the help of a stationery or dump knife. Voila, stencil is ready!

If you want to make a panel larger, for example, a3 format, then the picture will have to print in two parts (or more). To do this, download the silhouette of the rooster to the RasterBator.net website, print the resulting PDF file, cut the items, then collect them as a mosaic. Next, you can illuminate scotch stencil or transfer the contour of the stencil from office paper to a more dense or laminated paper (see photo).

As you can see, on this stencil, in addition to the silhouette of the bird, the French word "Le CoQ" is cut (per. "Rooster"). You can repeat this idea or come up with your signature, for example, "Bon Appétit!"
Step 7. Fasten the stencil on your panel with painting tape and proceed to the paint white paint silhouette. When the paint is dry, work some sections of the drawing of fine-grained emery paper to create an anthey effect.

Step 8. Hurray! Almost ready, it remains only to apply a layer of wax on the panel and polish it. Keep in mind that a dark wax will give your panel to your panels even more "skipped", and transparent - just protects.


The volumetric container of colored paper in the technique of appliquational torches is a wonderful handicraft for children in elementary school, which will help to develop a small motility of the child's hands, to instill a feeling of color compatibility and prerequisite. In addition to other cockerel made in this technique, it can become an excellent idea of \u200b\u200bdesigning a New Year's postcard, which a child will be happy to make it hands for mom, dad, grandparents.
We recommend to initially make such a cockerel (either at least print a final picture), and then start learning children to the first movement skills. It is also desirable to prepare multi-colored paper squares before the lesson, so that children do not spend time at this time, because in the process of such a routine work very often they lose interest in further work. We also recommend splitting and make it in 2-3 receptions.
How to make a volumetric sheal from colored paper or craft to the new year 2029 for elementary school or in kindergarten
Before you begin to prepare the materials necessary for crafts, I want to pay attention - paper material for cutting squares is a thin corrugated paper either colored napkins. Both are perfectly attached to paper, and give the craft a bright look and good volume. Required material:
- Corrugated paper (colored napkins);
- tight paper sheet A4;
- glue stick;
- scissors;
- match;
- cockup pattern.

We start working with. After that, the cockerel's tail can be divided for convenience, as shown in the figure below.
Cut the paper on the squares size of about 1.5 * 1.5 cm and begin to fill in them by the caller.
To do this, take each square, put a match in its center and screw the paper around the match in a clockwise.
 Now lubricate the base of match with paper glue and attach to the template in the right place.

As a result, at this stage it has such a job.

Then we take the next color and "fill" the other element of the rooster, for example, head and neck, not forgetting at the same time to highlight the eye with another color.

It is done with all other squares.


It remains to add tail and foot.

Near such crafts can slightly merge, so to see them as clearly better to look from afar. Although children are unlikely to raise attention, children's fantasy is an infinite storehouse for the development of creative abilities.

Necessary materials:
Scissors
- Set of colored paper
- Box
- PVA glue
Stages of work:
Prepare boxes of different values. From the box, cut down the part that closes the box, over the lines of bend, make cuts (they should be ½ height of the box itself). On the cuts, beaten parts of the box. Two opposite parts are wings, and the rest are tail and head. Wings round up. Tail Take up to the very base. Cover my head, moving away from the top and to the very base, so that the form of the triangle is. Decorate the cradle: make earrings and scallops.
Carnish Cockerel with your own hands
You will need:Plastic bottle - 3 pcs.
- Yellow ball from dry pool
- Red and yellow plates
- Red and yellow disposable cups
- Black marker
- Stapler
- simple scotch
- double sided tape
Work process:
From 3 bottles, cut the upper parts, secure them with a scotch with each other. On the edge, care about disposable cups. They must be attached to the neck of the rooster with the help of tape. Colors must be alternating. From disposable plates, cut the edge, make cuts from the inside. As a result, you got feathers. Tail and feathers assemble a stapler. Insert the tail in the incision. Connection location Cover the packaging paper. Wings also need to be cut with disposable plates. Hold your head with bilateral scotch. Scallop, beak and bead cut with red disposable plates. Insert the cut parts into the cuts on the head. The eyes are also created from disposable plates.
Cockerel 2017 do it yourself
You will need:Beads for eye
- hot glue
- Boxes from eggs
- Groundovka
- Acrylic paints
- balloon
- Old newspapers
- scissors
- 2 beads
- PVA glue
How to do:
Two cones from the tray from egg eggs cut out one side of each cone cut. Cut cones connect with each other cut down. You will have one big cone with 4 petals. In order to create a neck and head, connect 5 cones among themselves. To the top they will expand and become larger in size. Cut the scallop from the side of the tray. Cut the beak from the lid, which will consist of two parts. Feathers are also created from cones. On top of the cardboard, they are fixed with hot glue. The length of one wing is - 15 cm. Similarly, make billets for the tail.
The next stage is the creation of foot. From the copper wire, bring the shape of the paws. In order to give the necessary effect, twist the corrugated tube. Between the corrugated and metal tube insert the left tail. For strength, the lower part is filled with glue. Cut claws from the bottom. They must be long and narrow. It is necessary to fix them with glue. Feet with a torso paint the aerosol paint.

Prepare a stationery knife and a construction foam. All sections should be neat and smooth. You can cut the items separately. In complete, glue them with glue. Bring to the desired form can be sandpaper. Additionally, treat acrylic smear, wait full drying, reappear and process the PVA glue. It will allow paint better to take.
Staining start from my head. Stick your eyes on the head. To create a beautiful scallop, make melts on paper, transfer to the foam, cut out, stick to the right place. Take care of the preparation of the shape for the wings. Leave the back open. The top of the wings close up with feathers made with corrugated bottles. Last row bent the wing inside. Slide paint, leave for drying, attach the perforated ribbon and screws. Take a tail. Take the grid, bend it. Cut the feathers from bottles. Separately paint them on both sides. First apply black, and then - a little blue. Attach feathers with wire to the grid. As soon as the paint is dry, cut the feathers for another two parts so that the tail seemed to be more lousy.

You will enjoy it.
For the back, put the feathers from a transparent bottle. The width of one pen must roughly compose - 2-2.5 cm. Attach them on the back at once 3-4 pieces. Use screws for fastening. When you fix feathers on the neck, cut off the top. Stick the last row of feathers to hide the hats of the screws. Smaller feathers stick in the nape area and side from the ridge. All parts that you were painted, close the construction scotch and bags. First apply yellow paint, dry it. Add a few orange strips.
The final barcode is shores. Cut 2 strips, make an incision to the stationery knife. Insert them between the metal plastic and corrugated pipe. Delicate scorch with a yacht varnish.
How to sew a rootier with your own hands
You will need:Cardboard
- Threads, scissors
- orange, blue-green, black and white fabric
- Pinzet
- Vata.
- Scotch
- Glue
- Colored paper

Stages of work:
On the cardboard sheet draw a sample toy, cut it out. Discuss the wing separately, cut, see how they will look. Sample cut into separate parts so that you feel comfortably work. Each piece of the sample match with a separate piece of fabric, cut out in turn from the fabric every item. Each item should be 2. Head cut out of white fabric, the top of the wing and the torso - with a blue-green fabric, and the lower part of the wing and tail - with black fabric. Beard, paw, beak, scallop and eyes Make with colored paper. All parts for head Sust. With the sewing of the scallop, some difficulties may arise. The fact is that it is wider than the head. Sew it better outside. Stick eyes with colored paper.
Cooker suit with his own hands:
To the torso, make an input of 1.5 cm. Details Connect from the inside. The tip of the foot is inside. Wings Sustice outside, put a soft filler inside. If it is not at hand, an ordinary cardboard is suitable. The lower half is sustaining from the outside, enter to the body, connect through the cardboard of the seam. Tourib try on the head. Sew covers with a torso. The connected details fill with cotton. You need to fill through the hole in the tail. The hole is very small, so you need to be filled with a crawler with small portions. You may have to use tweezers. Tail details Squeeze out the outer seam, fill it with cotton.
Paws can be made of cardboard or piece of fabric. Pick the fabric of the desired size and color, make several square parts. Cut the tips, sew the oblong paws. Fill with cotton. To the body of the suite of the paws, wings, tail. Cut, not assigate. Toy cockerel with his own hands ready.
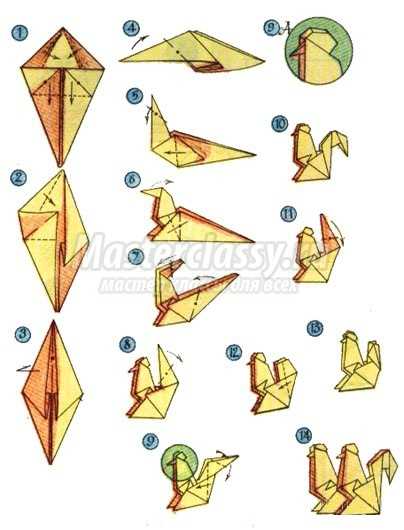

This is the easiest option to create a craft. There are several ways. You can use the technique of origami, queening, cutting with scissors, etc. Paper craft can be put or hang on the Christmas tree, glue the window, decorate a festive table. Excellent solution - the decor of the napkin. It will look quite restrained and at the same time - original. If you are using origami, you can immediately fold the napkin in the form of a cock. Schemes we will provide you.
Cockerel do it yourself patterns.
Rooster - symbol of 2017, with his own hands made from various materials, will become a wonderful memorable gift for a loved one.
And according to believe, he will also bring good luck to the house where it is settled.

A simple symbol of 2017, with your own hands, you can make it possible to make it possible to make a craft in the form of a wall panel. At the beginning of work, you will need to make a background (sky and grass) layer of plasticine of the corresponding color. In the sky immediately do clouds. Then the brown elevation is laid out, and sunflowers are planted near it. In the hedge, we replenish the bright rustic rooster, making it quite convex.


From plasticine it turns out a real New Year souvenir - a picture with a root.

Picture with a cock - symbol of 2017
New Year's cockerel can be made of salted dough. Look more on video:
You can make a rooster from a bright cardboard sheet. To do this, we cut off one of the corners of the cardboard around the circle and turn it into the cone. From the remaining paper, cut the wings, and from the red cardboard - scallop, beak and legs.


By the same principle you can make small funny cocks.

You can arrange them in the form of a postcard, the decoration of which will be the wings of feathers.

The original cockerel is obtained from paper rings and a triangle, which easily turns the strips.

And if the caller makes a paper cylinder, the rooster will become more stable.

Expanding the cylinder vertically, you get the basis for the original suspension.

Pendant pendant
And gluing his lower part, you can make interesting souvenirs. Special chic they will give the wings of feathers.


Pries can also be used when creating a cockerel from a bright shopping glove. If you replace it with a glove from knitwear, the craft is more durable.

The smallest creators will be under the power to perform a rooting in the technique of drawing and appliqués.
Print and cut the template for drawing a "Cockerel".

Pattern for drawing "Cockerel"
Color the cockerel in the most rainbow colors. It remains to decorate a roast tail. Cut the bright stripes from colored paper and please ride small tubes from them. We glue the tubes on the tail.

Figure and Applique for the little ones "Cockerel"
To make the cock even brighter and more beautifully sprinkle it with sparkles.

Little kids will be able to make the applique of the "rooster" from colored feathers. Two tight paper sheets are based on, between which the wand is glued.

Applique of colored feathers "Rooster"
In kindergarten, you can make a joint work "Cockerel from Ladoshek".

The beautiful applique of Petushok is obtained from coffee beans and real feathers.

Applique "Rooster" from coffee beans
Predeshki and in the manufacture of roosters-bells, the foundations of which are excreted from or clay. And as the basis, it is convenient to use cells from cardboard packaging from under eggs.

You can turn into a casket rooster a whole carriage for chicken eggs. Fill it with small candy - and already ready a gift for kids!

In this paper, you can use other cast materials - for example, disposable plates. Pendants of them differ simplicity of manufacture.

Funny cocks are obtained from colored clothespins, decorated with pieces of felt.

And from a piece of knitwear or sitse tissue, you can sew a real soft toy in the form of a symbol of the year.

Beautiful New Year's roots are obtained from a multicolored felt. Details of patterns connect with a thread or glue. The inside of the crafts fill with cotton.

Fetra can make a flat root on a stick.

Skillful craftsmen will be under the power to make a cockerel from colored wool.

Look at the Master Class video: "New Year's Cockerel from Fetra."
It looks very beautifully a cockerel created in the technique.


It is not inferior to him on the originality and beauty of the rooster in a wall panel, decorated from flat colorful butt. Using buttons of different sizes, you make a more expressive picture.

Applique "Rooster" from buttons
And placing such a panel into a glass frame, you will noticeably extend the life of its service.

Picture "Rooster" from buttons
A charming colorful rooster is obtained from beads.

Very different cocks can be done using vegetables and fruits. This symbol of the year you can decorate a festive New Year's table.

Decoration of the table "Rooster"

A very spectacular rooster is obtained from apples.

Parts of the crafts connect with a toothpicks.


Look at the video - how to make a fiery cockerel from Formin.
Show the kids on the topic, how the symbol of 2017 is made with your own hands, the master class - and they will definitely surprise you with unusual faiths and solutions!
Soon the New Year holidays will come, and you have no mood at all? Then create an atmosphere of joy and fun around you, making your own hands symbol of 2017 - a rooster. In addition, this is a great idea for a gift! You can make it possible from anything. In the article, consider how to make a rooster of paper, the most affordable material. The exercise can be performed in a variety of techniques: postcard, appliqué, quilling and more. What way do you choose?
Most simple cocks
For such an elementary craft, you will need colored paper, cardboard, simple pencil, ruler, scissors and glue.
First make a body. From cardboard (preferably color), cut out the square of the arbitrary size. You can make it possible to make miniature or large roosters, which then perform as a postcard. Using the line, we plan the fold line on the square. Then we fold it in half. Taurus is ready.
Before making a rooster of paper with your own hands, prepare the remaining elements. Cut your head, scallop, eyes, keyboy, wings and tail. The paper is better to take multi-colored so that the cockerel is bright and colorful. Cut parts are glued into place. Cockerel ready! Now inside the crafts you can write a pleasant wishes.
If you want to hide the places of gluing, then make a cockerel is a little different. Cut two mugs for the head and hide between them scallop and keyboard. On both sides of the square (on the fold line), make small cuts. Pan your head and tail in them. This option, the rootier turns out more accurate.
How to make a carpet paper rooster
To perform this craft, you will need all the same materials, only you can do without cardboard.

From colored paper we turn the cone. This can be done, for example, so. On the sheet draw a circle and cut out. We celebrate on it one fourth part. Cut it out of the circle. Now we turn the resulting figure into the cone and sample the place of the joints.
From the colored paper, cut out eyes and keyboy in the form of diamond. We glue into place. Now cut out non-fragile strips. Total need about 13-17 pieces (on scallop, beard, wings, tail and legs). Strips three fold in half (but do not bend) and glue to your head. It will be scallop. In the same way, we act with stripes for wings, tail and beard.
Already approaching how to make a rooster of paper. Two strips fold the harmonica and glue where the legs should be. A bit straighten. Optionally, you can cut your paws in the form of circles or teeth. Playful Cockerel ready!
Petup of paper in the Application technique
With a child, you can make a beautiful applique of colored paper. Pick up the appropriate colors and think where you will stick a cockerel. Tight cardboard is best. He should not be a motley, otherwise the application is simply lost. Stay on pastel colors: green or blue. In addition to cardboard and colored paper, scissors are needed, a simple pencil, glue and a cockerel pattern. It can be drawn independently or take the ready-made scheme.

We turn directly to how to make a carpet of paper in cardboard to carry the drawing, which chose. From the colored paper, cut the details: torso, head, beak, scallop, eye, beard, wing, tail and paws. Now you need to stick the pieces of the cock on the cardboard. Start better from the middle, that is, from the body. Further stick the remaining details, gradually moving towards the edges.
Show fantasy, add or grass. So the handicraft will look over.
Mastery Quilling Cockerel
In such a technique, non-screensy paper strips are used, twisted in different shapes with a toothpick or special fixture. Works are obtained very beautiful and unusual. How to make rooster from colored paper in "Quilling" technique? In principle, this is a type of applique. First you need to transfer the drawing to the cardboard and think what form strips for a particular body part will be twisted. It may be mugs, curls, drops, crescents, oblong ovals and other options.
Once all the details are ready, they must be pasted on the drawing. Start with the tail circuit. Strips should be tightly located to each other. Wait when the glue is dry. Now fill the tail from the inside. Give adhesion again. In the same way, do with the wing, head, foot and body a rooster.
Table Serving Element
Please make your children, make a beautiful accessory for the New Year's Eve - a rooster-cup! Although some adults will not give up such a decoration of the table. How to make a rooster of paper if we need a cup? Everything is very simple!

The basis will serve as a plastic or paper cup. Wrap his paper into the tone to the future rooster. Print or draw the items: head, tail and wings, then cut out. It is better to make them two-ways that the cup looks good from any Boc. Shack your head to the glass, and on the opposite side - the tail. Between them, lay the wings. Unusual rooster ready!
From such a beautiful cup you can drink, and you can fill it with candy, biscuits, grapes, lollipops and other small goodies.
How to make a cock mask from paper in the form of a hat
From color cardboard or tight paper Collect a cone in the size of the head. While it does not glue it. Cut a red scallop, beak and a beard. Make circles of different sizes from blue and black paper. Now in the seam of the cone, hide the scallop. We collect eyes. On the cheeks on both sides stick blue, then black mugs. Fix the beak and the beard. It remains only to make a holder for a hat. To do this, we need to sew a gum or ribbons on the sides of the cone. Mask Cockerel in the form of a hat ready!

Remember that the symbol of the upcoming year is a fiery rooster. Therefore, in the manufacture of crafts, preference gives such colors as red, orange, red, golden and yellow. So you express your personal guide with fiery rooster. Sequins and other overflowing material will only complement the image of the year symbol.
Now you know how to make a symbol of the new 2017. It remains only to choose which version of the craft is most like.

