21.09.2019
Crocheted crown with beads pattern. Crochet crown. Crown made from a plastic bottle
Crochet crown "Gold"
Another crochet crown. This time I used yellow yarn with gold-colored lurex. The crown can be additionally decorated with rhinestones, beads, and sequins.
Dimensions: diameter - 9 cm, height - 6 cm.
Yarn:"Brilliant Summer" Pekhorka (95% mercerized cotton, 5% methanite, 380m/100g)
Hook: №1,5.
Description of work:
Pattern repeat - 15 loops.
In order to get 6 vertices, you need to knit a chain of 90 loops and close them in a circle with a connecting loop.
Next knit according to the pattern.

Crochet crown pattern.
Tie the crown at the bottom with one row of connecting posts.
Starch the crown, put it on a round container and dry it. I put it on a round glass jar.
You can give the crown a rigid shape using sugar, gelatin or starch. Gelatin may produce a yellow tint.
I starched using potato starch: dilute 1 heaping tablespoon of starch in a small amount of cold water, then pour in 500 ml of boiling water and brew, stirring well. Dip the crown into the resulting paste, let it soak well, then squeeze out the excess.

Attention! If you liked our crochet crown model “Gold” and you crocheted it for yourself according to its description, and now you want to show your work - send a photo of the crown to the address [email protected]. We will place a photo of your work under the description of this model. We would like some brief information from you - what is your name (name or nickname), what city are you from, what materials were used and how the work progressed (was it easy or were there difficulties), wishes and suggestions.
We are waiting for your works!
You can complement your child’s New Year’s look with a hand-knitted crown. To do this, you will need crochet patterns and photos of finished products.
Crown is one of the important snowflake image elements for a child on New Year's Eve. She not only decorates the girl, but also adds elegance to her. Every needlewoman can make such a crown using simple crochet.
As a rule, snowflakes knitted from white yarn, then starched so that they “keep their shape.” After this, a small number of snowflakes (from three to five) should be glued to hoop - the basis of the crown. In some cases, you can decorate the resulting crown with other decorative elements: beads, sequins, ribbons, sparkles.
IMPORTANT: A diagram with a detailed indication of the number and type of loops will help you crochet a beautiful snowflake.
Patterns for knitting snowflakes:
Beautiful crochet snowflake, description and detailed diagram 
 Lacy snowflake
  Round snowflake
 Three types of snowflakes
 Unusual snowflakes, hexagon snowflakes
 Small thin snowflake
 Beautiful snowflake
IMPORTANT: The basis for the crown, that is, the hoop, can be purchased at any craft store. Everyone can choose a hoop according to their preference on a plastic or metal base. If you want to make it yourself, then you should use thick wire and tape to wrap it around.
Crocheted snowflake crown for a girl: diagram, pattern, description
A crown for a snowflake can be created not only with the help of small snowflakes, but also as one piece. To do this you should combine several patterns and get motif. It is also advisable to starch the finished product or sprinkle it generously with hairspray so that it holds its shape.
INTERESTING: You can use glitter hairspray, this will add elegance to the crown.

 Knitting patterns for a lace snowflake crown
 Each carnival costume is individual, has a variety of decorative elements, design, color shades and decorations. That is why one suit may suit huge lace kokoshnik, and others modest tiara. You need to look through each crown crochet pattern and choose the one that suits you.
IMPORTANT: If the finished product does not fit well on the head, it can be secured with bobby pins and hairpins.
Crochet crown patterns:

 Beautiful crochet tiara crown
 Classic crown
 High crown
  Beautiful crochet crown for a costume, description and detailed work diagram
 Diagram for creating a large crown
  Beautiful lace crown for a snowflake
 Types of crochet crowns for a snowflake costume: photo
Creation ideas New Year's costume snowflakes- many and each one is different in some way from the previous one. They will help your child get a “portion of inspiration” to create the most beautiful outfit and jewelry photos of finished products.
Using rubber glue, you can attach sparkles and rhinestones to the knitted crown, which will make your product shimmer and sparkle. If you wish, you can embroider the crown with beads or make pendants from beads.
Snowflake crown:

 Crochet snowflake crown decorated with pearl beads
 Crown made of a plastic hoop and five knitted snowflakes
  Crown made of plastic hoop, large and small snowflakes
  Snowflake crown, kokoshnik
 Snowflake crown embroidered with sequins
 Classic crown in snowflake costume
 Crown embroidered with beads and beads
 Silver thread crown
 Crochet crown of five snowflakes
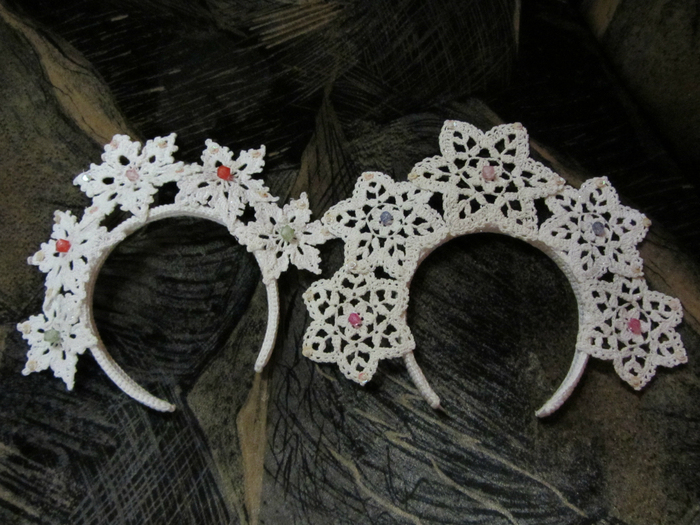
 Snowflake crowns embroidered with bright beads
Knitted crown for the spider princess. Last year my daughter wanted such an unusual costume. There were no problems with him. But I had to struggle with the headdress. But the almighty Internet helped!! After getting a little creative, I came up with this decoration. For it I used a large skein of cotton thread for knitting, a hook No. 2.5 and “golden” beads for the Christmas tree.
I cast on 170 loops, taking into account the lifting and joining loops. In the first row, the first double crochet was knitted in the 7th loop from the hook. The crown is not knitted in the round.
The finished fabric is sewn together with an invisible seam.
Then I diluted the gelatin in hot water and cooled it a little. I soaked the crown in gelatin, squeezed it out a little and pulled it onto the frame. Moreover, if you need a crown for a boy, it is better to use a glass jar, then it will turn out to be of a different shape. And I came up with the idea of stretching it onto an empty flowerpot. I smeared it a couple more times with a brush and left it to dry. The next evening I decorated it with beads.
Work by Anna Aleksakhina Taken 

|
Crochet crown "Gold"
Another crochet crown. This time I used yellow yarn with gold-colored lurex. The crown can be additionally decorated with rhinestones, beads, and sequins.
Dimensions: diameter - 9 cm, height - 6 cm.
Yarn: "Brilliant Summer" Pekhorka (95% mercerized cotton, 5% methanite, 380m/100g)
Hook: No. 1.5.
Description of work: Crochet crown
Pattern repeat - 15 loops.
In order to get 6 vertices, you need to knit a chain of 90 loops and close them in a circle with a connecting loop.
Next knit according to the pattern.

Crochet crown pattern.
Tie the crown at the bottom with one row of connecting posts.
Starch the crown, put it on a round container and dry it. I put it on a round glass jar.
You can give the crown a rigid shape using sugar, gelatin or starch. Gelatin may produce a yellow tint.
I starched using potato starch: dilute 1 heaping tablespoon of starch in a small amount of cold water, then pour in 500 ml of boiling water and brew, stirring well. Dip the crown into the resulting paste, let it soak well, then squeeze out the excess.


step
There are three types of starching products:
1. soft - 0.5-1 tsp. for 1 liter of water (suitable for bed linen)
2. semi-hard - 1 tbsp. for 1 liter of water (for collars of men's shirts)
3. hard - 2 tbsp. for 1 liter of water
2 step
Prepare the solution as follows:
Put starch in a glass or enamel bowl, add a little cold water and mix thoroughly until it becomes thick sour cream, and then, stirring constantly, add boiling water until the desired consistency is obtained.
For starching, it is better to use a warm solution. Dip the finished product into the solution and carefully squeeze out the excess solution.
3step
If you need to starch a napkin knitted from cotton threads, then a semi-rigid type of starch is sufficient.
If you need to starch the skirt of a Christmas angel or a knitted vase, then use hard starch.
ATTENTION! After the excess solution has been squeezed out, the knitted product must be given the desired shape and left until completely dry.
So, lay out the napkin and straighten it on a horizontal surface, stretch the knitted vase onto glass, plastic or other dishes of a similar shape. The skirt for the angel also needs to be pulled over a cone (truncated cone) after treatment with a starch solution.
New Year's snowflake costume
If you have a daughter in your family, then at least once she was or will be a Snowflake at the New Year's party. Today, for those who know how to crochet, I want to show how you can make a New Year’s Snowflake costume with your own hands. You most likely have an elegant dress. Now let's make accessories: a crown and a snowflake magic wand.
We will need: a 1.5 crochet hook, snow-white acrylic knitting threads, a hair hoop, a wooden stick and glitter glue for decoration.
Now we crochet 5 snowflakes for the crown and 1 snowflake for the magic wand.
There are a lot of snowflake knitting patterns on the Internet, you can choose any you like. The main thing is that one snowflake is large, two medium and 2 small.
I used this pattern to knit the central large snowflake:

The scheme is not complicated. I photographed the process of knitting snowflakes:


After all the snowflakes are ready, they need to be lightly smoothed and starched. Wait until completely dry (can be laid out on white cardboard on the radiator).
These are the snowflakes I made for the crown:


We apply snowflakes to the hoop, figuring out how they will be located.
We sew snowflakes to the hoop and to each other.
We wrap the lower ray of the central snowflake around the hoop and sew the tip to the snowflake from the inside out. Now she "sits" tightly.

We use glue with glitter to make it beautiful and put it back on the battery to dry (snowflakes from moisture can become limp and sag a little, but this is fixable).
Snowflake Crown is ready:

To complement Snowflake’s costume, we’ll make a Magic Wand.
We take a wooden sushi stick, glue the tip of a white thread to it and wrap it tightly, ring to ring, all the way to the end. We wind the last turns around the glue and cut off the end of the thread.
Glue the pre-tied snowflake with superglue.
Your DIY magic wand is ready:

This is how Snowflake’s New Year’s costume turned out:

Let your little ones be the most beautiful on the New Year's holiday!
Knitted crown is knitted a lot on Osinka
7 simple and effective crowns for a princess girl!
What is the most important thing in preparation for the holiday?
Mood! How to create it?
It’s very simple, quick and easy to make a crown for your girl to make her feel like a princess or queen. If you have a lot of time to prepare, then you can make a kokoshnik on a frame, or use cardboard to cut out a template, according to which you can make a crown for the Snow Maiden or a snowflake...
Unfortunately or fortunately, our kids are designed in such a way that they need a crown instantly, literally in a few hours, preferably in a few minutes.
Therefore, we will consider just quick ways to create crowns, at the same time they are very impressive and beautiful, not at all inferior to kokoshniks, having the main advantage - they are light!
Top simple crowns
- from foil;
- from a plastic bottle;
- from a peat pot;
- from a cardboard roll;
- frame decorated with tinsel;
- from lace;
- from paper.
We chose exactly 7, since hundreds of thousands of options can already be made using this type; they will differ only in details in execution or decoration.
Foil crown
To create such a crown, you need a roll of baking foil, tear it off and make voluminous rolls, creating a ring, then attach the top to it. The foil bends well and maintains its shape. In addition to the crown, you can make other signs of royalty.
Crown made from a plastic bottle
We immediately found 3 options, they differ in the method of adding color.
Golden
The golden crown is a plastic bottle painted.... varnish, its main advantage is that it is not closed in a ring, it covers ¾ of the head, which allows anyone to wear it, decorating it according to their own opinion and taste.
Diadem
To create a tiara, you need a 2 liter bottle and a template, according to which we will draw a design with sparkles. Then we carefully cut it out and it is ready, if there is still time, then you can paint it and attach rhinestones and stones, so it will become more valuable.
Lilac
The base is a plastic bottle wrapped in shimmery paper, and the front part is decorated with rhinestones in the shape of shells, and there may also be sequins.
Crown from a peat pot and cardboard roll
Its production is very similar, with a crown made from a cardboard roll, so we will not give the second description.
- We draw peaks on the crown so that we can see the necessary cutouts.
- We paint with white paint, it’s better to take acrylic, we need to paint our future crown inside and out;
- We cover it with golden paint so that our crown looks like a real one, we use a sponge for this.
- We decorate with rhinestones, beads, sequins, then glue a hairpin for fastening.
Frame decorated with tinsel
On the finished frame, tinsel or rain is wound very tightly, preferably with glue, if possible, add beads to the peaks of the tops.
You can make a beaded crown on a frame, but such a crown cannot be called simple and quick, so it remained outside the top, but crowns sometimes turn out simply breathtaking.
Lace crown
We starch any lace you like or grease it with PVA glue (you can also use rubber glue), let it dry, paint it with acrylic paint and give it the desired size (put it on a jar or bottle).
Paper crown
Nowadays, many templates have appeared on the Internet; if you print them out and place them on a hard base, you will get a crown; an alternative option is to glue them to cardboard.
Pay attention to the 5th and 6th crowns, just cardboard or paper decorated with sequins, and in the second case lace and some beads are glued on.
But that’s not all, you can make a high crown using the origami technique. It is enough to bend the required sides correctly.
Our top is all closed, but one more type of crown is left out. The reason for this is that they are easy if you master the crochet technique.
Note to needlewomen!
They can be either simple crowns or kokoshniks, with or without beads.
If you know the beading technique, you can make crowns like these for your pet. We recommend making crowns on a wire frame, then the problem of maintaining the shape will not worry you.
Crochet crown
To crochet a crown, it is better to use non-cotton threads; remember, threads with lurex will make sequins and small rhinestones invisible.
When making a crown from threads of the wrong color, you shouldn’t be upset, you can paint it, but then you shouldn’t tie in beads, it’s better to sew them on later.
If you knit beads along the edge, you can put them on a loop, but if you want them to be on top of the product, then it is better to string them on a thread before knitting and knit them through a double crochet, so all the beads will lie on top. You can also use a single crochet stitch, we show 2 knitting methods in the photo. 1 is an option on the Russian-language Internet, and 2 is an English-language option.
Now you have a lot of ideas and ready-made instructions for implementation, if you found our review useful, click on the buttons on social networks.
Using our instructions, in a few minutes your baby can get at least 3 crowns, and if she wants, maybe more if she doesn’t help!
If you have a boy, then we offer you variations of crowns, as well as
How to crochet a crown
Based on numerous requests from site readers, I have prepared a selection of models and patterns for New Year’s crowns.
Crown 1


Crown 2


Crown 3

For the manufacture of crowns You will need: Bright yarn (80% polyester, 20% metallized polyester) - 30 g gold, hook number 3.
Dial a chain of 135 air. etc., enclose it in a ring. Next, knit according to the pattern until the length of the strip is equal to the circumference of the child’s head.

Crown 4 (kokoshnik with beads)


diagram of the second option (without beads)

Crown 4 (kokoshnik according to the collar knitting pattern)


Crown 5 (collar pattern)
 Materials: “Iris” yarn (100% cotton), 20 g white; satin ribbon; hook No. 0.9.
Height: 18 cm.
Description of work: use white yarn to cast on a chain of 113 sts. p. (110 v. p. base + 3 v. p. rise). 1st row: 1 tbsp. s/n in the 4th century. p. chains from the hook, finish the row according to the row diagram. Continue work according to the diagram up to the 22nd row inclusive. Cut the thread. Attach a new thread to the reverse side of the base of the chain and knit according to the pattern of the row of binding.
Collar (Model No. 13)
Materials: “Iris” yarn (100% cotton), 40 g white; hook No. 0.9.
Width: 13 cm.
Length: 66 cm.
Description of work: use white yarn to cast on a chain of 199 v. p. (193 v. p. base + 3 v. p. rise + 3 v. p.). 1st row: 1 tbsp. s/n in the 9th century. chains from a hook, * 1 tbsp. s/n in the 3rd century. p. base of the chain from the hook, 2 in. p. *, repeat from * to * 62 times, 64 times in total, finish the row with st. s/n. Then continue work according to the diagram up to the 18th row inclusive.
Starch the finished collar, stretch it to size and leave until dry.
Crown (Model No. 14)
Materials: “Iris” yarn (100% cotton), 13 g white; satin ribbon; hook No. 0.9.
Height: 9 cm.
Description of work: use white yarn to cast on a chain of 159 sts. p. (154 v. p. base + 3 v. p. rise + 2 v. p.). 1st row: 1 tbsp. s/n in the 9th century. p. chains from the hook, finish the row according to the row diagram. Next, continue work according to the diagram up to the 8th row inclusive. Cut the thread.
Tying: attach a new thread and knit according to the tying pattern. Row finish connection. Art.
Lightly starch the finished crown, stretch it to size and leave to dry. Attach satin ribbons to the edges of the crown.


Crown 6 and 7
Crown knitting pattern, example one. For work we will need “Iris” yarn - 10 g white and gold, ribbon, hook 0.9. And let's start knitting, using white yarn we will make a chain of 68 chain stitches. knit the first row of 1 treble s/n into the third cart. n chains and continue knitting to the end according to the row pattern. We continue to work according to the scheme up to the seventh row inclusive. Then we tear off the thread. In the eighth row we attach a new thread and knit again according to the pattern. And cut the thread again. In the ninth row, adding a new thread, knit according to the diagram. Let's cut the thread. And the last time - in the tenth row, we will attach a new thread, knit it according to the diagram, and break it again. All that remains is to tie the magic crown, to do this we attach a gold thread and knit along the top of the crown in this way: above the arches of the seventh row we knit 6 tbsp. b/n. , and above the arches of the eighth row - 3 tbsp. b/n.

The second pattern for knitting a miracle crown, which can also be further decorated with sequins, beads and rhinestones. The report of this pattern will consist of 15 loops. In order for us to get six vertices, we need to knit a chain of 90 loops and close it with a connecting loop.
Now we knit as follows:
First row - st. b/n.
Second row: st. b/n.
Third row: 3 in. n rise, 3 tbsp. s/n., 3 v.p., 7 tbsp. b/n., 3 v.p.
Fourth row: 3 ch. rise, 1 v.p., art. s/n., 2 v.p., art. s/n., 1st century. p., art. s/n., 3 v.p., 5 tbsp. b/n., 3 v.p.
Fifth row: 3 ch. rise, 1 v.p., art. s/n., 2 v.p., art. s/n., v.p., art. s/n., 2 v.p., art. s/n., 1st century. p., art. s/n., 3 v.p., 3 tbsp. b/n., 3 v.p.
Sixth row: 3 ch. rise, 1 v.p., art. s/n., 2 v.p., art. s/n., v.p., art. s/n., 2 v.p., art. s/n., 1st century. p., art. s/n., 2 v.p., art. s/n., v.p., art. s/n., 3 v.p., art. b/n., 3 v.p.

Crown 8


 Crown 9 (Kokoshnik on a metal frame)
Materials: cotton yarn with metallic (50g) - 2 skeins (it took one and a half); star yarn (silver, 50g) - 1 skein (very little, only for binding); silver beads of 2 sizes; various sew-on rhinestones; rubber; satin tape.
My husband made a frame out of wire and crocheted it.
I tied a mesh around the frame.
I knitted the floral elements separately and attached them to the mesh. (You can do it according to the principle of Irish lace, or you can put it on a mesh and simply tie the edges, grabbing the mesh. In my opinion, it’s a hassle, whatever it is, it’s the same, so do what’s most convenient for you). If you are simply sewing elements onto a mesh, it is better to immediately tie them with an asterisk, it creates the effect of frost; if you attach them with a tie, then it is not necessary. Asterisk by asterisk in the second row - it turns out too thick. The whole idea is lost.
Headband (or forehead protector). I crocheted from the inner edge and knitted several rows, not reaching the end each time. Then I picked up the loops on the back side and didn’t decrease them there. Knit the second part, put a strip of fleece folded 2-3 times between them (so that the rim does not press and the kokoshnik fits better on the head).
Decorate with beads, rhinestones and whatever else you like. Let your imagination run wild.
I sewed an elastic band and satin ribbons to the back. Ribbons tied in a bow will cover the elastic band. You can do it without an elastic band, but it holds better with it. The bands may slip on the head.
You can starch it. That's all.


Very soon the New Year will come, and our children will go to matinees in their charming outfits. And what could be better than a costume made by yourself? In this master class we will knit one of the important components of the costume of the queen or king, as well as the princess and the Snow Maiden. We will crochet a crown!
To knit such a crown we will need:
- Blue yarn;
- Hook;
- Scissors;
- Beads.
Thick yarn is best suited for knitting such a headdress. However, if there is none, then you can use any available one. The color of the yarn is not important. It all depends on the color of the suit. This master class uses blue yarn for the Snow Maiden costume.
First, determine the size of the child's head. To knit a crown, you need to cast a chain of VPs, the number of which will be a multiple of 6. That is, the total number of loops in the chain should be divided by 6. Since it is 6 loops that make up the repeat of the crown pattern. Therefore, we measure the head and adjust the resulting number of loops by adding or subtracting extra loops. If this is not done, the design will be distorted and spoil the overall appearance of the crown.
We close the chain into a ring with a connecting loop. We check that our chain is not twisted somewhere. Otherwise, after knitting a row, we will still discover this and we will have to unravel the knitting to the very end in order to correctly connect the 2 ends of the air chain.

After making sure that the chain is straight and not twisted anywhere, we continue knitting. To begin with, we just need to knit regular sc. We need to knit 2 rows of sc in the round.


We straighten our knitting and begin to knit the edges of the crown. Now we perform 3 VP and knit 2 Dc here.

We make 2 VP and 3 more dc in the same loop.

We count the next 2 loops and perform 1 sc in the 3rd loop.

Again we count 2 loops and in the 3rd we perform 1 dc.

And here are 2 more CCHs. Next 2 VP and here 3 CCH. We skip 2 loops and knit 1 sc in the 3rd. Next, the knitting will be the same until the end of the row: 3 dc, 2 ch, 3 dc here, skip 2 loops and perform 1 sc, skip 2 loops and perform the previous element.

You can leave the crown as is. But we will knit another row to raise it a little. Join in the 2nd loop. We make 3 VP and knit 2 dc in the arch. Again 2 VP and here 3 more SSN. In the sc of the previous row we knit 1 dc. Further knitting will be repeated.

For beauty, we will attach beads around the entire circumference of the crown. This is such a beautiful crochet crown!


