16.03.2024
A quick autumn craft for the garden. What crafts to make for the autumn holiday
In kindergartens, with the onset of autumn, active work is underway - teachers, together with children, actively use natural materials in classes. After all, you don’t need to purchase it - everything can be collected in the nearest park during a walk or even in your own garden.
Parents are also invited to show their imagination by making “Gifts of Autumn” crafts for kindergarten with their own hands, together with their child. Watching how mom or dad create miracles from the most ordinary vegetables or fruits, the baby will also want to take part in this. Such activities increase perseverance, develop imagination and simply lift the spirits of participants in the creative process.
Ideas for autumn crafts “Gifts of Autumn” for kindergarten
Every year in kindergarten, starting with the younger group, an exhibition-competition “Gifts of Autumn” is held. To participate, you only need a desire and a few available materials, which are often used as plant seeds, chestnuts, and cones:
- The youngest participants in the autumn crafts competition “Gifts of Autumn”, which they will take to kindergarten, can be offered an easy job. By placing an ordinary chestnut in front of your baby, you can invite him to fantasize and imagine it in the form of some kind of animal. Using plasticine, which is often used to hold together the parts of crafts, it is easy to make a funny spider.
- But not only chestnut kernels can be used to make crafts. Its peel with needles is also suitable for this purpose. They will make an excellent hedgehog, which can be decorated with rowan berries and leaves.
- The chestnut theme is inexhaustible. You can create a whole zoo from ordinary fruits lying under your feet. And all you need to do is take toothpicks and bright plasticine.
- And if on the back side of the chestnut you glue a piece of yellow felt and an acorn to it, you will get a very plausible moss mushroom.
- Little beauty creators will love working with paints. With their help, you can paint acorns in bright colors and fill a transparent container with them - such an unusual work will undoubtedly attract attention.
- It is easy to make people and animals from acorns collected in green form using toothpicks.
- If you have walnuts, chestnuts, acorns and pieces of moss, you can invite your child to make a decorative wreath for the front door of the group - it looks unusual and elegant.
- Don't forget about vegetables. With their help, stunning crafts are created for the garden for the “Gifts of Autumn” exhibition, and if you do them step by step, then even a child will not have any difficulty in the work. For example, ordinary potatoes can be an excellent starting material for various people. Thanks to its round or oval shape, the craftsman already has a blank of the desired shape. All that remains is to think of the scenery.
- In addition to edible pumpkin, on the plot of land, there are also types of pumpkins that are specially designed by nature for creating crafts. Some of them are very tiny in size and have a variety of bright colors. Taking advantage of this gift of nature, you can create a cheerful pumpkin family.
- Using plasticine and seeds you will get an excellent hedgehog. By planting it in a clearing of grass and moss and decorating it with mushrooms and acorns, we will get a realistic mushroom clearing.
- Round, red-sided apples are always associated with a cheerful caterpillar. To make such a craft look original and not hackneyed, you should complement it with unusual decor - beads, feathers and flowers.
- Little children will be delighted that from a simple pine cone, a couple of leaves and a piece of plasticine they can make a beautiful swan.
- The pine cones make funny animals, such as squirrels. If there are pieces of chenille (fluffy) wire in the house, then it can be used as legs and a tail, and a pine cone will serve as the body.
- In the area where walnuts grow, you should not throw away their shells, because they are an excellent natural material. By painting them “mushroom-like” and planting them on wooden legs made from twigs, we get a whole mushroom meadow.
- And if you paint the nuts in different colors using gouache and place them in a basket of leaves, it will become an original decoration.


Parents of children attending preschool are aware that every holiday is necessarily accompanied by children's crafts for kindergarten. Maybe to some this task will seem like a waste of time. But for most, this is still an entertaining and creative process, as well as an opportunity to spend time with the child with interest.
It is important to keep natural materials in stock in accordance with the season, and then any task for the production of work will not be taken by surprise.

Reserves of natural material
When traveling to the sea, you can collect small stones and shells. When walking in nature, stock up on beautiful leaves, pine cones and twigs. You can plant decorative pumpkins in your summer cottage - this is a good raw material for products that can be stored for a long time.

You can store the leaves in a book. It is better to keep the cones in the oven and pour boiling water over them, thereby destroying all the bugs. It’s also better not to throw away toilet paper or paper towel cartons, and save plastic bottles with caps. Make room for these items by placing everything neatly in a box.
Crafts for kindergarten are something that a child must prepare with his own hands. The degree of difficulty is determined based on the age category.

With skillful direction, the child will be able to create an applique, a drawing, or mold a plasticine product on his own. Using natural materials in the form of leaves and cones.

The do-it-yourself craft ideas for kindergarten below will tell you how best to use non-standard tools, for example, pasta or plastic dishes.

Plastic bottles can already be classified as standard materials; the possibilities for working with them are endless. Use matches, napkins, and sushi chopsticks, they are all great tools.

Products in the autumn version can be executed as compositions or as independent works. Perky hedgehogs, old forest men or alien creatures in a flying saucer - all this can be done with children's hands using raw materials given by nature.
Winter style products
In winter, we have associations of New Year holidays, and we also don’t forget about Defenders of the Fatherland Day.

On February 23, military-themed products will be relevant. You can make greeting cards. Excellent products are made from fabric, but parents must take part in the creation, as cutting is necessary.

The body is made of fabric, and the corners at the bottom should be stitched, this is necessary for stability. Next, fill the bag with padding polyester and tighten the thread.

All that remains is to create the face. The nose can be made from a beige bead. You can use ready-made eyes or create an applique. Embroider the eyelashes and make antennae from threads tied into a bun. Add tone with blush or lipstick.

We make the hands from fleece or cloth and glue them on. As an option, attach one handle to the cap. The ideas are endless, you can complement the work with shoulder straps.

Works in autumn style
Products in the autumn style are distinguished by the fact that materials given by nature are used for production. Leaves, cones and acorns of these raw materials are in abundance in the fall, which is perfect for crafts for a kindergarten plot.
As a rule, work competitions are held in the autumn. The child can create the applique on his own with a little help from his parents.

For products made from vegetables and fruits, a knife is used, so work must be carried out strictly under supervision. Paints are often used in kindergartens. But you can also replace them with material, for example, autumn leaves will serve as stamps for creating a forest.
Note!


You can tell the kids how much their help is needed for the birds and make a feeder together.

This not only promotes creativity, but also fosters a sense of caring for animals.

In winter, the death rate of birds is very high, because due to frost it is difficult for them to survive, so care will be taken when creating the feeder.

For the feeder you need: wood, a box and plastic bottles. Wooden feeders are distinguished by their durability. But not everyone can handle this material. Cardboard is easy to use, but it will not stand up in wet weather.

In this case, the cardboard feeder can be periodically updated, and the baby will like its decoration. Plastic is the most unpretentious material. Easy to work with and will withstand rain. The work uses a breadboard knife, so the process is carried out under the guidance of adults.
Note!


Street layouts
You can create situations that convey the meaning of reality; such a game will help you master traffic on the road and study signs. Street markings can be painted on cardboard and houses can be built from boxes. Decorate the cityscape with greenery and, most importantly, make road signs and traffic lights.
Road signs can be printed from the Internet. A stand for the sign can be made from a plastic bottle cap and a sushi stick, and fastened with plasticine.

Houses can be easily created from cardboard boxes or glued together from cardboard and painted on the facade. Trees are created from cardboard or natural materials.

If you finely chop green threads and sprinkle them on cardboard, previously greased with glue, you will get grass. It is easy to create soil using grain glued to the surface.


Note!

One side has a background color, and the other has three traffic light colors. Glue a thread between the halves and the circle is easily glued so that you can rotate it to the hole on one side or the other.

Craft from bottles
Wall panels, plot compositions and toys can be made using various techniques. It’s very easy to make crafts from plastic bottles for kindergarten.
You can make a baby penguin. To do this, you will need two plastic bottles, with the bottom cut to the required size. And the part is placed one inside the other. For convenience, several cuts can be made in the inner part.

Using acrylic paints we paint the toy. We make a pompom from threads to decorate the hat.

The scarf is made from braid or fleece; it will successfully hide the junction of the bottles. To make the scarf stable, you can place it on glue or double-sided tape. For the wings and paws, colored paper is used.

Photos of crafts for kindergarten


Autumn! Gold autumn! There are so many colors and warmth in it, which are about to be replaced by cold weather. Don't waste a moment, it's time to get inspired for new ideas for creating beauty. Be creative, create interesting things from materials given by nature. Let autumn become the muse for inspiration, go for it!
The main thing in the article
Autumn crafts are a great idea for leisure time
With the onset of autumn, it is simply impossible to stroll through parks and squares indifferently. Colorful landscapes enchant the eye with their bright notes. At this time, nature gifts us with juicy fruits, as well as a variety of color palettes.
 These autumn gifts can be immortalized in time by decorating your home with them using a variety of crafts and “hand maid” things. Such decorations will not only transform the interior, but will also help you while away the cold autumn evenings. This activity will allow you to plunge into the atmosphere of home warmth and comfort. So brew your favorite warming drink and grab a warm blanket.
So, autumn has arrived, it’s time to stock up on all sorts of natural materials for creativity.

Crafts from natural materials for home and interior: paintings and panels
Panels are widely used to decorate walls in the interior. Such paintings will look original if made from natural materials.
In general, a great option would be to involve children in doing manual work of this type. This will give children the opportunity to show their creativity and imagination, and will also have a beneficial effect on the development of fine motor skills, which is important for the normal development of the child.
Panel of coffee beans
 This type of wall art is best suited for the kitchen. Often this place is associated with comfort and homely warmth. It has been scientifically proven that the smell of coffee has anti-stress properties. So such a panel will not only decorate the house, but will also benefit the body.
 For this type of work you will need:
- Coffee beans that have different properties, ranging from smell and color to size.
- The material that will serve as the frame (base) of the panel. Typically, any durable fabric, wood, paper, etc. is used for this.
- Glue, the most common PVA will also work, but it’s better to consult a craft store.
- A drawing that will be depicted using grains.
- Carbon copy.
- A simple pencil.
- The frame in which the finished product will be mounted.
 This list of necessary materials is the most basic. You can add various cereals and legumes to coffee beans, thus creating a whole picture filled with various shades.
 How to do the job:
- Transfer the desired design onto the base using a pencil and carbon paper.
- Then apply glue to small areas and immediately glue coffee beans onto them, alternating beans of different colors, depending on your idea. An interesting idea would be to make appliqués from grains, gluing fringes, ribbons, rhinestones, etc.
- Frame the final result.
- The product can be decorated with multi-colored aromatic spices or dryings.
- To attach cereals, such as buckwheat or semolina, apply glue liberally to the desired surface, cover it tightly with the cereal and wait for it to dry; simply shake off any excess residue.

Leaves panel
There are a lot of design options for such handicrafts; you just have to take a walk along the autumn alley and stock up on the necessary materials.
 Children take on such paintings with particular passion.
 You can decorate the room not only with paintings, but also with works in the form of bouquets of leaves.


 Below are ideas for panels made from natural materials that will inspire you to get creative.
Shell panel


Leather panel


Crafts for school and kindergarten
Almost all school and preschool institutions hold autumn-themed competitions. It is at this time of year that you can stock up on natural materials so that you can use them throughout the year.
 Sometimes children do crafts so passionately in labor lessons and at home that entire works of art are created.
The creativity kits that can be purchased in stores cannot be compared with the variety of generous gifts of autumn. The completed craft will be saturated not only with children's love, but also with the magical aromas of the forest.
 So what can be useful for creation?
- Fallen leaves. The abundance of dry foliage is rich in the brightest shades of colors. There is room for your imagination to run wild.
- Cones. If there is a park, forest plantation or even a forest not far from your house, you can stock up on these fruits of coniferous plants.
- Shells, stones and sand. These materials, of course, can be found not only in the fall, but they can diversify the list of necessary materials.
- Acorns and chestnuts. It is with these finds that a lot of ideas for DIY work are associated.
- Coniferous and spruce branches are a real find for nature lovers.
- “Perky helicopters” is what maple seeds are sometimes called and used in their work.
- Walnut shells, pumpkin and melon seeds, bunches of rowan - this is not the whole arsenal of supplies.
- Tree bark, reeds, and dried flowers are also needed.
- It happens that after visiting exhibitions and zoos with birds, you can get rich with a whole collection of feathers.


 If possible, try to pay attention to the surrounding delights of nature every walk and pick up all the above-mentioned abundance. Be careful, because in the simplest and most ordinary things there is often hidden a whole treasure.
In addition to being outdoors, your child will have the opportunity to develop their creative thinking and exercise their logic.
DIY children's crafts: funny applications
So, you have stocked up on the necessary natural gizmos, so you should put them into practice. One of the many types of crafts is applique. Call the kids and sit down to create. Here are ideas for creativity.


Autumn crafts from leaves: ideas for creativity
Interesting leaf applications

 Autumn collages


 Leaf print paintings


 Leaf candlesticks


 Vase of leaves


Autumn paper crafts


DIY crafts from pine cones


Photo exhibition of autumn crafts


Autumn themed crafts: original ideas
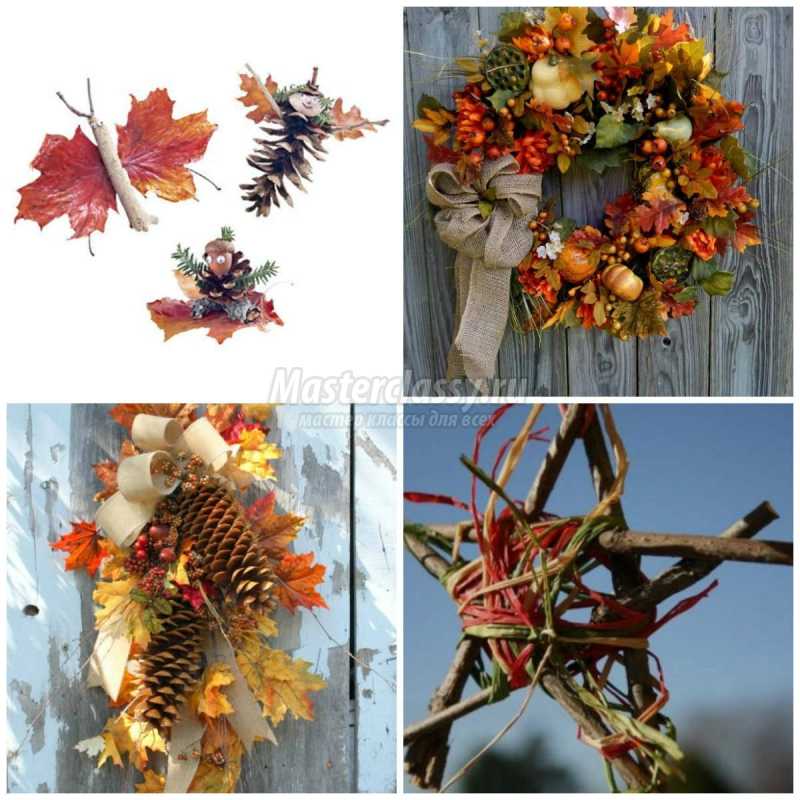
Unusual wreath

 Creative wall framing
 Crafts from vegetables and fruits


Video tutorials for making autumn crafts
Nature has blessed us with an incredible abundance of bright and colorful natural materials. Don’t miss the opportunity to take advantage of these gifts, create comfort by decorating your home with handmade crafts!
Collage "Autumn"Prepare:
Multi-colored threads
- flowers and leaves for decoration
- thin dried twigs
How to do:
1. Make a circle of dried twigs. Secure the structure with wire or thread.
2. Take a colored thread and wrap the circle so that you get a “cobweb”. Secure the end of the thread with a strong knot.
3. Decorate the round frame with leaves. They need to be inserted between the threads of the web. For decoration you can use any natural material.

DIY natural crafts on the theme of Autumn
"Crown of Leaves"
Necessary materials:
Scissors
- thick paper or cardboard
- colorful leaves and natural materials for decoration
- adhesive tape
Stages of work:
1. Measure the circumference of the baby's head. Add a few centimeters to this length. This data will be needed to cut a strip 5 centimeters wide. If one cardboard sheet is not enough, you can cut out 2-3 strips and glue them together.
2. Cut one strip again, but now zigzag. Only one side should be zigzag cut.
3. Cut a piece of adhesive tape the same length as the cardboard strips. Place the ribbons, sticky side up, on a flat surface.
4. Glue 1 cardboard strip to the top half of the tape, and the jagged part to the bottom. There will be an empty part of the adhesive tape in the center. This is where you need to glue natural materials for decoration.
5. Instead of adhesive tape, you can also use PVA glue.
Make some like this too.
"Finger puppets"
Necessary materials:
Thin brush or thin branches
- cardboard cylinders
- leaves
- colored paper
- PVA glue
- glue stick
- scissors
- small stones or buttons
How to do:
1. Start gluing the sheet evenly to one end of the cylinder. First you can glue colored paper, and then the leaves.
2. Glue small branches on the sides - these will be hands.
3. Glue pebbles or buttons along the cylinder.
4. Make eyes from plasticine and fix them on a cardboard cylinder.

Try doing this too.
DIY autumn garden craft
"Pine Pine Spider"
Prepare:
Thread
- thin branch – 4 pcs.
- cone
- plasticine or plastic eyes
- glue “Moment”
Stages of work:
1. Make paws from twigs.
2. Attach eyes to the bottom of the pine cone.
3. Tie a thread and hang the spider.
"Stars from branches"
Necessary materials:
Raffia or paper tape
- gouache or acrylic paint
- branches of the same diameter and length
- Super glue
Stages of work:
1. Collect twigs in the forest, cut them to obtain material of the same length. In total you will need 5 pieces.
2. Form a star from the twigs. If desired, the branches can be painted with gouache or acrylic paint.
3. Using raffia, connect the branches to form a star.
4. Wrap the craft with bright ribbons or raffia.
DIY autumn theme photo:

Collect acorns from a forest or park, clean them of dust and dirt, and rinse with water. Pierce each fruit through with a needle or awl. Stretch wire, fishing line or thread through the acorns. As a result, you should have a ring. Glue the acorn caps to the surface with superglue and coat with varnish.
"Tree with acorns."
Separate the caps from the fruits, paint them with paint of any color so that the craft blends organically into the interior. Attach loops made from twine to the hats. If there are branches left on the caps, tie a rope to them. If there are no branches left, use glue. For best results, place the vase on a tray covered with fall leaves and acorns.
Autumn candle
The easiest way to decorate a candle is to place it in a glass container. Beautiful handmade candlesticks will make the atmosphere in your home festive and cozy. First of all, choose a beautiful glass vase. If the candle is too low, pick up any object on which you can place the candle. A bowl works great. Just turn it upside down and install the candle. Additionally, decorate the bowl to make it unnoticeable. You can use willow branches for decoration. They bend well, so you can wrap them around a bowl. Fill the gaps between the walls of the bowl and vase with hay, moss, etc. Place a candle in the center and decorate it. To do this, use red and yellow leaves. Just cover the outer wall of the vase with them. Weave the twine into a braid and tie the leaves. The rope not only holds the leaves in place, but also serves as an additional decoration.

Branches are an excellent environmental material. To create compositions from them, you do not need to have special materials and tools. You can see unusual shapes in simple branches and driftwood and use them to create original crafts.
Be sure to clean and dry the collected branches. The branches can be used in their pure form or covered with paints or varnish. Large, sweeping branches will look great on the walls. They will become not only a decorative element. They can be used as lamps or hangers.
DIY autumn crafts for kindergarten
Application “Pieces of Autumn”.
During your walk, collect chestnuts, acorns, and beautiful leaves with your child. Even from the simplest leaves you can make funny little animals, as well as beautiful patterns and ornaments. Joint creativity will develop the baby's fine motor skills, imagination, attentiveness and perseverance. Creating an applique is a simple process. Prepare dry leaves, clean them of dust and dirt, smooth them with an iron, placing them between two pages of a book or paper sheets. Prepare the paper, glue the prepared leaves using PVA glue. You can use scissors and cut out beautiful details. Children very often cut out animal figures. To cut out a realistic silhouette, just use a template.

Candles make the interior cozy, interesting and magical. Prepare a large candle and decorate it with small ears of corn. Give your child the opportunity to paint the cobs with all the colors of the rainbow. Place a rubber band around the candle, insert heads of corn into it, and tie it with a beautiful ribbon. Coat each head of cabbage with additional glue so that it is better fixed to the candle.
Decorative basket
Necessary materials:
Beautifully colored leaves
- cones
- chestnuts
- acorns
- fruits vegetables
- wicker basket
- all kinds of cereals
How to do:
Line the inside of the basket with paper. If you have a floral sponge, place it on top. It is very convenient to insert autumn flowers into it. Place cereal and autumn leaves along the edges of the basket. Place the fruit in the center and insert the stems into the sponge. For better fixation, string the fruits onto wooden skewers and insert them into a floral sponge.
Autumn leaves made of felt
Prepare 2 pieces of fabric of different colors. Mark the veins on one segment and cut them along the contour. Pin 2 leaves together with pins and sew along each vein. For this purpose, use a sewing machine or a needle and thread. Make the veins in the center of the leaf using machine or hand stitches. You can make a beautiful garland from these leaves and hang them in your home.
Children love to do something creative, they just need to be shown what can be made from certain materials.
Here you will find many interesting crafts made from colored paper or natural materials that you can make with your children.
All crafts are not at all complicated and making them will be a pleasure.
Crafts for kindergartens: coloring pebbles
If you have collected stones at sea, you should not throw them away. Arm yourself with acrylic paints or gouache and start painting them.
Such pebbles can be found in many places, then brought home or to the kindergarten and painted in all the colors of the rainbow. You can also draw different characters - the possibilities are endless.


DIY crafts for kindergarten from plastic caps
If you have plastic bottles lying around, don't throw them away. You can make a huge number of crafts from them.

Moreover, crafts can be made not only from bottles, but from their caps. These are some interesting crafts you can make with your children. Arm yourself with colored paper, colored cardboard, glue and various decorations.


Autumn crafts from pine cones for kindergarten
Cones are a natural material from which you can make many interesting crafts.

You can connect several cones, for example. This can be done in several ways: using thread, wire or elastic; using glue or simply placing the pine cones on a stick.
There are many other natural materials that can be attached to the pine cones, such as various branches, acorns and grains.
If the buds are hard, you can soak them in water and after a couple of days they will become soft, which will make it easier for you to cut and pierce them (with an awl or nail).

Opened cones can be used to make the body of a camel or turkey, and closed ones can be used for limbs (legs, arms).
* First, you can make a bird - this is perhaps the simplest craft from pine cones.

* The “camel”, “deer” or “swan” craft will be a little more difficult. You will need to make a neck - use caps of acorns, which should be strung on bent wire. The head consists of an acorn.

* Also try making a forest tree with your children. It is made using green and ripe pine cones. Use wire to attach the arms and legs.

Attach the forest man's head to the body using glue.
Use the needles to make the whiskers, and use the scales from the pine cone to create the eyes.
What craft to make for kindergarten: “Apple”
You can make an incredible number of bright crafts from colored paper with your children. One of them is a three-dimensional “apple” craft.

Children will do this simple work with great interest.
For it you will need: colored paper, glue, cardboard (colored cardboard).
Prepare a template and cut out a certain number of parts according to it.


Start gluing all the pieces together.
Glue the blank onto some kind of rod (ice cream stick).


Make a ponytail by cutting out an additional piece from paper.


Crafts for children in kindergarten: "Cloud and bright rain"
This craft also uses colored paper and glue.

You will need:
Colored paper
Scissors
1. First, cut out the outline of a cloud from white or blue paper.
2. Follow the pictures to understand how to make a raindrop.

3. By putting everything together, the baby will get a very beautiful picture.


Paper crafts in kindergarten: "Autumn leaves"
From colored paper you can make very beautiful leaves that take on the rich colors of autumn.

Look at the pictures to see how you can make these leaves. The craft is actually quite simple and kids will love working on it.


Autumn crafts for kindergarten: "Mushrooms - fly agarics"
You can make these beautiful mushrooms from old egg packaging. Although fly agarics are poisonous mushrooms, they can boast of a very beautiful color, which you will convey in your crafts.


Crafts for the kindergarten area: "Bull"
But what a beautiful bull you can make from an old plastic bottle or container.

You will need:
2 cardboard toilet paper cylinders
Plastic bottle (not rounded)
Follow the photo instructions to make a beautiful animal.


Crafts for kindergarten (photo): “Sheep”
If you don’t mind cotton swabs, then you can make such a beautiful and fluffy sheep with your children.

You will need:
White cardboard
Cotton buds
Scissors
Clothespins
Black marker
Pink marker
1. Prepare a sheet of cardboard and cut out two elliptical shapes from it - one part will serve as the body, and the other as the head. Temporarily set aside the part for the torso.
2. Prepare cotton buds and cut off the tops of them, about 1.5 cm long.
3. Start gluing these tops to the body.


4. Take two cotton tops and glue them on both sides of the sheep's head. For bangs, you can glue 3 cotton swab tips on top.
5. Draw eyes with a marker. You can also add some color part.


6. Prepare the ribbon and make a bow out of it. This bow needs to be attached to the sheep’s head.
7. Now glue the sheep's head to the body.
8. Take the body of the sheep and attach clothespins to it - they will act as legs. If necessary, you can apply glue to these clothespins.

Crafts on the theme "Autumn": "Spider"
You can make such a beautiful craft from natural materials. Using autumn leaves, chestnuts and string, try making a spider on a web with your children.

From the image you can understand how to do this. The craft is quite simple, but very interesting and original.


DIY autumn crafts: "Tree made of leaves"

You will need:
Leaves (red, yellow, green)
*you can choose leaves of different shapes
*do not choose leaves that are too dry
Several thin branches and one thicker branch
* a large branch may be of an unusual shape, with knots
Rowan (if desired)
Glue gun or superglue

